How to Bulk Schedule Posts Through SocialPilot?
SocialPilot allows you to create and bulk import up to 500 posts to schedule at once, making it easy to manage large volumes of content efficiently. Whether you are scheduling images, links, or text posts, you can do so using a CSV or text file. This guide will walk you through the process of creating and uploading a CSV file for bulk scheduling and how to manage your posts.
In this article:
- How to Create a CSV File for Bulk Scheduling?
- How to Save a CSV File Correctly?
- How to Export Posts as a CSV?
- How to Import Posts in Bulk to the Library?
How to Create a CSV File for Bulk Scheduling?
To schedule your posts in bulk, you need to create a CSV file in the proper format. So open an Excel sheet and add your post data according to the given format.
| Column | For Text / Link Posts | For Image Posts |
|---|---|---|
| 1st | Caption and URL(for link posts) | Caption |
| 2nd | - | Image URLs single or Video link |
| 3rd | Scheduling date and time | Scheduling date and time |
| 4th | Account ID | Account ID |
| 5th | First comment for Facebook, Instagram, and LinkedIn posts | First comment for Facebook, Instagram, and LinkedIn posts |
| 6th | Tags (up to 10) | Tags (up to 10) |
📋 Note:
- For an Image Post, ensure you add image URLs and not a web page URL i.e when you open it in a browser, it should open an image only and not the website.
- You can also use Google Drive or Dropbox to add media to your Bulk Import sheet. Simply copy the public URLs by directly clicking on "Share" and paste it in the 2nd column.
- Multiple image URLs should be separated by a semi-colon (;) max 20 images
- You can get the unique account ID from the Accounts >> Manage Account page.
- You can only post a single video URL in a post.
-
You can choose any date and time format as mentioned in Your Profile > Date and Time

- However, first comments can be scheduled for Facebook, Instagram, and LinkedIn posts only. If you add it to any other platform’s posts, it will not appear in the post or be published.
- You can add a maximum of 10 tags in the 6th column, separated by a semi-colon (;).
Here is an example of how your sheet should look:

How to Save a CSV File Correctly?
Here is how you can save a CSV file correctly
Excel to CSV:
- Go to the top left corner and click on “Save as.”
- Now press on the “Save as type” dropdown box and choose “ CSV ( comma delimited)”
- Beside the Save button, click on Tools dropdown >> Web Options.
- Go to the Encoding tab and select Unicode (UTF-8) from the dropdown beside "Save this document as".

Text File to CSV:
If you are creating a CSV on your text editor or Notepad, use a comma (,) to separate the fields and also ensure that your post description is written in double inverted commas (“ ”), and save it in UTF8 format.
Note: If you encounter replacement characters during upload, it might be due to an outdated version of Excel or the file not being in UTF-8 format. To fix this:
- Right-click on the Excel/CSV file, choose Open with > Notepad.
- Save the file with a .csv extension and ensure it’s in UTF-8 encoding before uploading.

How to Export Posts as a CSV?
Another way to manage your posts is by using the Export as CSV feature. This allows you to download posts from the queue, published posts, posts with errors, or unscheduled posts.
Here’s how:
- Select the account or group you want to filter by.
-
Click on the CSV button to download the posts as a CSV file.


Bulk Schedule Posts in SocialPilot
Once your CSV file is ready, follow these steps to schedule your posts in bulk:
- Log into SocialPilot and click on Posts > Bulk Import from the left sidebar.
-
Drag and drop your CSV file or select it from your computer.

-
In the preview window, you can review and edit your posts:
- Edit Text Content: Click on the text box of any post to make changes.
- Add or Change Accounts: Select or change accounts for each post by clicking the dropdown menu.
- Add or Change Publishing Date and Time: Add a new publishing schedule or change one that has been assigned to it.
- Manage Images: Upload, change, edit, or delete images as needed.
- Add First Comment: Add a first comment with the post to be scheduled for Facebook, Instagram, or LinkedIn if you want.
-
Add Tags: Add a tag to any post for better categorization.
Choose the accounts or groups you want to schedule the posts for.
Note that:
- The accounts you select in this step will be assigned to all the posts that did not have accounts assigned to them.
- If you have already assigned accounts to all of the posts, this step will be skipped. You will be taken directly from Review Content >> Schedule Posts.
- Note that you can only bulk schedule for one Twitter account at a time.
- If you don't assign time to any of the post, they will take the next available schedule slot on the same day you are scheduling them.
- Click on the Schedule All Posts button to finalize your schedule.
- To view your scheduled posts, go to Posts > Manage Posts.

📋 Note: If a post is to be scheduled, it is necessary to add either the post caption or an image / video URL.
You can also import posts in bulk and save them in the SocialPilot content library to be used or scheduled later.
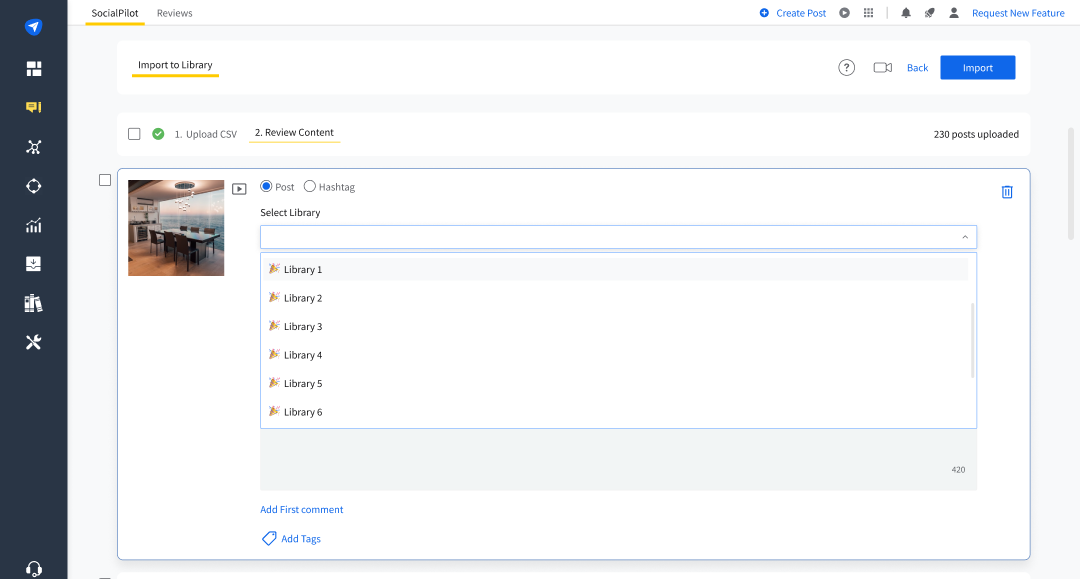
How to Import Posts in Bulk to the Library?
SocialPilot allows users to import posts in bulk and save them to the content library for later use, as well as schedule them in one go immediately.
The process of saving bulk posts to the library is very similar to that of scheduling them, involving the use of a CSV file.
Now, a CSV file for saving posts in a Library is structured differently than the one for scheduling posts in bulk.
In the CSV file for importing content in bulk to the library, the columns in the file are as follows:
- 1st Column: Any text-based content, including captions/descriptions, hashtags, and links.
- 2nd Column: URLs to images, or a single video if any, separated by semi-colons(;).
- 3rd Column: First comments for posts meant for Facebook, Instagram or Linkedin.
- 4th Column: This space is for any tags you want to assign to the content.
- 5th Column: Label the content type between Post or Hahstag.
- 6th Column: Give a title to your content to make it discoverable in the library.

Mentions in Bulk Imported Posts
When you write captions in the CSV file for bulk importing posts, you can add links, emojis, and hashtags. Additionally, mentions are also supported for posts on Facebook, Instagram, LinkedIn, and X (Twitter).
For Instagram and X (Twitter)
-
For any mentions added to Instagram and X posts, you have to write the exact handle name of the profile you want to mention.

- You can only mention Business and Creator accounts in Instagram posts. Private accounts can't be mentioned due to platform-specific restrictions.

For Facebook and LinkedIn
-
For mentions on Facebook and LinkedIn posts, you need to add the account id visible in the URL of that account after the "@."

-
If the URL has a number at the end rather than the account name, use that instead of the name.

- For LinkedIn posts, you can only mention accounts that follow your organization's page.


Once you have your content in the above format, save the file as a CSV, as described in the above sections.
Now, follow these steps to save up to 500 posts to your SocialPilot library at once.
- Log into SocialPilot and click on Posts >> Bulk Import from the left sidebar.
-
Now go to the top of the page and switch the radio button from Schedule in Bulk to Import to Library.

- Now drag and drop or Browse and select the CSV file with all your content details.
- Once you select and upload your CSV, the preview of your content will appear from where you can edit and add details like the first comment, title, tags, images, etc.
- Select the specific library you want to place each post into from the dropdown list in the preview window.
- Once you’re done perfecting your content, click on Import to complete the process.

Once the CSV is imported into the library, each post or piece of content will be saved separately, which you can use as needed.