Getting Started With SocialPilot Reviews
Introduction
Welcome to SocialPilot Reviews! This guide will walk you through setting up your account and leveraging the platform to manage your online reputation effectively. Here’s how you can get started with SocialPilot Reviews to enhance your online presence and engage directly with customer feedback.
In this article
- How to Sign up on SocialPilot Reviews?
- How to Connect Your First Brand?
- How to Set up Custom Emails for Your Brand?
- How to Add Brand Locations on SocialPilot Reviews?
- How to Add Contacts on SocialPilot Reviews?
- How to Create Your First Campaign?
- How to Send SMS-Based Review Requests Through Twilio?
- How to Send WhatsApp-Based Review Requests?
- How to Add Team Members on SocialPilot Reviews?
- How to Manage Reviews and Feedback?
How to Sign up on SocialPilot Reviews?
Follow the simple steps below to create your SocialPilot Reviews account.
- Go to the SocialPilot Reviews Website sign-up page and fill in these details:
- First name
- Last Name
- Business Email
- Password (ensure it meets the specified requirements for strength and security)
- Business Type
- Phone Number
- Once you have entered all required information and reviewed the terms, click the Sign-Up button to complete the sign-up process.
Congratulations! You have successfully signed up for SocialPilot Reviews.
You are now logged in to your account and begin exploring the features and tools available to manage your online reputation. If you are an existing SocialPilot user, you can switch to the Reviews tab in the top left corner.

How to Connect Your First Brand?
The first step to using SocialPilot Reviews is to connect your brand account to the platform. A brand account represents your business identification.
Let's connect your first brand on SocialPilot Reviews:
-
From the panel, select the Setup, located on the bottom of the panel, and then on Brands. You will see a screen that looks like this.


-
Since you have not connected any brand yet, click on Add Brand.

- Enter the brand logo and name.
- Upload the brand logo.


✔️ You can have multiple brands, which is particularly useful for agencies managing multiple businesses for different clients.
- After entering all details, Save the information.
Check all entered information for accuracy, then click on Save to save your brand.
Note: Users on the Starter plan can add one brand and one location, while users on the Pro plan can add 3 brands and 3 locations, along with unlimited add-on locations.
How to Set up Custom Emails for Your Brand?
You can set up a custom email to personalize your email communication. Though it is an optional step, it is highly recommended as it personalizes the sender’s email address, enhances professionalism, and generally reduces the likelihood of your emails landing in the spam box.
Follow the steps to set up custom emails for your brand:
- Specify the name that will appear as the sender.
- Provide the email address you want to use.
- Add an email address for replies.
- Follow the verification process (displayed on the screen) to confirm your custom email.
To get a detailed breakdown of how to set up a custom email for your brand, read this.
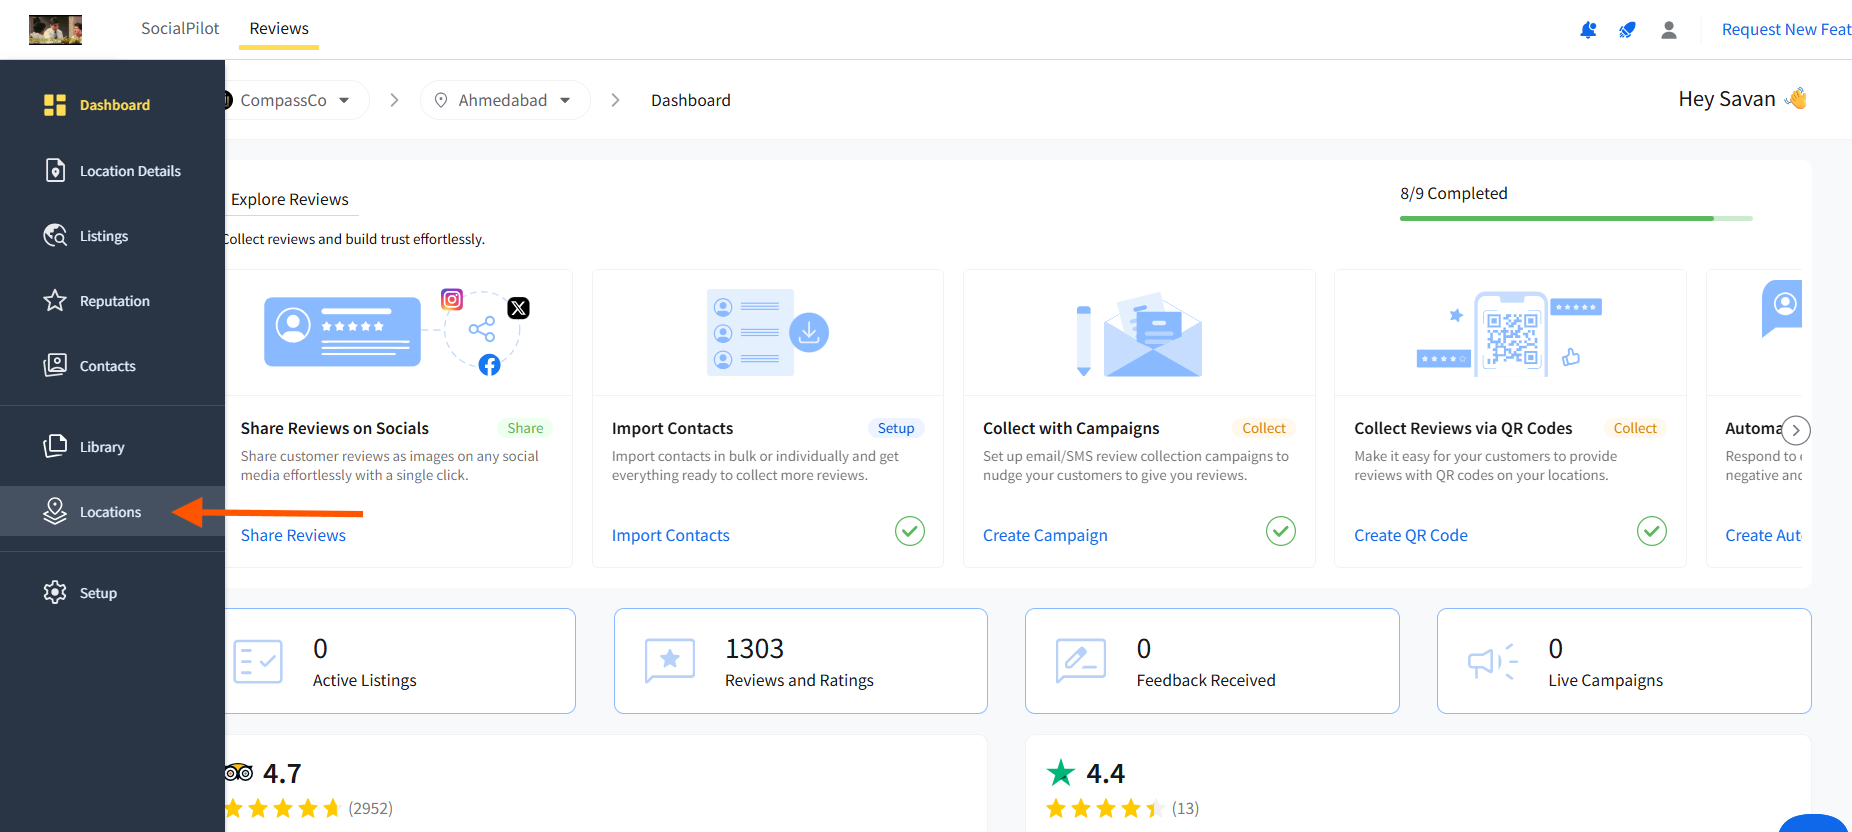
How to Add Locations on SocialPilot Reviews?
To add new locations on the platform, follow these steps:
-
On the dashboard, find the sidebar menu and click on Locations.
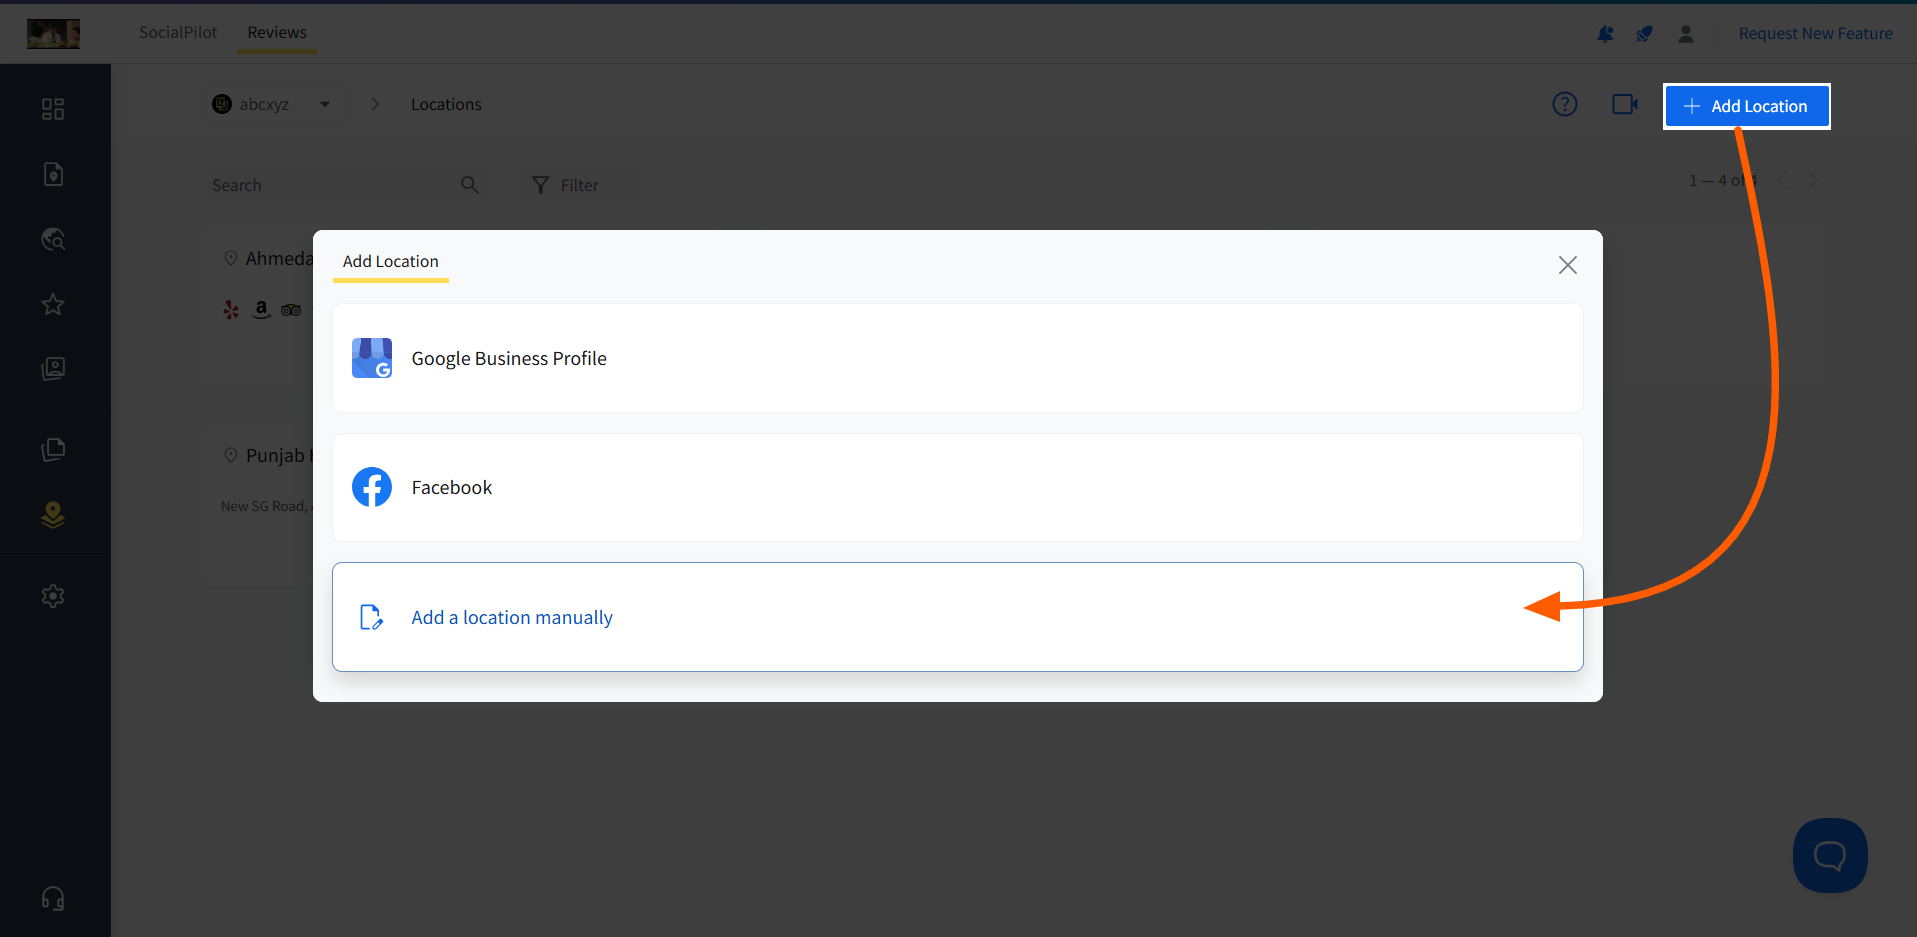
- Now, click on the dropdown beside the Brand tab and select the brand you want to add the location to.
-
Click the Add Location button and select Add a location manually.
-
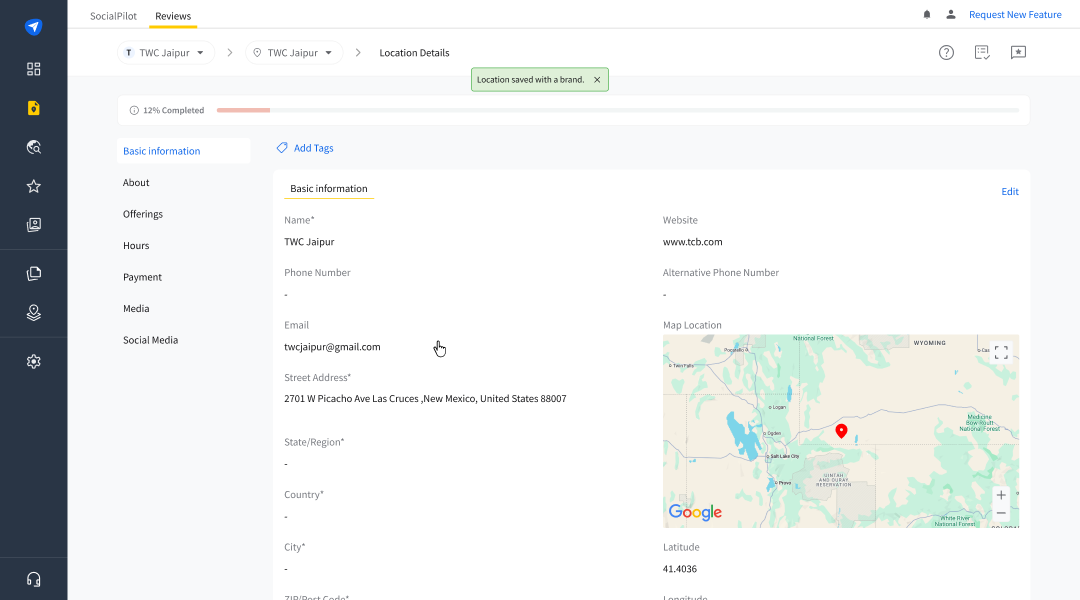
You will be directed to the Location Details page.
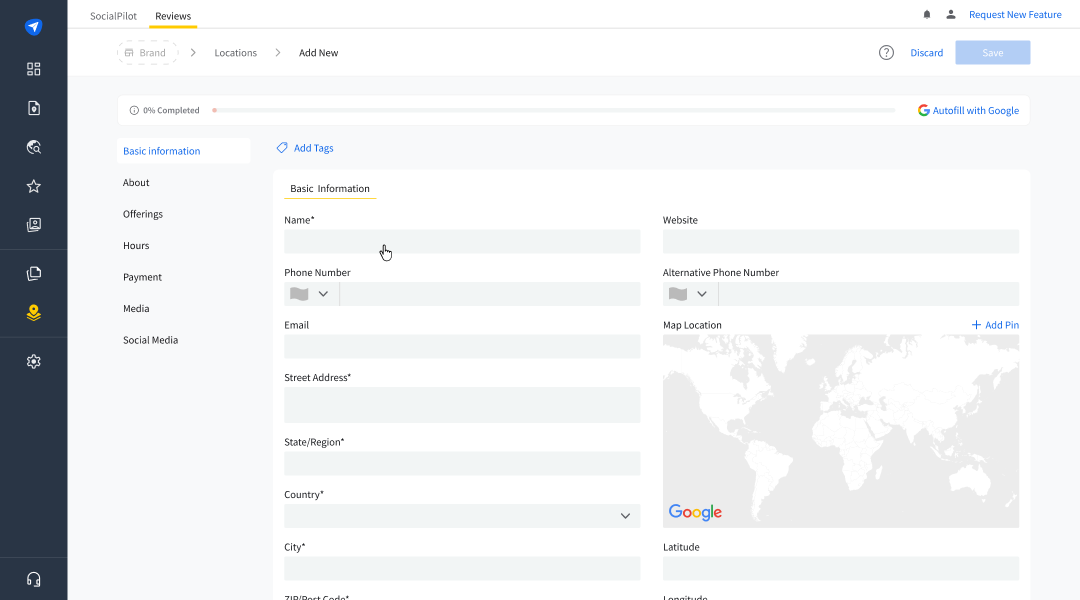
- Fill out the necessary fields with your business information. The more information you provide, the better your listing’s health and discoverability will be.


- Mandatory Fields: Business Name, Address, Phone Number, Business Category, Map Location.
- Optional Fields: Website URL, Social Media Links, Location Image. Fill in the details of your location, including Brand Name, Location Name, Website, Country, Address, City, State, Zip Code, and Tags.
Notes:
- If you do not have any Brands saved yet, one will be automatically created for you with the same name you create a location will have.
- Fields with an asterisk (*) are required to save the location. Make sure to fill them out to avoid any errors.
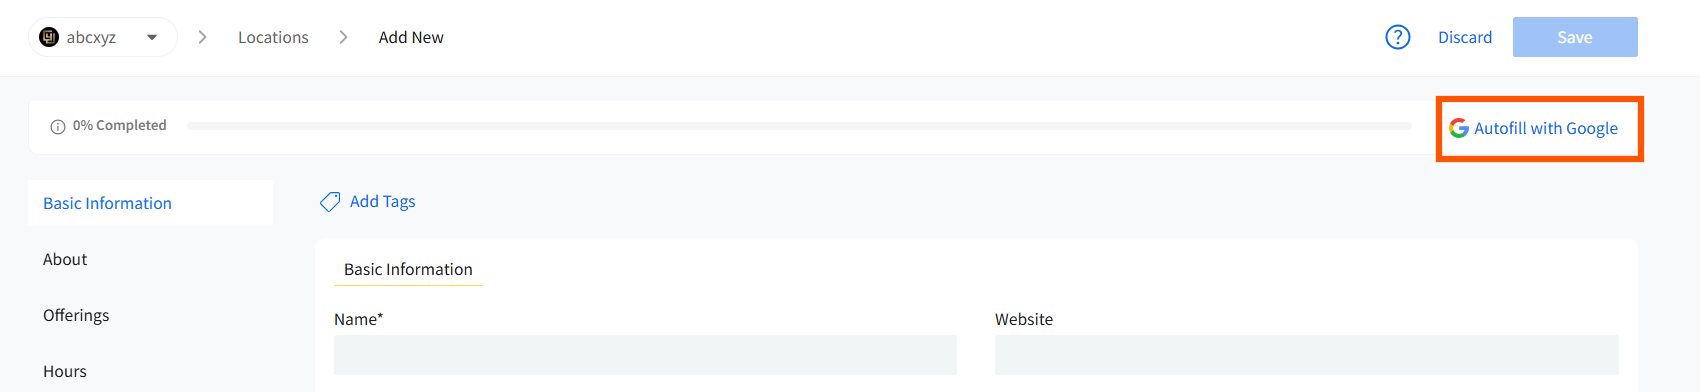
-
Use Google Autofill to quickly populate location details by searching your business (standard or advanced search) and selecting the correct result.
-
Check all entered information for accuracy, then click on Save to save your brand.


Voila! You have now added brand locations on SocialPilot Reviews.
To learn how to add locations from platform-specific options (such as Google Business Profile or SocialPilot), refer to the document that details the processes for adding locations from different platforms.
Note:
- Each added location automatically generates a Location Report, giving structured, up-to-date review data for every branch. These reports can be viewed or customized depending on your access level.
How to Add a Listing Publisher to Your Location
To get started with listing your business on various online directories, you'll first need to add your business location and then opt in for listing publishers. Here's how you can add a Listing Publisher like Google Business Profile (GBP) for the first time.
- From the top navigation bar, use the Brand Switcher to select the relevant brand.
- Then, use the Location Switcher to select the business location for which you want to add a listing.
-
Navigate to the side menu and select Listings.
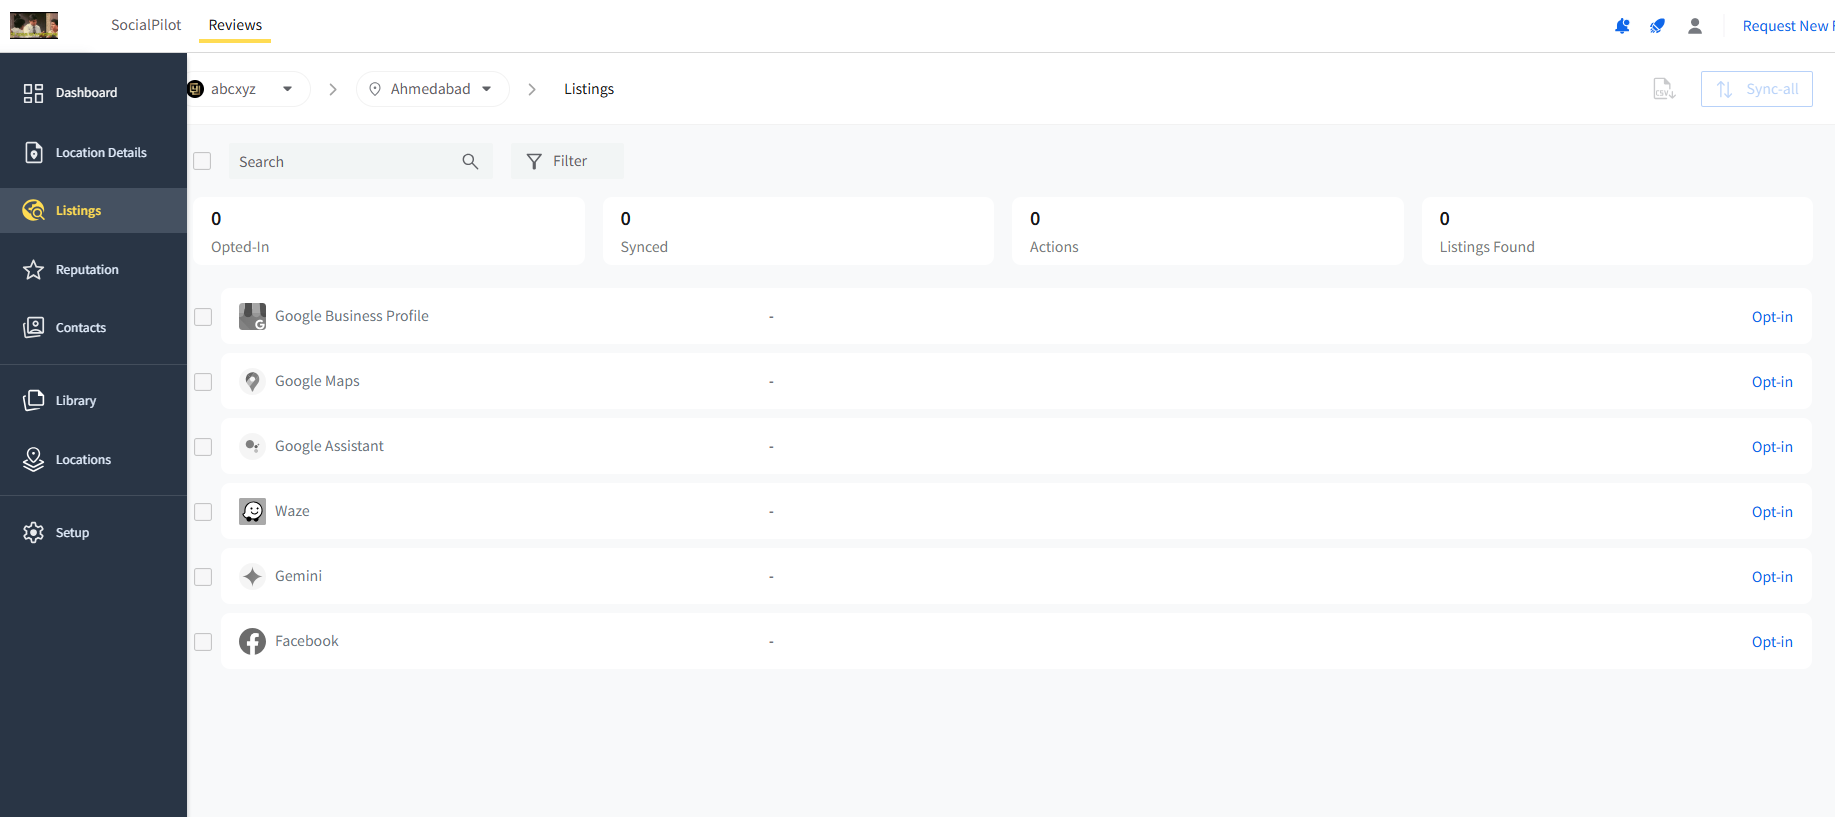
- You'll be directed to the Listings page, where you'll see all the available listing publishers, such as Google Business Profile (GBP), and Facebook.
-
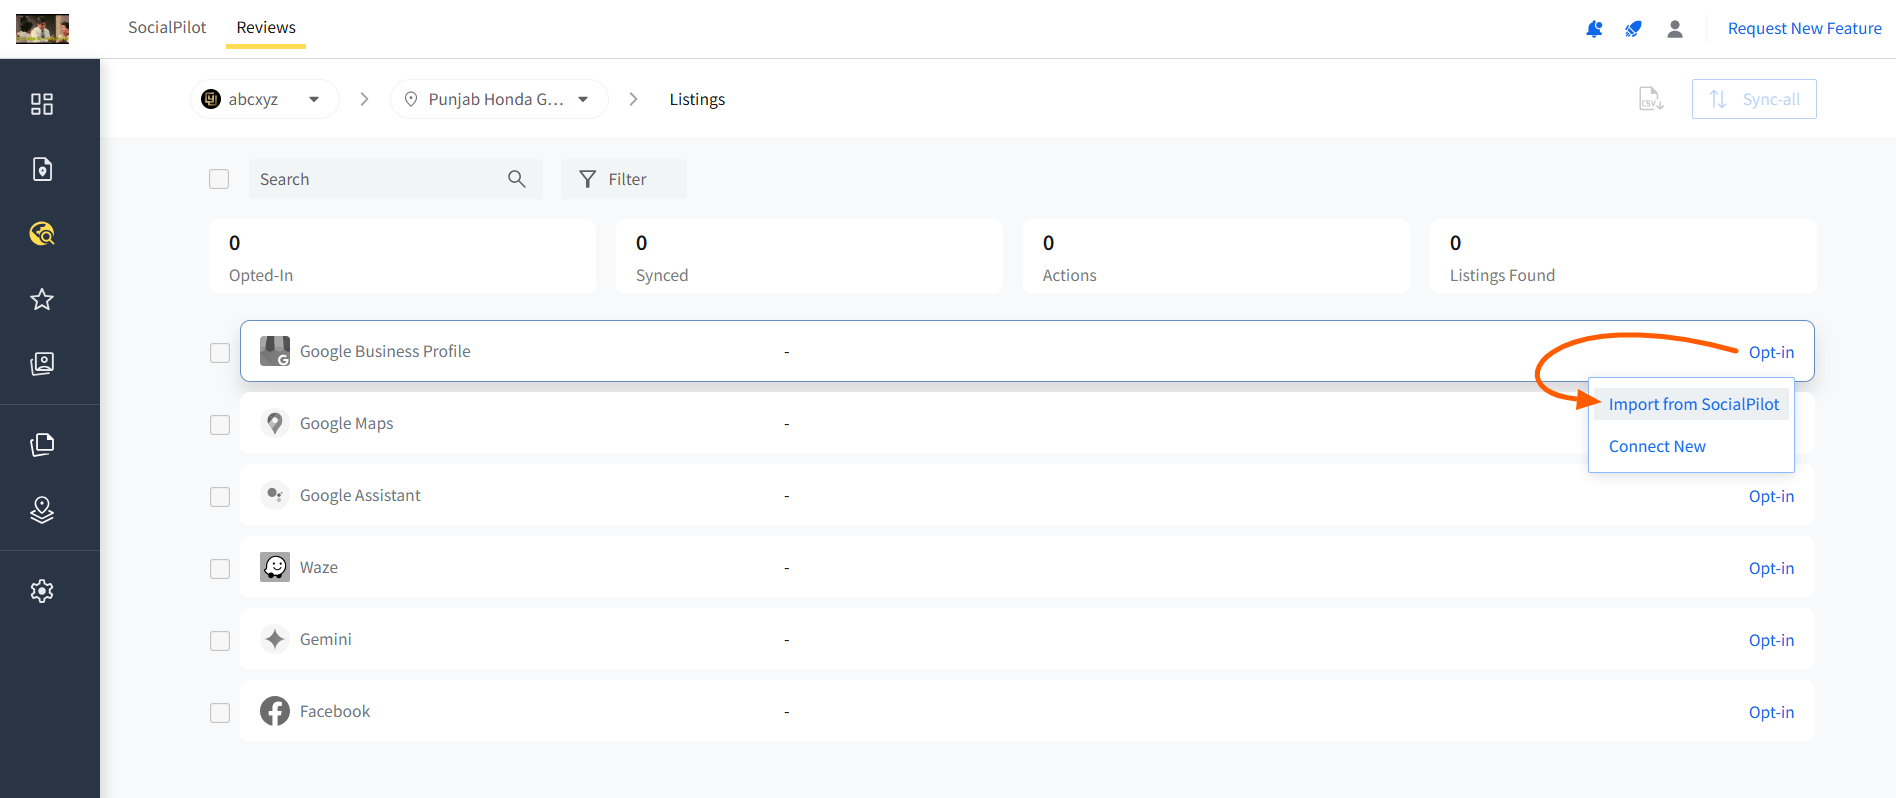
Click on the Opt-In button next to GBP and then select Connect New.
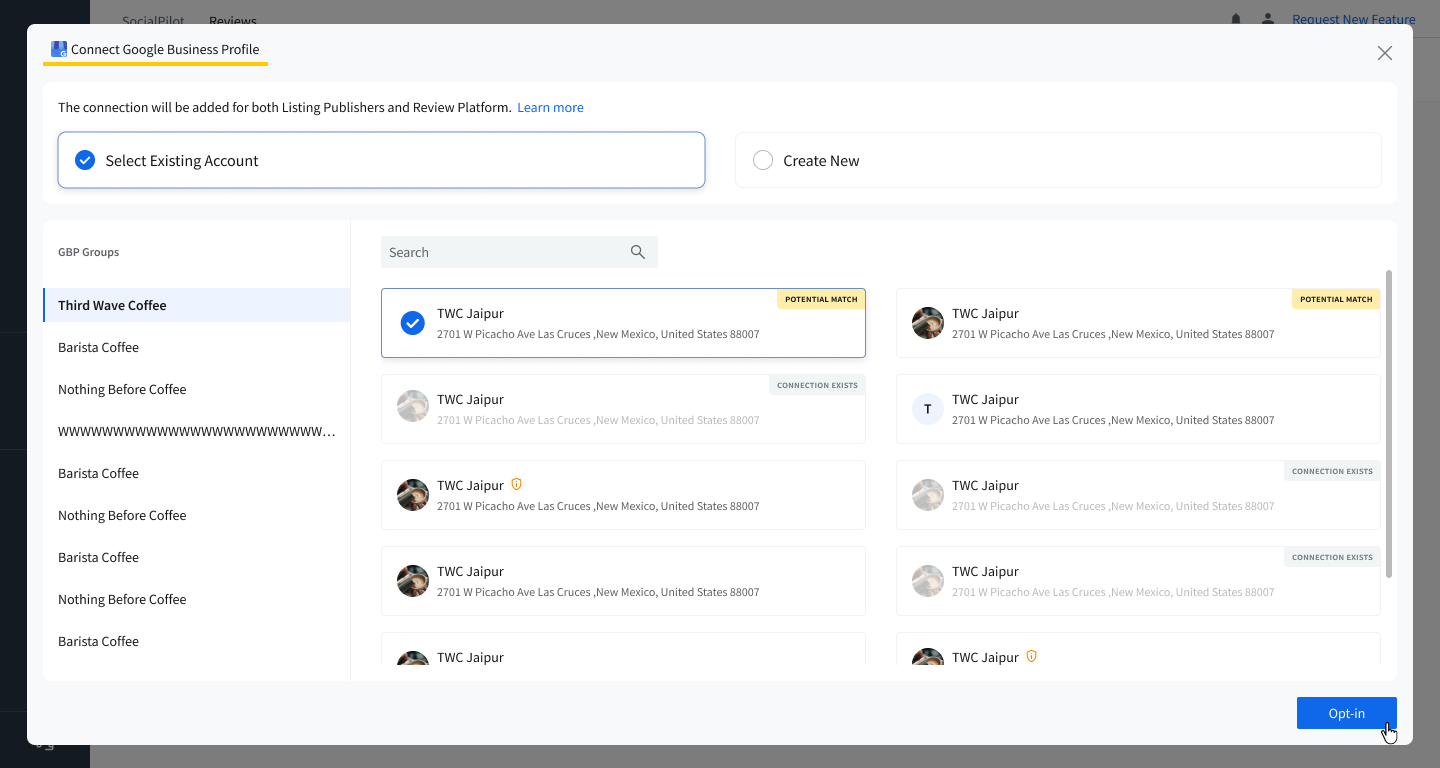
- You'll be prompted to sign in to your Google account.
- Enter your Google credentials and grant SocialPilot Reviews permission to connect to your Google Business Profile.
- Once signed in, you'll see a list of Google accounts connected to your Google profile.
- Choose the Google Business Profile account that is not connected yet to SocialPilot Reviews.
- If you see an amber badge (indicating the profile is not verified), you can still opt to connect it, but the profile verification can be completed later.
-
Click the Opt-In button again to confirm and connect your Google Business Profile to SocialPilot Reviews.
- Once connected, your GBP listing will be synced to the location you selected in SocialPilot Reviews.
- After opting in, if your Google Business Profile is not verified, SocialPilot Reviews will prompt you to complete the verification process.
-
You can redirect to Google to complete the verification (e.g., phone call, email, etc).
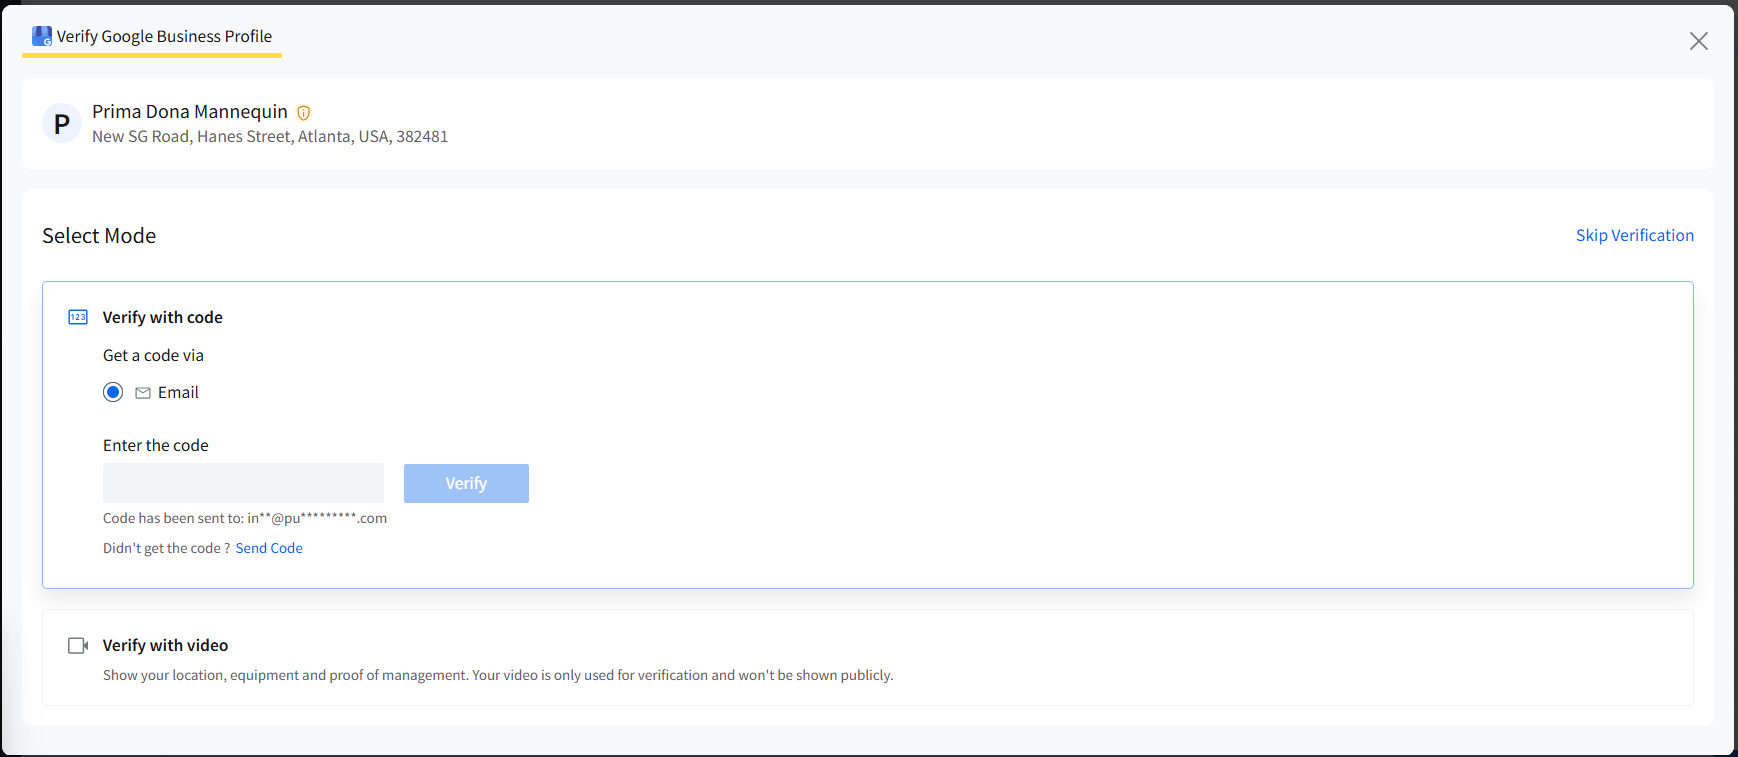
- Once verified, your listing will be fully functional and visible on Google Search and Google Maps.


Once connected, your business data will be published and visible on Google.
To learn more about adding listings from other platforms or handling different scenarios, refer to the full guide on adding Listing Publishers.
How to Add Contacts on SocialPilot Reviews?
Contacts are the recipients of your outreach campaigns, primarily review requests.
Here is how you can add contacts to the SocialPilot Reviews platform:
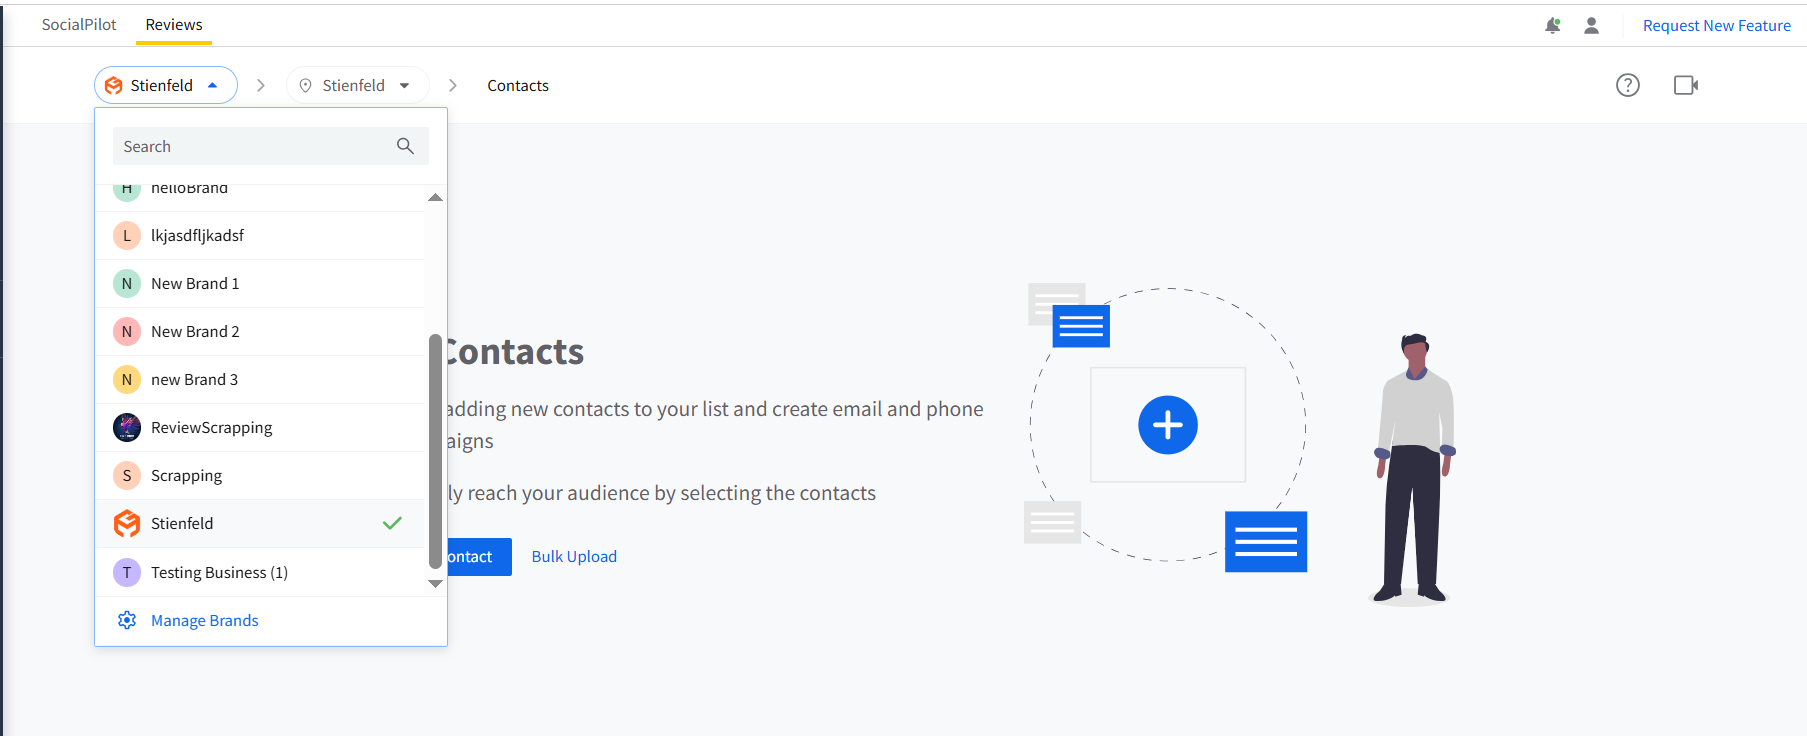
- On the dashboard sidebar, locate and click the Contacts.
-
Make sure you have selected the brand for which you want to add the contact by selecting the right brand and location from the dropdown at the top of the page.
- Select Create Contact to start adding a new entry.
- Fill in the following details:

- First Name
- Last Name
- Phone Number
- Tags
-
After filling in the details, click on Save to add the contact to your database. The new contact is now ready to receive communications and contribute to the data pool used for campaigns.


You can also bulk-upload contacts, as it is an efficient way to quickly fill out your contact list with hundreds and thousands of entries at once.
Bulk Upload Contacts
-
Go to the Contacts tab on the dashboard sidebar and click on the Bulk Upload Contacts option to proceed.

🚨 Before beginning the upload process, prepare a CSV (Comma-Separated Values) file with all your contact information organized into columns such as first name, last name, email, phone number, and tags. Ensure that:
- Each contact is in a separate row.
- The first row contains column headers.
- Email or phone number fields are filled out as they are essential for contact identification.


- Click on your desired location. You will see a drag-and-drop area on the bulk upload page with an option to browse your computer files.
- Drag the CSV file into the upload area or click Browse to select the file manually.
- Once uploaded, SocialPilot Reviews will provide a preview or a summary of the uploaded contacts for review.
- Once the data is validated, you have to confirm the upload.
SocialPilot Reviews will process the file and add the contacts to your account's database. After the upload, you can go to the contacts section to see all the newly added contacts.
Note: Users, regardless of the plan they are on, can upload as many as contacts they wish to.
How to Create Your First Campaign?
Creating a campaign requires a thorough setup process to ensure effective outreach.
Follow the steps below to create your very first review campaign on SocialPilot Reviews:
- Go to Reputation > Campaigns > Add Campaign. Make sure to check if the brand and location are the ones you want to create a campaign for.
- Assign a descriptive name for the campaign.
- Enable Intermediate Feedback. It allows customers to provide feedback before posting a public review, helping to filter negative responses. However, this is an optional step.
- Set the start date, time zone, and daily contact limit.
- Choose contact enrollment: Automatic (new contacts auto-enrolled) or Manual (you decide who gets enrolled).
- Set criteria for unenrollment (e.g., when a review link is clicked).
-
Customize the campaign’s branding by adjusting colors, adding your logo, and adjusting the size to your preference.


Adding and Managing Contacts:
- Switch to the Contacts tab. Check their status: Enrolled, Exited, or Bounced.
- Add new contacts manually.

Setting Up Workflow:
- Personalize elements like sender name and reply-to email.
- Add Email, Text, or WhatsApp steps to the workflow and set up reminders.
- Use the built-in spam detector to ensure messages are delivered to the inbox.

Launch:
- Preview and test the campaign before launching.
- Click on the Actions button and select Launch to start sending requests according to your schedule.

Next, choose the channels you want to use in your campaign: Email, Text, WhatsApp, or a combination of them
-
For emails, specify the sender's name, reply-to address, subject line, logo, button color, link choice (Facebook or Google Business Profile), and text color, and write the email body.
For WhatsApp, select one of your Approved WhatsApp messages. If WhatsApp is not connected for the selected brand, click the Setup button and complete the connection through Meta.
- Text campaigns require selecting a link and sender information and creating the message body with options to personalize.
- Preview your campaign before launching. If everything you have set up is good to go, click on launch. Your review campaign is now active and running
How to Send SMS-Based Review Requests Through Twilio?
To send SMS messages through SocialPilot Reviews, you need to integrate Twilio, a cloud communications platform that provides APIs for SMS and other messaging services.
Here is how you can set up Twilio integration within SocialPilot Reviews:
- Enter your Twilio Account SID and Auth Token from the Twilio Console. These credentials are necessary to reach out to their customers via SMS, requesting reviews and feedback.
-
Once Twilio is integrated, you can create text campaigns with sender IDs.


Note: There is no limit to the number of campaigns you can create, regardless of your plan. However, if you run out of email credits, the campaign will be paused until you add more. This applies to both Starter and Pro plan users.
For SMS-based campaigns, SocialPilot Reviews integrates with Twilio. If you're using a free Twilio account, there is a limited number of SMS messages you can send. With a paid Twilio plan, the number of SMS messages you can send depends on the plan you’ve purchased.
How to Send WhatsApp-Based Review Requests?
WhatsApp works alongside Email and Text as a review request channel. Before you can use it in a campaign, you need to connect a WhatsApp Business account and create a message that is approved by Meta.
Here is how you can set up WhatsApp review requests in SocialPilot Reviews:
1. Go to Setup and select Integrations.
Open the WhatsApp integration, select the brand you want to connect, and complete the connection through Meta.
See How to Connect Your WhatsApp Business Account to SocialPilot Reviews to learn more about connecting your account and understanding its connection status and quality rating.
2. Go to Library and select WhatsApp Messages.
Click the Create WA Message button, create your message, and send it to Meta for approval.
See How to Create and Manage WhatsApp Message Templates in SocialPilot Reviews to learn more about creating messages and understanding their approval statuses.
Note: Only Approved WhatsApp messages can be used in a campaign.
3. While creating or editing a campaign, go to the Workflow section.
Click the Add button within the relevant day and select WhatsApp.
4. Select one of your Approved WhatsApp messages.
If WhatsApp is not connected for the selected brand, click the Setup button and complete the connection without leaving the campaign.
5. Send a test WhatsApp message to yourself to check how it will appear to customers.
6. Once the workflow is ready, click the Launch button.
WhatsApp messages will be sent according to the campaign schedule, alongside any Email or Text steps included in the workflow.
Note: If the connected WhatsApp account is disconnected or a message used in the campaign becomes Unavailable, the campaign will pause automatically, and you will be notified.
How to Add Team Members on SocialPilot Reviews?
Let us now see how to add team members on SocialPilot Reviews to efficiently manage all your review campaigns and feedback.
- To add team members, you have to click on the profile in the top-right corner and then on Users.
- Upon clicking on the Users, now, on the top, locate Invite User and click on it.
- In order to invite others and create a team, your access role needs to be either Account Owner or Admin. You can add members and assign them roles of Admin, Manager, or Client.
- The admin can add new users and has all permissions except billing.
- The manager can manage locations, campaigns, and reviews.
-
The client can view and comment on posts and connect new accounts.


- Now add the email IDs of people you want to add as team members and assign them the role you want to give them - Admin, Manager, or Client. After this click, click on Send Invite.
- If you are also a SocialPilot user, your Invite User screen will display options for both SocialPilot and SocialPilot Reviews.
- If your team members already use SocialPilot and you want to give them access to Reviews, too, click on Edit next to their names, go to SocialPilot Reviews, click Edit again, and assign them their roles.
👉 If you select the campaign check box for clients, they can manage the campaigns that are running.
👉 Notes:
- On the 'Invite User' you can click on the arrow beside it to either send a direct SocialPilot Client Invite link by clicking the copy button, or you can edit it to send it to the client.
- You can invite as many team members as you want to on SocialPilot Reviews.
- You can invite team members to SocialPilot and SocialPilot Reviews from either of the platforms, too.
- While assigning roles to the manager and client, you can select all the brands and their locations you want them to have access to.
- Permissions assigned to team members also control access to review reports. Owners/Admins can view all reports, Managers can see reports for their assigned locations, and Clients have restricted visibility for location-level reports only.
How to Manage Reviews and Feedback?
It is time to manage all the reviews and feedback you have received on review platforms.
Follow the steps below to manage them efficiently:
- To start managing all your reviews and feedback, go to the dashboard, click on Reputation, and select Reviews.
- Make sure to check the Brand and Location from the dropdowns at the top of the page.
-
You will see a list of all the reviews from the connected review platforms in one place. Use the refresh button at the top to see all the new reviews. From this place, you can reply to each one of them.

-
Directly write personalized responses to reviews from the dashboard. You can also enhance replies with images, emojis, and GIFs for Facebook reviews.
Alternatively, you can also use AI for responses. Click on Reply with AI to generate replies. If you are not satisfied with the output, you can edit the AI-generated replies to adjust length, grammar, or tone as necessary.


-
Now click Send to post your reply.
You may sometimes want to filter all the reviews. For that you can use the search and filter option.
Searching and Filtering Reviews
-
Use the search bar at the top of the Reviews Inbox to find specific reviews by keywords or reviewer names. You can select a date range to view reviews from a specific period up to the past one year.


The filter button can be applied to reviews to filters such as tags, sources, ratings, recommendations, reply status, and review content.

Tags help categorize and organize reviews. Click Add Tag below any review to assign tags based on your preferences.
- Sources: Identifies the medium of the review, like Facebook or GBP.
- Ratings and Recommendations: Filter by user ratings and whether your business was recommended.
- Reply Status: Shows whether a review has been responded to.
- Review Content: Sorts reviews that include text feedback from those that are ratings only.