How to Create Review Request Campaigns on SocialPilot Reviews?
Collecting reviews from your customers is a crucial part of maintaining and improving your brand’s online reputation. However, with a large customer base, manually managing review requests can be time-consuming. SocialPilot Reviews allows you to automate this process, making it simple to create and manage campaigns that request feedback and generate more 5-star reviews.
For instantly sending a review request or reaching multiple customers at once, there’s the Quick Review Request option. It makes it easy to send one-time requests or upload contacts in bulk without building a full campaign.
Once reviews start coming in, you can also view and respond to them directly from the SocialPilot mobile app, helping you stay responsive to customer feedback and maintain a positive brand reputation.
Check out how you can create Review Request Campaigns on SocialPilot Reviews in this quick video.
In This Article
- How to Set up Your Review Request Campaigns?
- How to Add and Manage Contacts?
- How to Automate Review Request Campaigns for New Customers?
- How to Create a Campaign Using Quick Review Request?
- How to Set up the Campaign Workflow on SocialPilot Reviews?
How to Set up Review Request Campaigns?
Here is how you can set up a review campaign on SocialPilot Reviews:
-
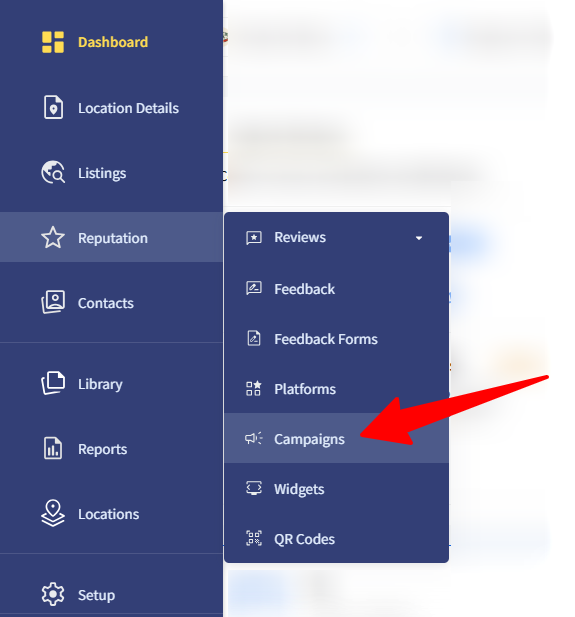
Go to your dashboard and click on the Reputation > Campaign.
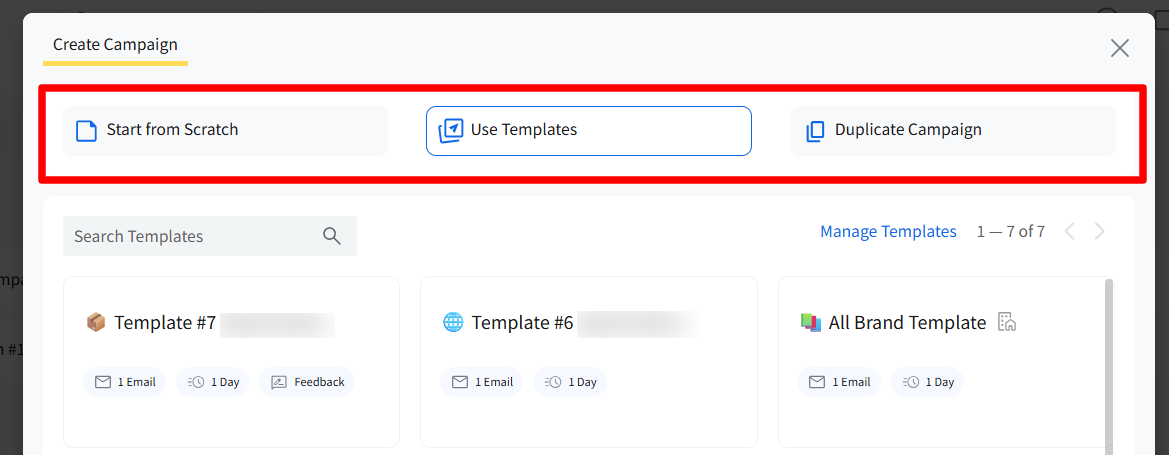
- Click on the Create Campaign button.
- Select any of the given options between:
- Start from Scratch: Use this to create a fresh campaign with an empty template.
- Use Templates: Choose any of the premade campaign templates to create your campaign.
- Duplicate Campaign: Use any of the existing campaigns as a template to create a new campaign.
-
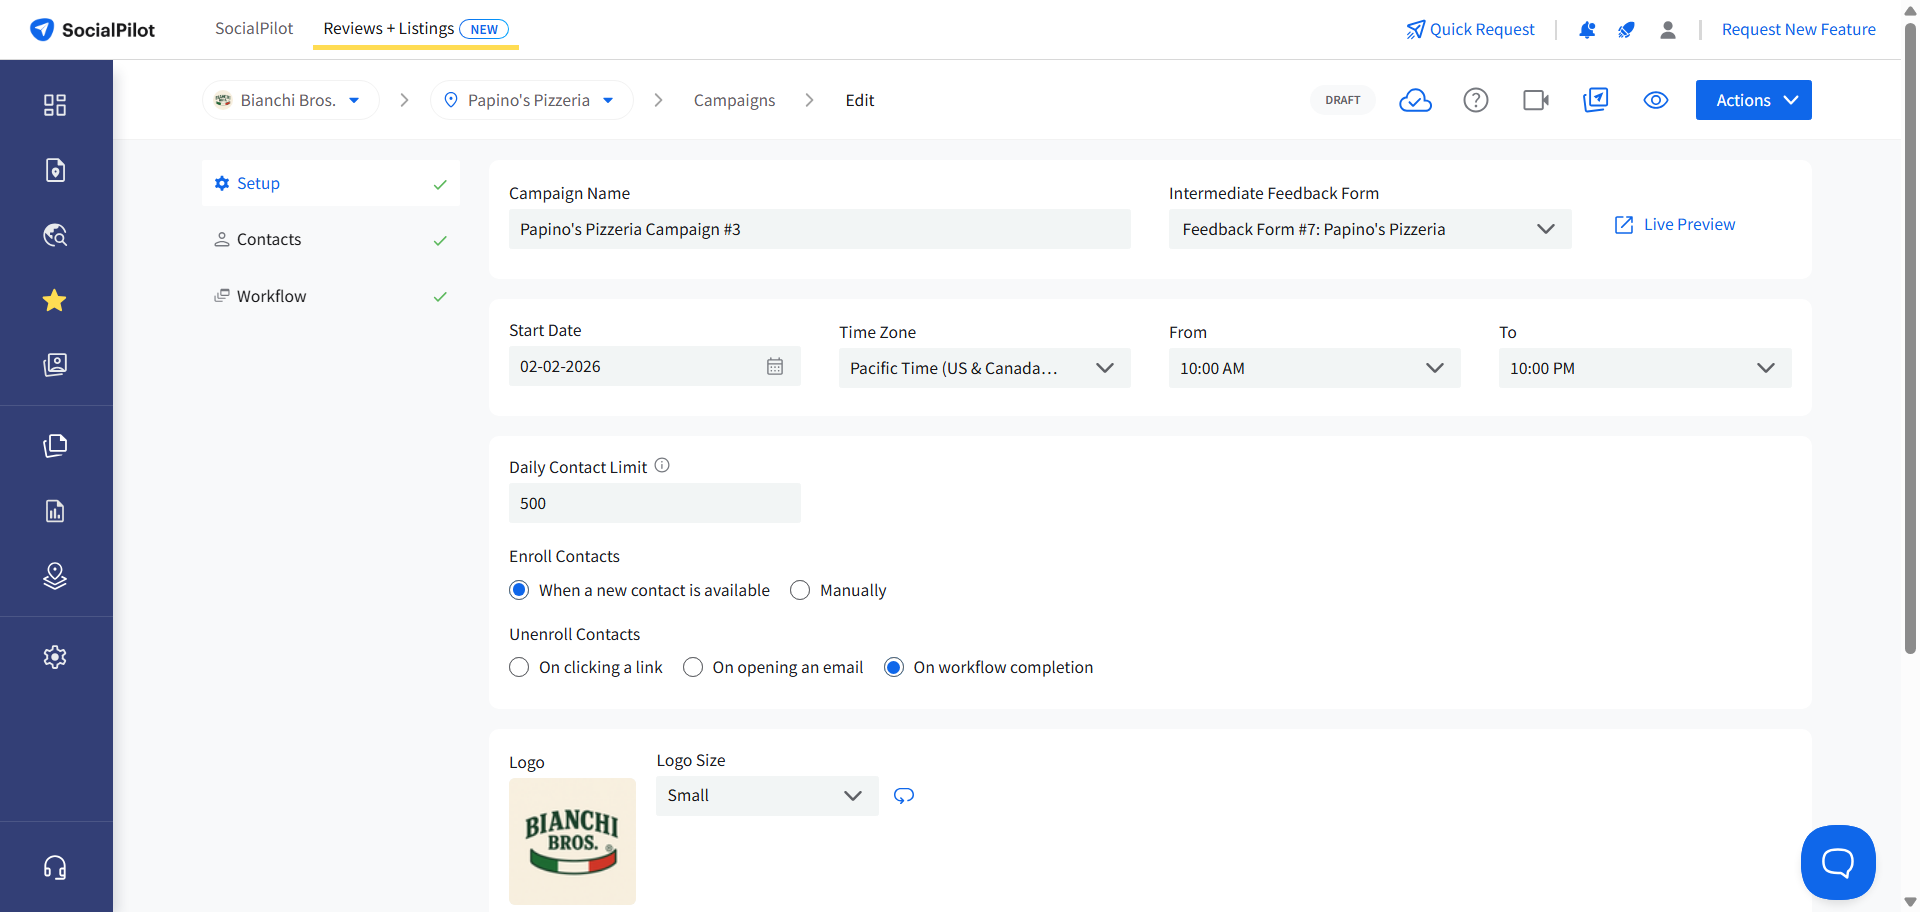
- Assign a unique and descriptive name to your campaign for easy identification.
- Select a Feedback Form if you want to let customers provide direct feedback before leaving a public review. This can help get detailed understanding of customer experience.
-
After that, set the start date and choose the time zone for your campaign.
Start at Launch Option:
Select Start at Launch to begin the campaign immediately. Start at Launch sends review requests to the first 30 contacts instantly and schedules the remaining contacts based on your daily limit.
Note: When the campaign is created using Quick Review Request, Start at Launch is selected automatically.
- Set the maximum number of contacts that can receive review requests each day to prevent overwhelming your audience.
- Choose how to enroll contacts
- Automatically: New contacts added to the selected location are automatically enrolled to the campaign.
- Manually: You can manually enroll contacts based on your preference.
- Select the criteria for when a contact should be unenrolled from the campaign:
- On clicking a review link.
- On opening an email.
- On completion of the entire workflow.
-
Adjust branding elements such as the button color, button text color, and upload your company logo to ensure consistent branding throughout the campaign communication. You can even adjust the size of the log, picking a custom option from the given ones.


Default Campaign Settings
Your brand may have default campaign settings, including start time, end time, daily contact limit, and branding preferences. These defaults apply automatically to new campaigns, including campaigns created through Quick Review Request.
To update these settings, click Edit Campaign Defaults on the campaign setup page.
Default settings do not change existing campaigns.
How to Add and Manage Contacts?
Once your campaign is created, you can manage the contacts associated with the selected brand and location.
When a campaign is created for a specific location, all contacts added under that location are displayed in the Contacts tab of the campaign.

Enrollment Behavior Based on Setup Selection
During the Setup step, you choose how contacts should be enrolled:
- When a new contact is available
- Manually
The enrollment behavior depends on this selection.
If “When a new contact is available” is selected
- All existing contacts under the selected location are automatically enrolled in the campaign.
- Any new contact added to that location after the campaign is launched will also be automatically enrolled.
- You can manually unenroll any contact if required.
If “Manually” is selected
- Contacts are not automatically enrolled after the campaign.
-
You must manually select and enroll contacts in the campaign.


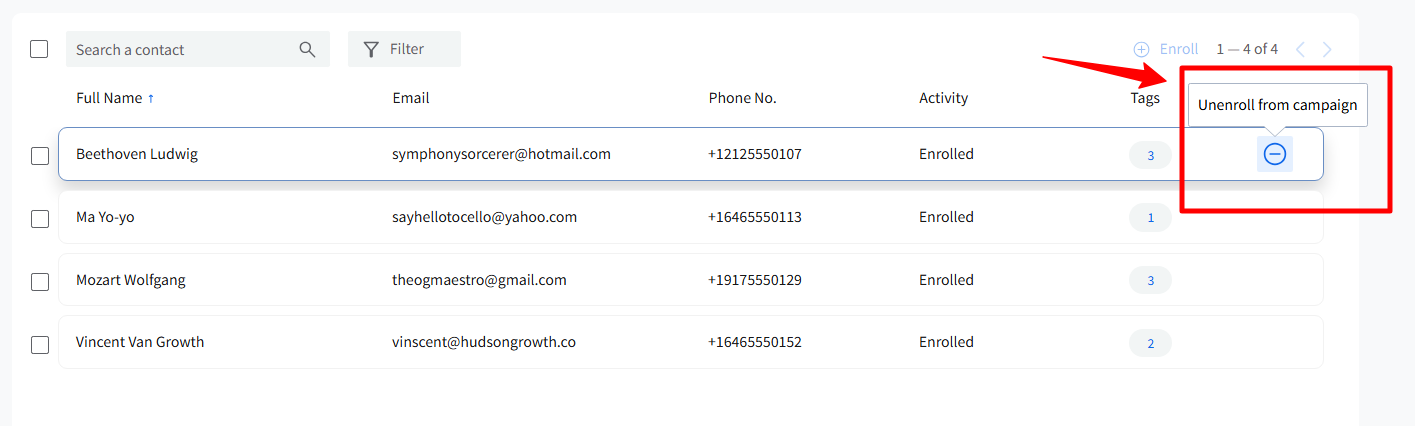
How to Unenroll a Contact
- Go to the Contacts tab within the campaign.
- Locate the contact you want to remove.
-
Click the Unenroll icon next to the contact.

Once unenrolled:
- The contact is removed from the campaign.
- The contact will appear again in the Enroll window if you wish to re-enroll them.
If one or more contacts are not enrolled, the Enroll button will be visible at the top of the Contacts tab.

How Duplicate Request Prevention Affects Enrollment
When enrolling contacts into a campaign, you may notice additional indicators next to certain contacts.
Lock Icon in the Enroll Window
In the Enroll window, some contacts may display a lock icon.
This indicates that Duplicate Request Prevention (DRP) is active for that contact.
Hover over the icon to view the message:
- If a date is displayed, the contact has already received a review request, and the waiting period is currently active. The date shown indicates when the contact becomes eligible again.
- If no date is displayed, the contact is part of a campaign where DRP applies, but the first review request has not yet been sent.
You can still select and enroll these contacts.
Red Warning Indicator After Enrollment
If you enroll a contact who is currently under Duplicate Request Prevention:
- A red warning icon appears next to the contact in the Contacts tab.
- Hovering over the icon displays the protection message and, if applicable, the date until which the contact is protected.
The contact remains enrolled in the campaign. However, review requests will not be sent to that contact until the defined waiting period ends.
Launching a Campaign with DRP-Protected Contacts
If a campaign includes contacts who are currently under Duplicate Request Prevention, and you attempt to launch the campaign, a confirmation popup will appear.
The popup message states that some contacts are within the duplicate request prevention period and continuing will remove those contacts from the campaign.
You will see two options:
Manage Contacts
Selecting Manage Contacts opens the filtered Contacts view.
Here, you can:
- Review the contacts under Duplicate Request Prevention
- Check their availability date
- Manually unenroll them if required
Remove & Continue
Selecting Remove & Continue automatically removes all contacts currently under Duplicate Request Prevention from the campaign.
After removal, you can proceed with launching the campaign.
How to Automate Review Request Campaigns for New Customers?
Follow the steps to see how to ensure all the new contacts are automatically added to an ongoing campaign
- Go to Setup from the side menu and click on Integrations.
- Choose the Zapier integration option. You can use this guide to connect your SocialPilot Review account to Zapier.
- Once connected, go to Zapier and select your CRM (e.g., Salesforce, HubSpot) as the trigger app within Zapier. This setup ensures new or updated contacts in your CRM are synced to SocialPilot.
- Select New Contact or Updated Contact as the trigger event to capture and sync new contacts.
- Now, authorize Zapier to access your CRM account and retrieve data.
- Run a test to confirm Zapier can successfully retrieve contacts.
- In Zapier, select SocialPilot Review as the app to send contacts to.
- Select Create Contact in SocialPilot Review to import each new CRM contact.
- Authorize Zapier to connect with SocialPilot Review, allowing the contacts to be imported automatically.
- Align fields from your CRM with SocialPilot Review’s fields. For instance, match the First Name, Last Name, Email, and Phone Number fields.
- If you are managing multiple locations, ensure that location-based fields are mapped to identify which business or branch the contact is associated with.
- If your contact organization in SocialPilot includes tags, make sure to map relevant CRM data to maintain organized tagging for easy filtering and segmentation.
- If you need to restrict the contact import to certain criteria (such as contacts tagged with a specific label in your CRM), add Zapier’s filter steps here.
- Run a test in Zapier to make sure that a sample contact from your CRM is correctly imported to SocialPilot Review.
- Check the SocialPilot Review platform to confirm the contact was added accurately.
- Once verified, turn on the Zap to enable automatic imports of new contacts from your CRM to SocialPilot.
Voila! Now, every time there is a new contact added to the CRM, they will be automatically added to the campaign of that particular location.
How to Create a Campaign Using Quick Review Request?
Quick Review Request allows you to create a review request campaign instantly without using the full Create Campaign setup flow.
Follow these steps to create a campaign using Quick Review Request:
-
Click the Quick Request button on the top bar.

-
Enter the customer’s First Name, Last Name, Email, or Phone Number.
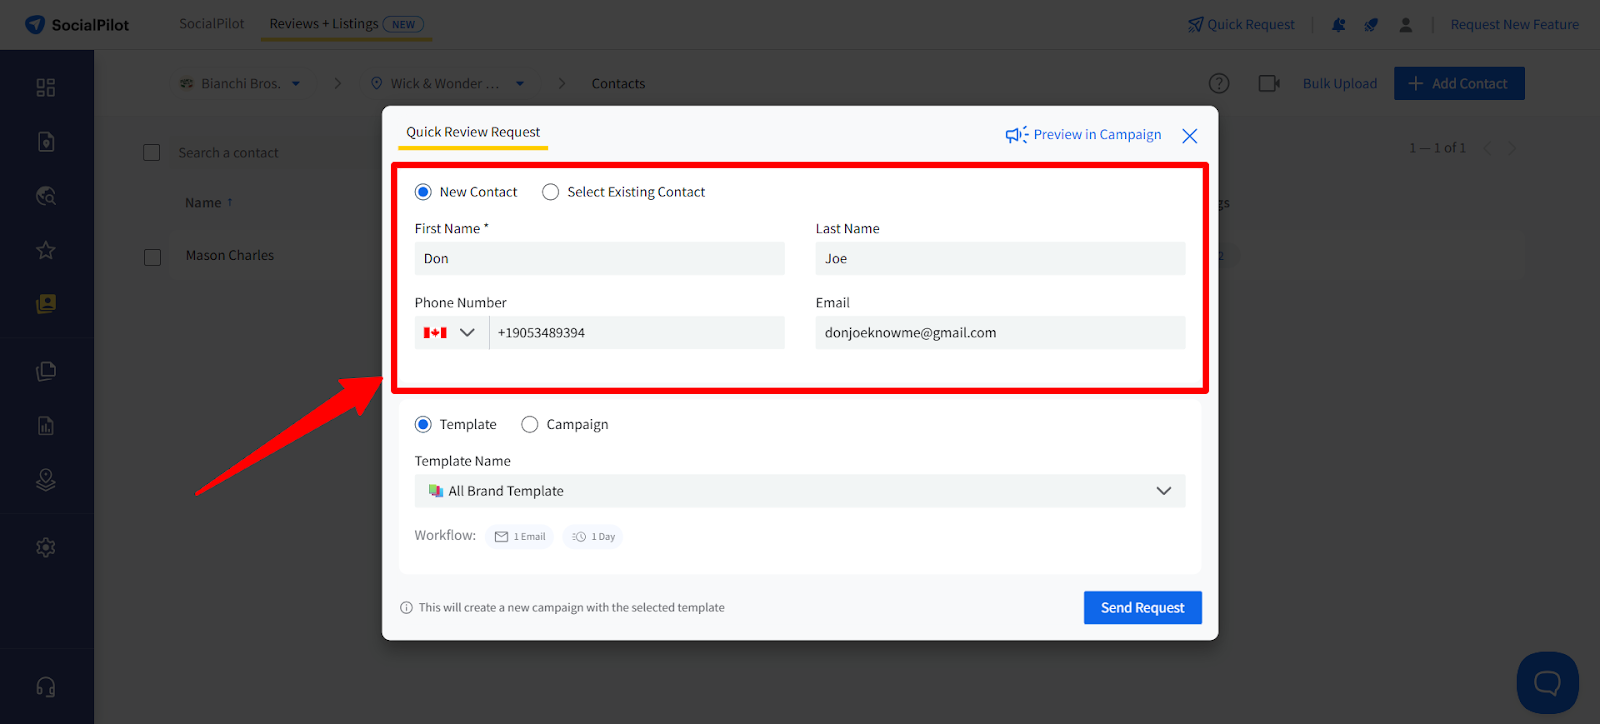
- Choose Campaign, and select a Live one from the drop down in Campaign Name.
-
- Click Send Request and enroll the contact directly into an existing campaign.


Sending to Multiple Customers Using Bulk Upload
In addition to adding a single contact, you can use the Bulk Upload Contacts option in Quick Review Request to upload a CSV file and send requests to multiple customers at once.
This is useful when you want to reach many customers quickly without manually adding each contact.

You can choose a template or an existing campaign, and eligible contacts will be processed instantly while the rest follow the campaign schedule.
How to Set up the Campaign Workflow on SocialPilot Reviews?
Here is the final stage of setting up your campaign:
- In the Workflow section, personalize elements such as the sender name, reply-to email, text sender for SMS campaigns, and WhatsApp Text From for WhatsApp campaigns.
- To include Email, Text, or WhatsApp in the same campaign, click the Add button in the Workflow section and select Email, Text (SMS), or WhatsApp from the dropdown.
-
3. If WhatsApp is not connected for the selected brand, select WhatsApp and click the Setup button.
Complete the Meta connection flow without leaving the campaign. See How to Connect Your WhatsApp Business Account to SocialPilot Reviews for detailed steps.
-
Once connected, select one of your Approved WhatsApp messages.
Hover over a message to preview it, or use the filter to narrow the list by message type, such as Image.
To create or manage a message, click Manage Messages to open the WhatsApp Messages section in the Library.
-
Compose the body of the email or SMS.
By default, there’s a one-day delay between two similar communications (e.g., two emails). If you prefer quicker follow-ups, switch the communication type from email to SMS to avoid overwhelming customers.
💡 A built-in spam detector analyzes your email for elements that could trigger spam filters. It ensures your email reaches the recipient's inbox by checking for excessive use of sales language, too many links, or other factors that could be seen as spammy.
- Before launching, always preview how the messages will appear to customers. You can also send a test email to yourself to ensure everything is set up correctly.
- Once the campaign is ready, click Launch. SocialPilot will begin sending emails and texts according to the schedule you’ve defined. Keep in mind, the Start Date and Location are locked once the campaign goes live, though you can still adjust the workflow or add contacts.

Saving Campaigns as Templates
You can save a campaign you have created as a template to use later, cutting down on the time it takes to create.
On the Create Campaign page, go to the top right side. Click on the paper plane icon and select "Save as Template."

Pausing and Resuming the Campaign
-
If changes need to be made after launching, click Pause, make the necessary adjustments, and then resume the campaign. If there’s an issue (e.g., running out of email credits), the campaign will automatically pause and alert you until the issue is resolved.
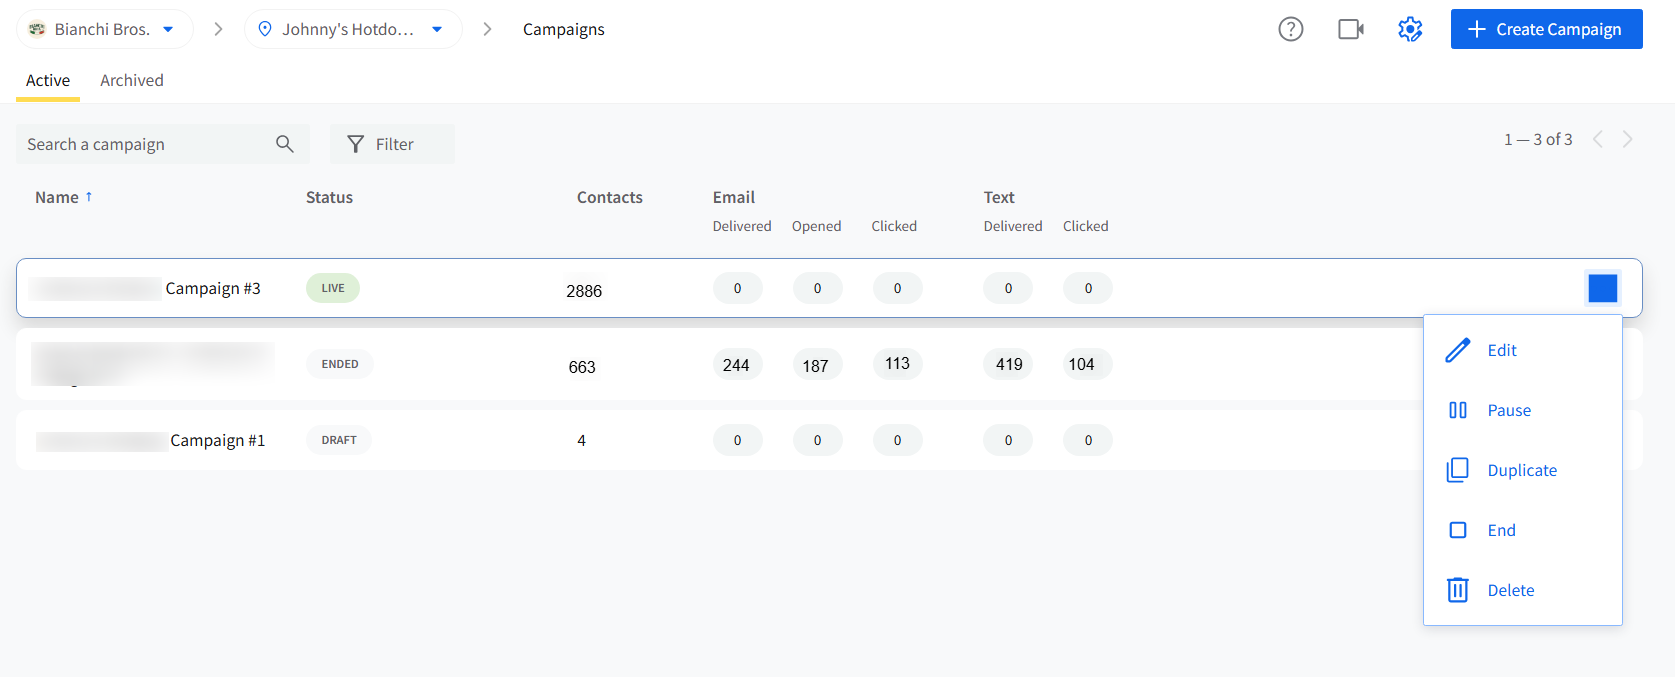

Duplicating and Archiving Campaigns:
-
If a campaign is successful, you can duplicate it and make slight adjustments for future campaigns. You can also archive or delete campaigns as needed to maintain a clean workspace.


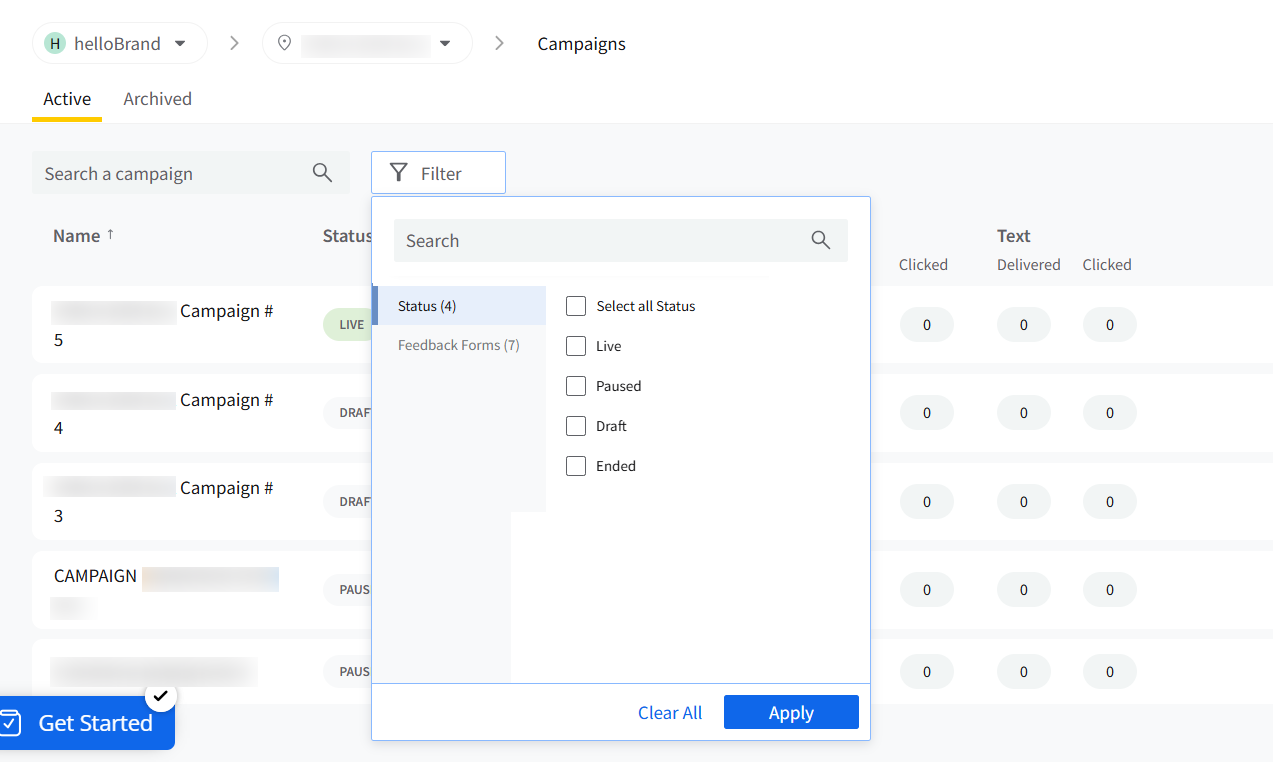
Searching and Filtering Campaigns:
-
Use the Search bar to quickly find specific campaigns within your list.
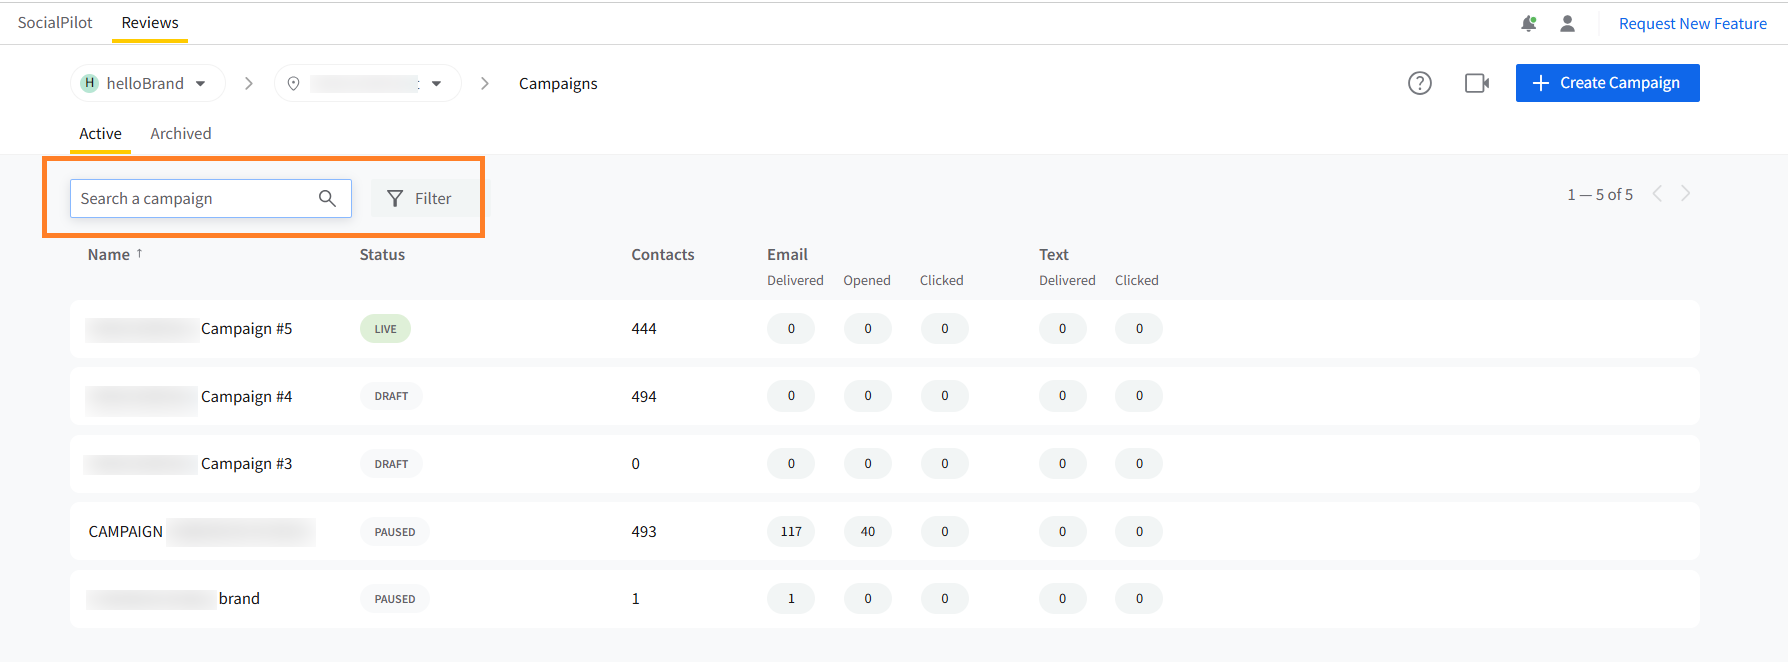
-
You can also click on Filter to sort campaigns based on criteria such as the 'Status' of the campaign or based on the 'Feedback Forms' used in it.


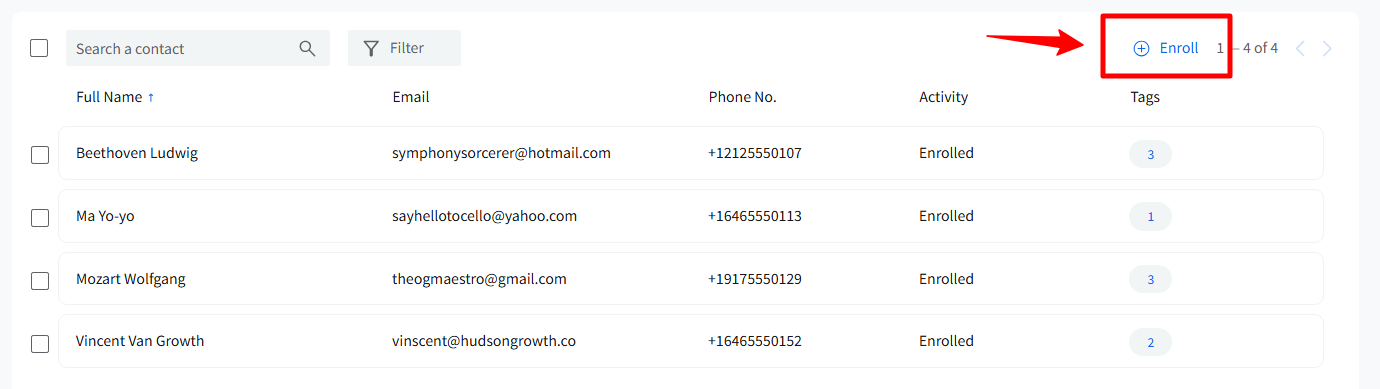
Enrolling Contacts
-
If needed, click the + Enroll button to manually add more contacts to the campaign. The system allows both automatic and manual enrollment, depending on how you set up the campaign during the initial phase.


Viewing Campaign History
- Campaign History allows you to see all the review requests sent through your campaigns and Quick Review Requests in one place.
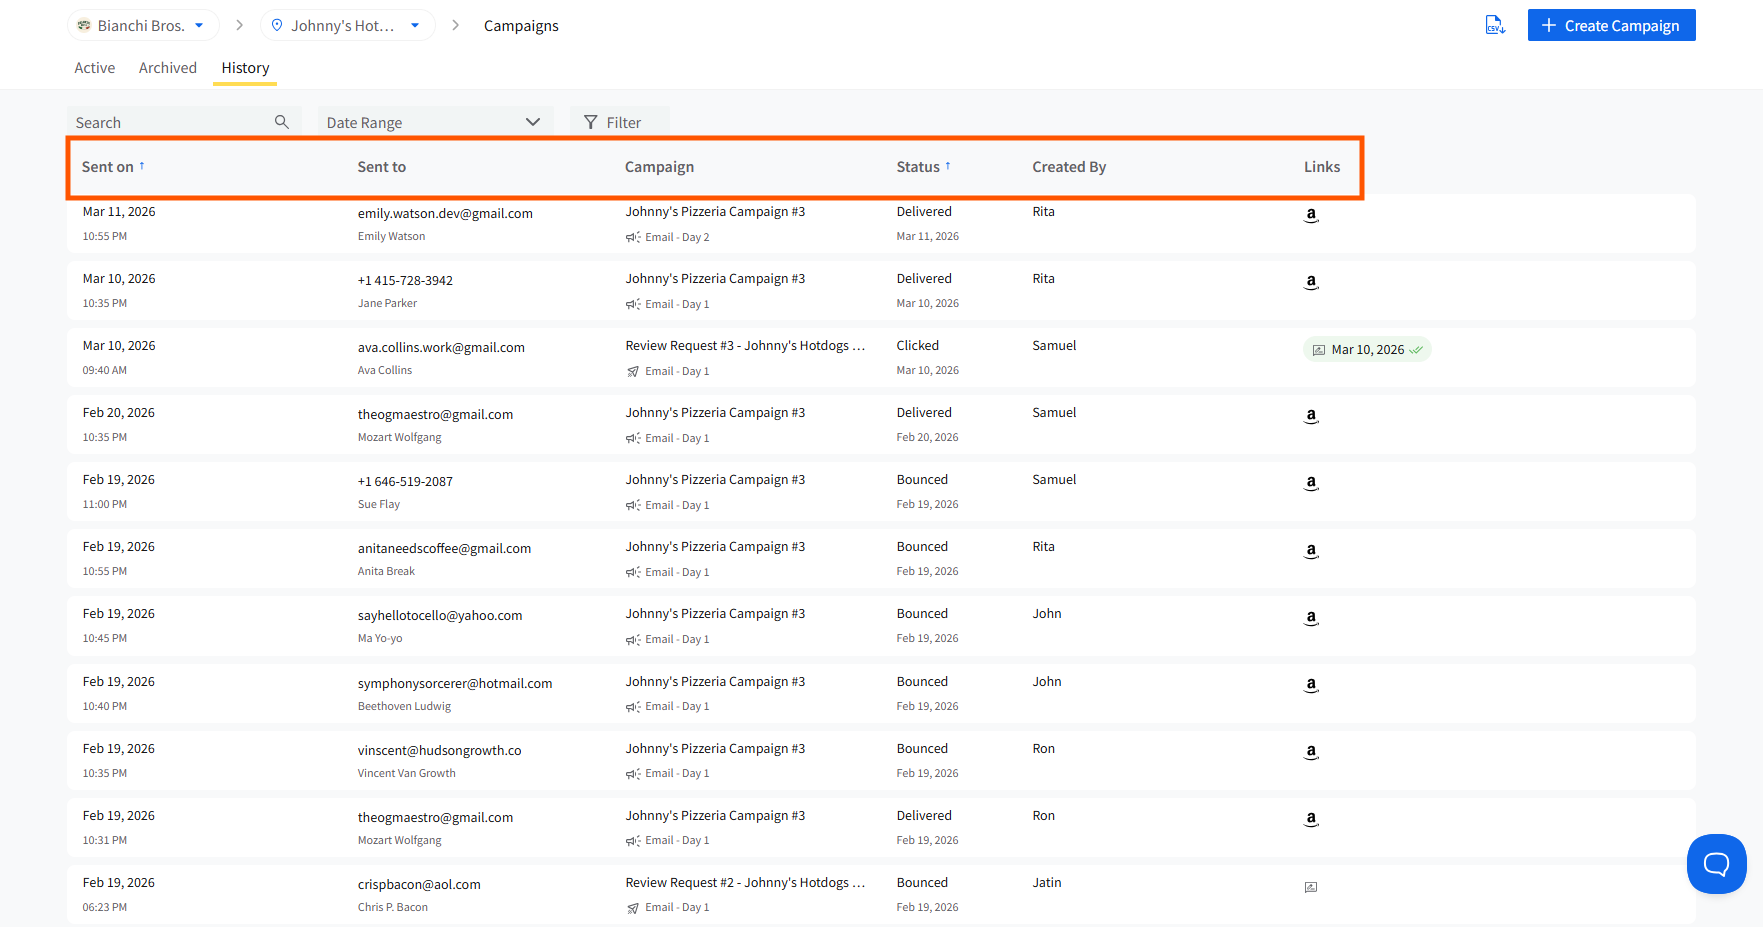
- You can review delivery status, engagement activity, and platform interactions to understand how your campaigns performed over time.
To read about it in detail, refer to the campaign history document.
Contact Status:
The Activity column indicates whether a contact is actively enrolled in the campaign. You can also check the Tags column to manage any specific labels assigned to the contacts, which can help in segmentation or targeted messaging.
By following these steps, you can efficiently manage your contacts within the campaign and ensure that review requests are sent to the right individuals at the right time.
⚠️ To send SMS messages through SocialPilot Review, you need to integrate Twilio, a cloud communications platform that provides APIs for SMS and other messaging services.
⚠️ There is no limit to the number of campaigns you can create, regardless of your plan. However, if you run out of email credits, the campaign will be paused until you add more. This applies to both Starter and Pro plan users.
For SMS-based campaigns, SocialPilot Reviews integrates with Twilio. If you are using a free Twilio account, there is a limited number of SMS messages you can send. With a paid Twilio plan, the number of SMS messages you can send depends on the plan you’ve purchased.
⚠️ To send WhatsApp messages, you need to connect a WhatsApp Business account and have at least one Meta-approved message template.
Note: At any time while creating a campaign, if you want to implement a different template, you can click the paper plane icon located at the top right corner of the Create Campaign page. Click on Choose Template and opt for the relevant template.

This will populate the workflow page with the content saved in the selected new template. Additionally, if the new template you have chosen has the intermediate feedback page enabled, it will also be enabled in the latest campaign you are creating.
Need to Send a One-Time Review Instantly?
If you want to send a review request immediately without going through the full campaign setup flow, use Quick Review Request.
Quick Review Request allows you to:
- Send a one-time request instantly.
- Send requests to multiple customers using bulk upload.
- Enroll contacts directly into a live campaign.
- Create a campaign automatically from a template.
For detailed steps, see: How to Send a Quick Review Request in SocialPilot Reviews