How to Connect SocialPilot With ChatGPT Using MCP Server?
The SocialPilot MCP Server changes how your social media workflow runs.
Instead of creating content in ChatGPT and then manually setting it up in SocialPilot, you can define your workflow once inside ChatGPT and let it carry out the execution for you. Posts can be created, scheduled, reviewed, and managed directly through your SocialPilot account without repeating the same steps every time.
This setup connects your SocialPilot account to ChatGPT so your workflow moves from idea to published post in one continuous flow.
In This Article:
- How to Enable Developer Mode in ChatGPT?
- How to Set Up SocialPilot MCP in ChatGPT Using SocialPilot Login?
- How to Set Up SocialPilot MCP in ChatGPT Using Your API Key?
- How to Use SocialPilot in ChatGPT Conversations?
- Troubleshooting
Before You Begin
Make sure you have:
- A supported ChatGPT paid plan with connector support.
- Access to your SocialPilot login credentials.
- Access to ChatGPT on the web app. (The setup flow may not be available on mobile.)
How to Enable Developer Mode in ChatGPT?
Developer Mode is required to add custom MCP apps in ChatGPT.
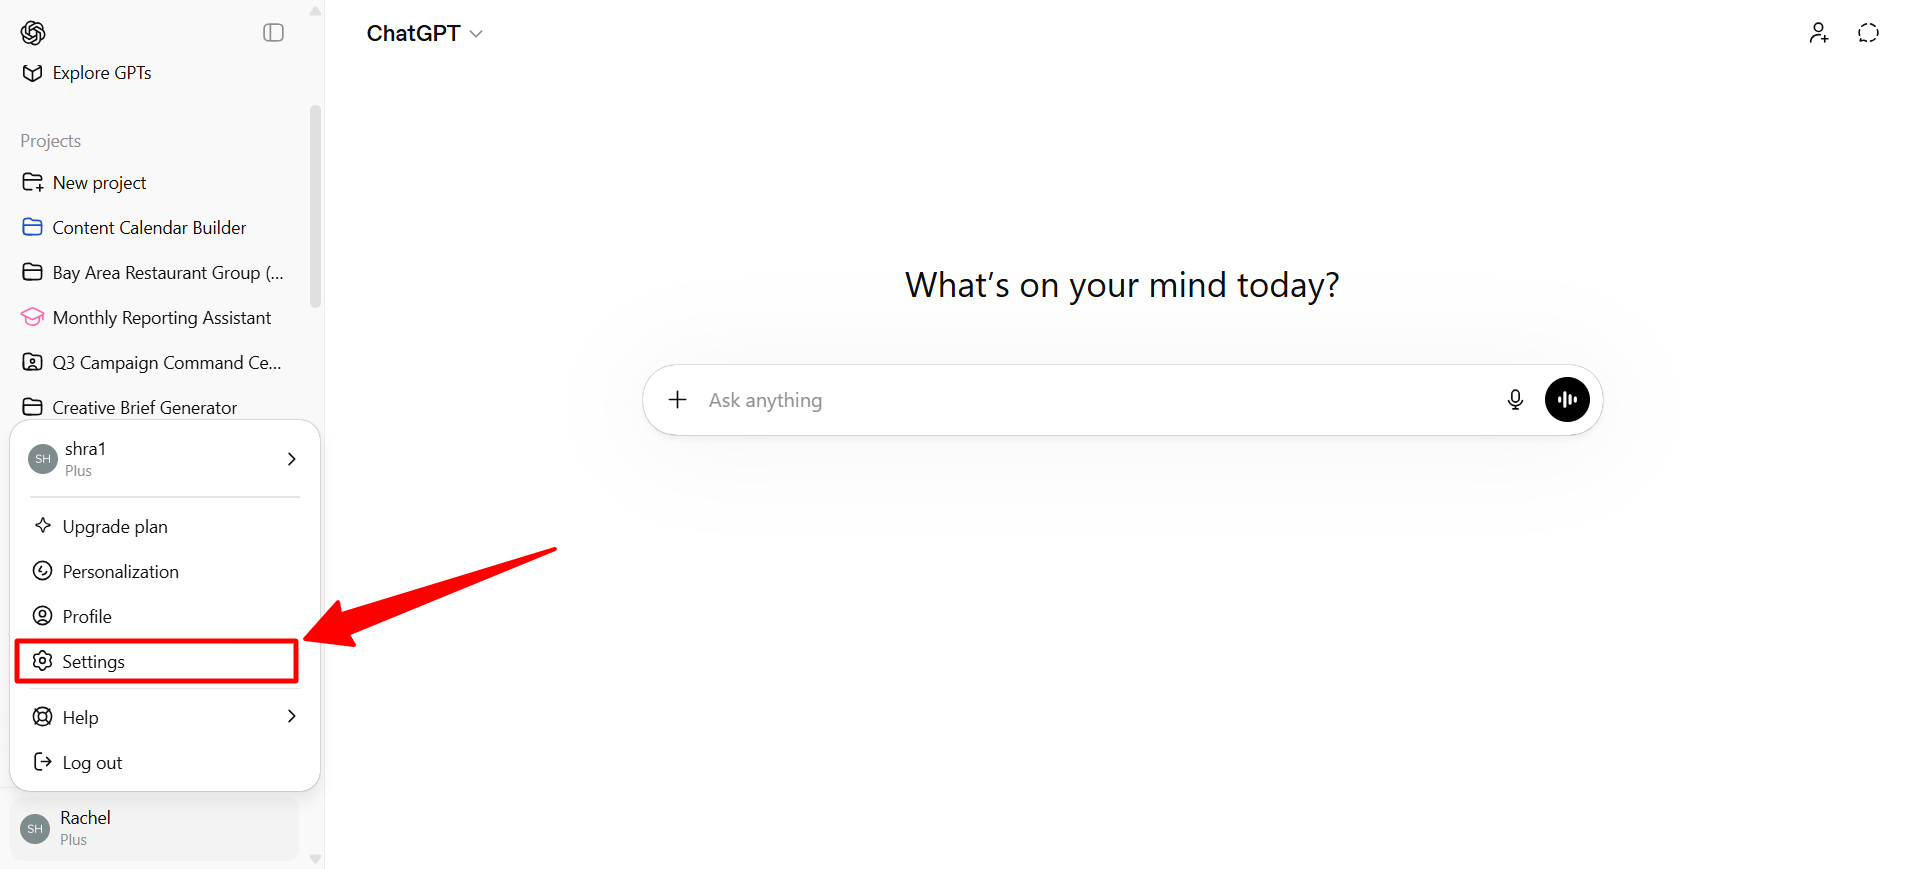
- Open ChatGPT and click your profile icon in the bottom-left corner.
-
Select Settings.
-
In the Settings window, click Apps from the left menu.
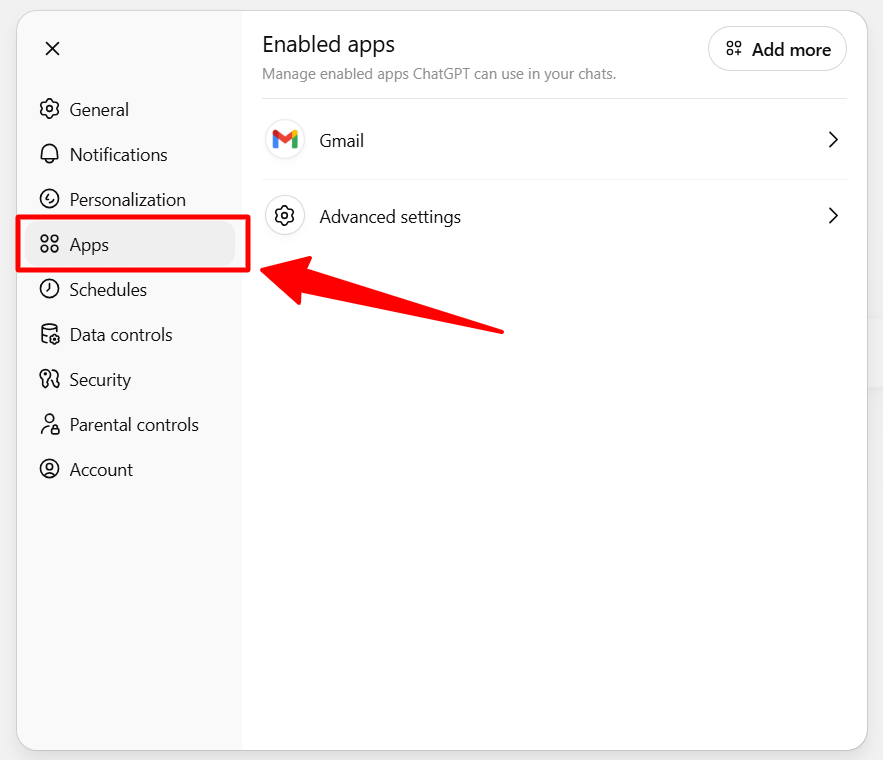
- Open Advanced settings.
- Turn on Developer mode.
-
Once enabled, you will see a Create app button at the top of the Apps section.


If you do not see this option, it may not be available on your plan or may be restricted by your workspace administrator.
How to Set Up SocialPilot MCP in ChatGPT Using SocialPilot Login?
Before you begin, make sure Developer Mode is enabled in ChatGPT.
- Open ChatGPT on the web app.
- Click your profile icon in the bottom-left corner and select Settings.
- Open Apps from the left menu.
-
Click Create app.
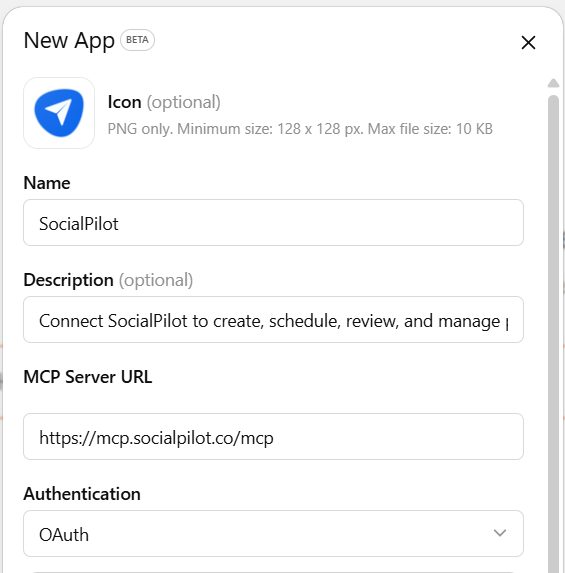
- Fill in the app details:
- Name: SocialPilot
- Description: Connect SocialPilot to create, schedule, review, and manage posts through ChatGPT.
- MCP Server URL:
https://mcp.socialpilot.co/mcp -
Authentication: OAuth

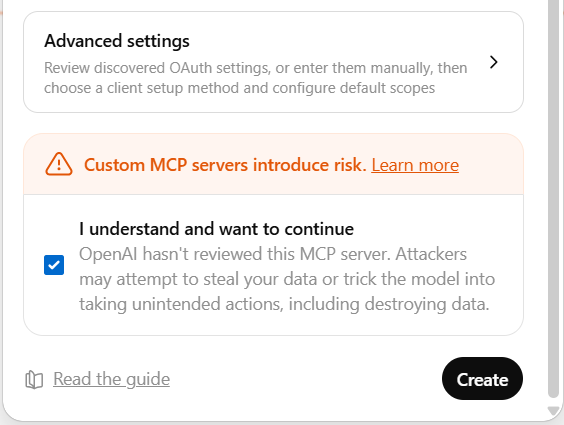
- Review the custom MCP server warning.
-
Check I understand and want to continue and click Create.
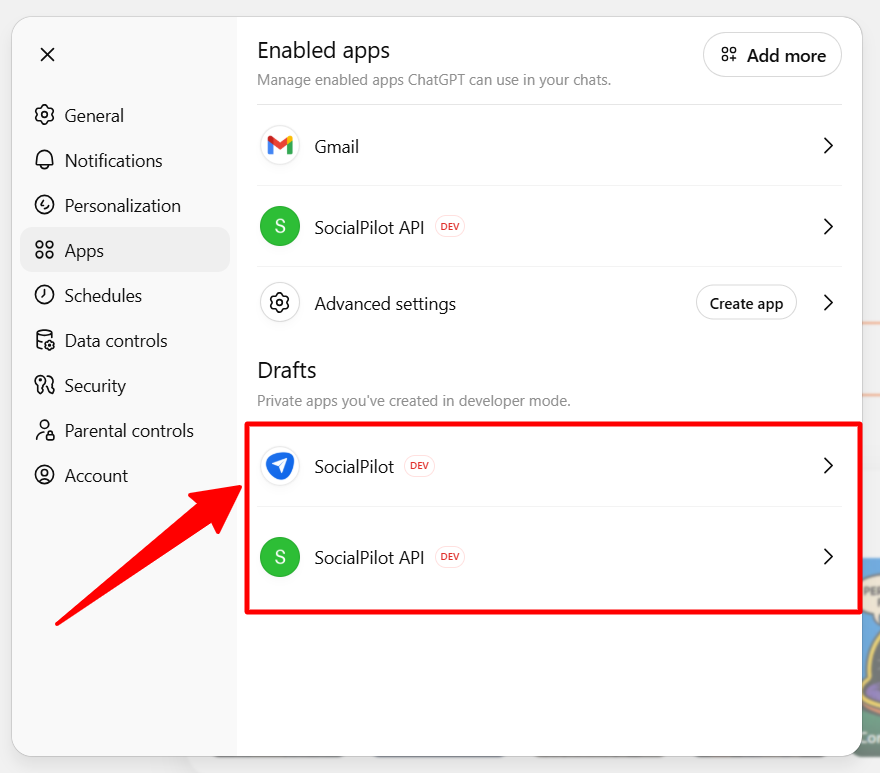
- Once created, the SocialPilot app will appear under Drafts in the Apps section.
-
Click SocialPilot from the Drafts list.
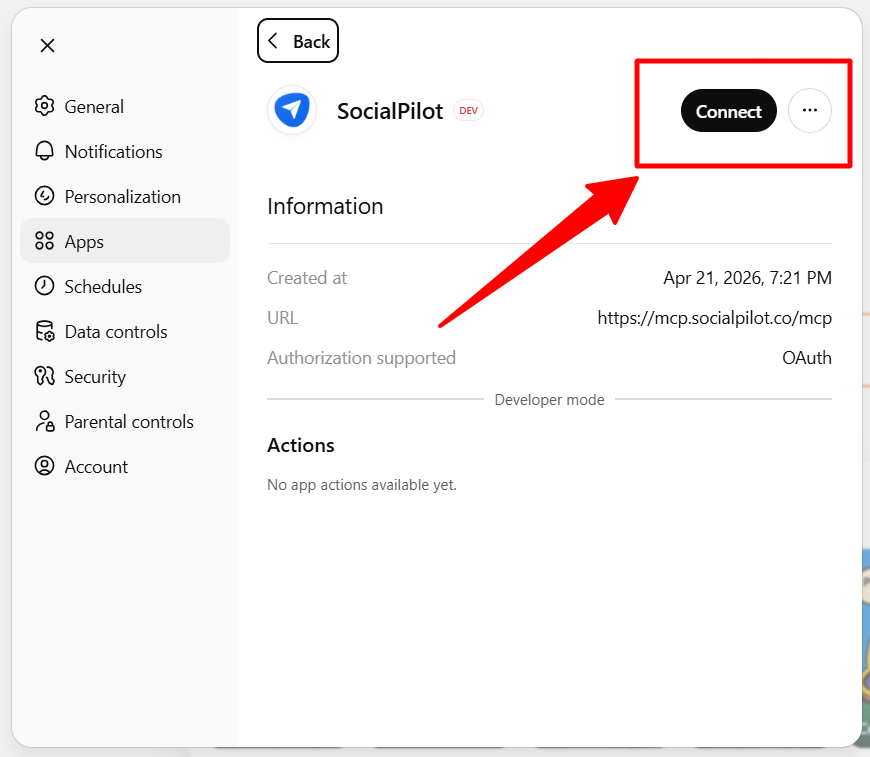
-
On the app details screen, click Connect.
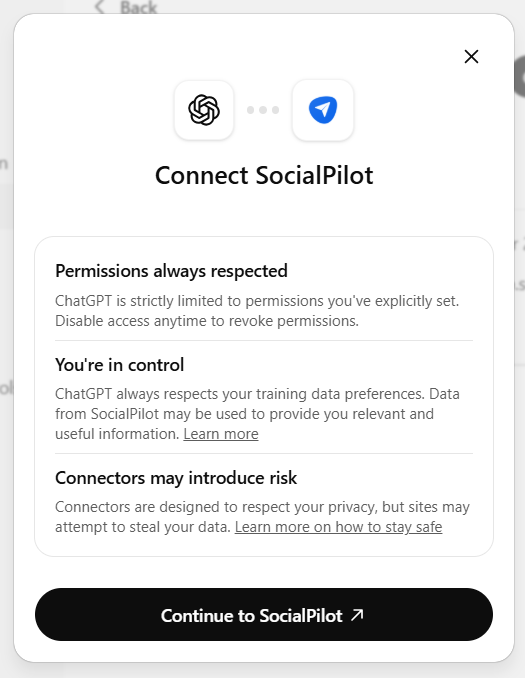
-
In the connection window, click Continue to SocialPilot.
-
Sign in using your SocialPilot email and password.

- Approve the requested permissions.


Once connected, ChatGPT can use SocialPilot to create posts, schedule content, manage drafts, and review publishing workflows.
How to Set Up SocialPilot MCP in ChatGPT Using Your API Key?
If you have already enabled Developer Mode and know how to create an app in ChatGPT, this setup is even faster.
- Open Settings in ChatGPT and go to Apps.
- Click Create app on the right.
- Fill in the app details:
- Name: SocialPilot API Key.
- Description: Connect SocialPilot using your API key for direct access in ChatGPT.
- MCP Server URL:
https://mcp.socialpilot.co/{{API_KEY}}/mcp
Replace {{API_KEY}} with your actual SocialPilot API key.
- Authentication: No Auth.
- Review the custom MCP server notice.
- Check I understand and want to continue and click Create.
- Open SocialPilot API Key from the Drafts list and click Connect.
The connection completes automatically without a login screen.
Once connected, ChatGPT can use SocialPilot to create posts, schedule content, manage drafts, and review publishing workflows.
How to Use SocialPilot in ChatGPT Conversations?
- Open a new ChatGPT conversation.
- Click the + (plus) icon.
- Choose Developer Mode.
- Select the SocialPilot connector to make it available in the conversation.
- Start prompting ChatGPT to carry out SocialPilot workflows.
Example Prompts
Creating and Publishing
- Schedule this launch post to all LinkedIn accounts tomorrow at 10 AM.
- Publish this weekend offer to Instagram and Facebook today at 6 PM.
- Create and schedule a new campaign post for Group X next Monday morning.
Drafting and Reviewing
- Save this post as a draft for Client A.
- Show drafts created this week that need review.
- Update the latest draft with a shorter caption.
Monitoring and Troubleshooting
- What posts are scheduled today?
- Show posts that failed in the last 7 days.
- Which posts missed their scheduled time this week?
Troubleshooting
I Do Not See Developer Mode
Developer Mode is only available on supported ChatGPT plans and may require admin access or workspace permissions.
If you use ChatGPT Business, Enterprise, or Edu, an admin may need to enable Developer Mode first.
I Do Not See Apps or Connectors
Apps and MCP connector access are only available on supported plans and may be limited by workspace settings.
Try using ChatGPT on the web app. Open Settings, then go to Apps and select Advanced Settings.
If your workspace is managed by an admin, they may need to enable access first.
Authentication Failed
Verify your SocialPilot login credentials and try again.
If you are using an API key method, confirm the key is active and entered correctly.
SocialPilot Is Not Appearing in Chat
Start a new conversation, enable Developer Mode if required, and make sure the SocialPilot app or connector is selected for the chat.
Refresh ChatGPT and try again if it still does not appear.
This MCP Server Doesn’t Implement Our Specification
Check that the SocialPilot MCP Server URL is entered correctly and that the server is reachable.
Use: https://mcp.socialpilot.co/mcp
If you are using a custom URL with an API key, confirm the full URL is formatted correctly.
Notes:
- Once connected, SocialPilot remains available in ChatGPT until the connection is removed, expires, or requires reauthorization.
- All SocialPilot actions follow your existing account permissions.
- Access is limited to the accounts, groups, and features already available in your SocialPilot workspace.
- You can disconnect SocialPilot later from the Apps section in ChatGPT settings.
- Some ChatGPT plans or managed workspaces may require admin approval for apps or Developer Mode.
- If your SocialPilot password, permissions, or authentication settings change, you may need to reconnect the app.