How to Create a Custom Post in the New Create Post Dashboard?
SocialPilot offers a powerful feature set that allows you to customize your posts for each social network you manage, ensuring that your content is tailored to the unique audience and functionality of each platform. Whether you're posting on Facebook, Instagram, Twitter, LinkedIn, Google Business Profile, Pinterest, or YouTube, the customization options help you optimize your posts for maximum engagement.
With the redesigned Create Post, per-network customizations are now handled within the Platform Options panel and via the network tabs when Customization mode is enabled. The Media section, Preview, and Error panel work together to keep customizations transparent and to surface any platform-specific issues before scheduling.
In This Article
- Why Customize Your Posts?
- How Does the New Customization Option Work?
- How To Add Media?
- Canva Integration
- Mentions and Mention Groups
- Platform-Specific Options
- Audience Targeting
- Location Tags
- Custom Fields
- UTM Parameters
- Hashtags
- CTA Buttons
- First Comment
- Image Tagging
- Content From Library
- Preview & Error Panel
Why Customize Your Posts?
Each social platform has different content patterns and publishing capabilities. Customizing captions, media arrangement, and platform options helps your post look native to the platform, improves engagement, and prevents publishing errors that can occur when the same post is sent to networks with different rules.
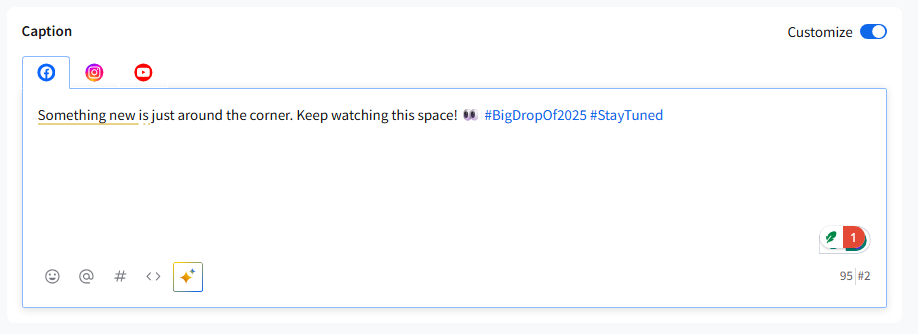
How Does the New Customization Option Work?
- Customization OFF (Original Draft): You create a single caption and media set (the Original Draft). That single draft is applied to all selected networks that support the content. Use this when you want the same message everywhere.
- Customization ON (Platform Tabs): Switch customization ON to open network-specific tabs. Each visible platform tab (only platforms with at least one selected account) becomes editable independently—you can change caption text, enable/disable mentions, add platform-only first comments, and toggle platform options. This creates a Custom Post for each network.
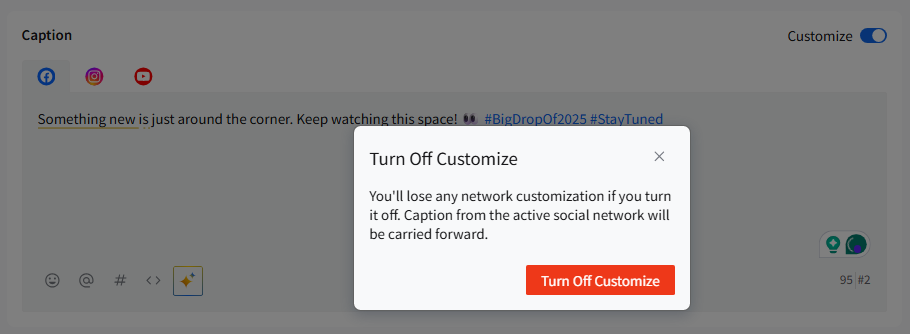
- Important: Switching from ON → OFF will remove per-network customizations (a confirmation pop-up appears before losing them) and the last customized version will become the single, original draft. Customizations saved in the Original Draft do not automatically carry over to platform tabs unless you copy them across.
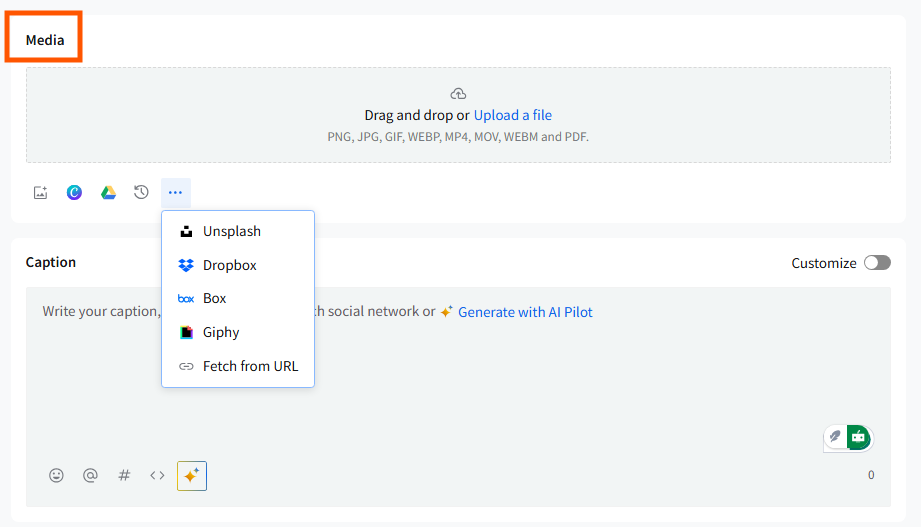
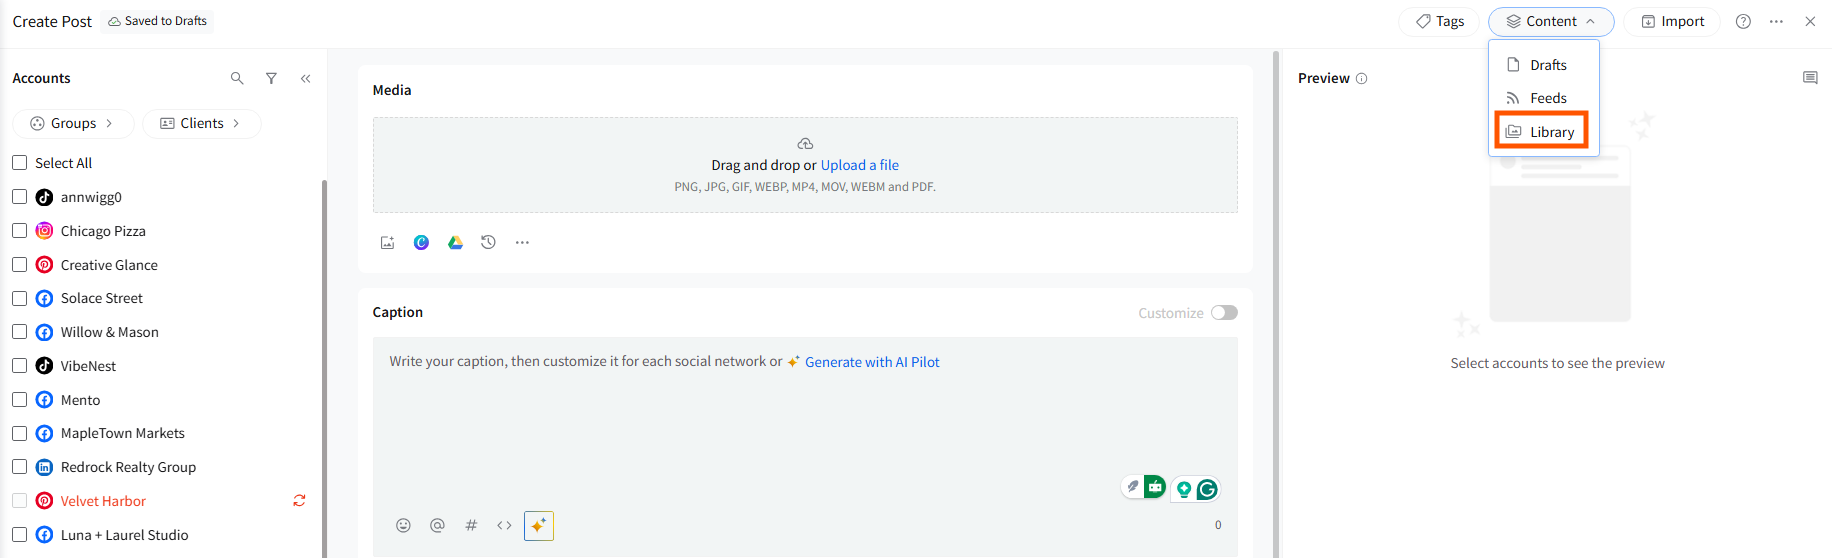
How To Add Media?
Visual content is a powerful tool for capturing attention on social media. SocialPilot allows you to easily add images to your posts, whether they are your own or sourced from a vast library of stock images. The new Create Post now has a dedicated section for Media at the top. Here’s how you can add media to your content:
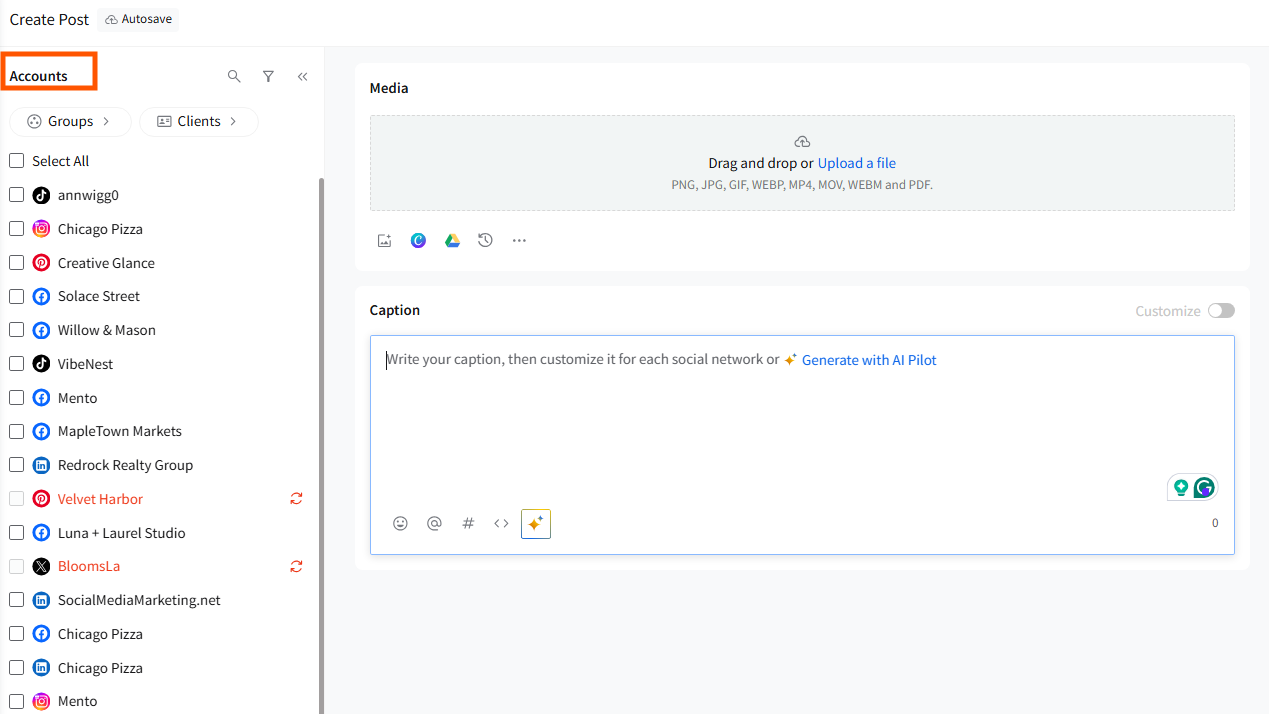
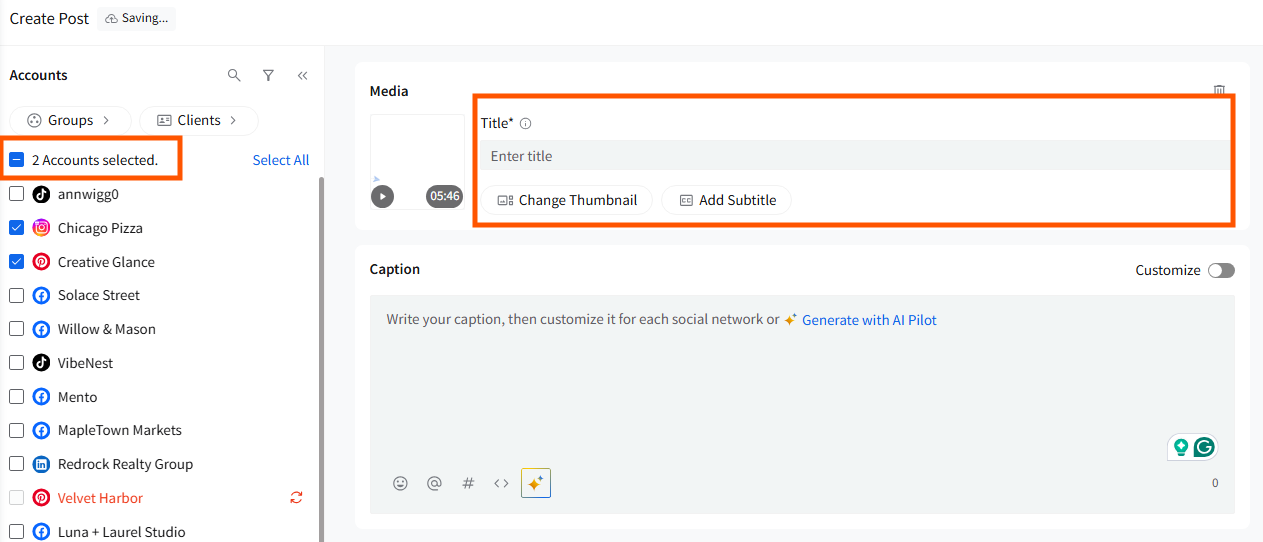
- Go to the Create Post section in SocialPilot.
- From the left panel, choose the account(s) you want to publish to.
- The new Create Post supports one media type per post (image(s) or video or GIF, or document). This means a custom post cannot contain both images and videos for a single post.
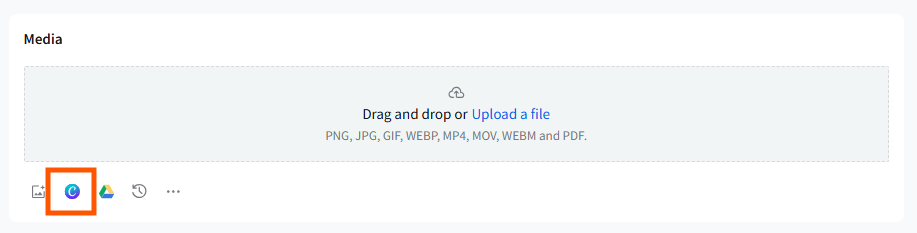
- The new Media section supports upload, drag-and-drop, and imports from Google Drive, Dropbox, Box, Unsplash, GIFs, and Canva. You can also simply copy and paste images directly into the Media section.
- Media is now organized into three tabs: Upload, External Source, and Recently Uploaded. Recently Uploaded stores all media you've added in the last 7 days, making it easy to reuse assets across drafts without uploading again.
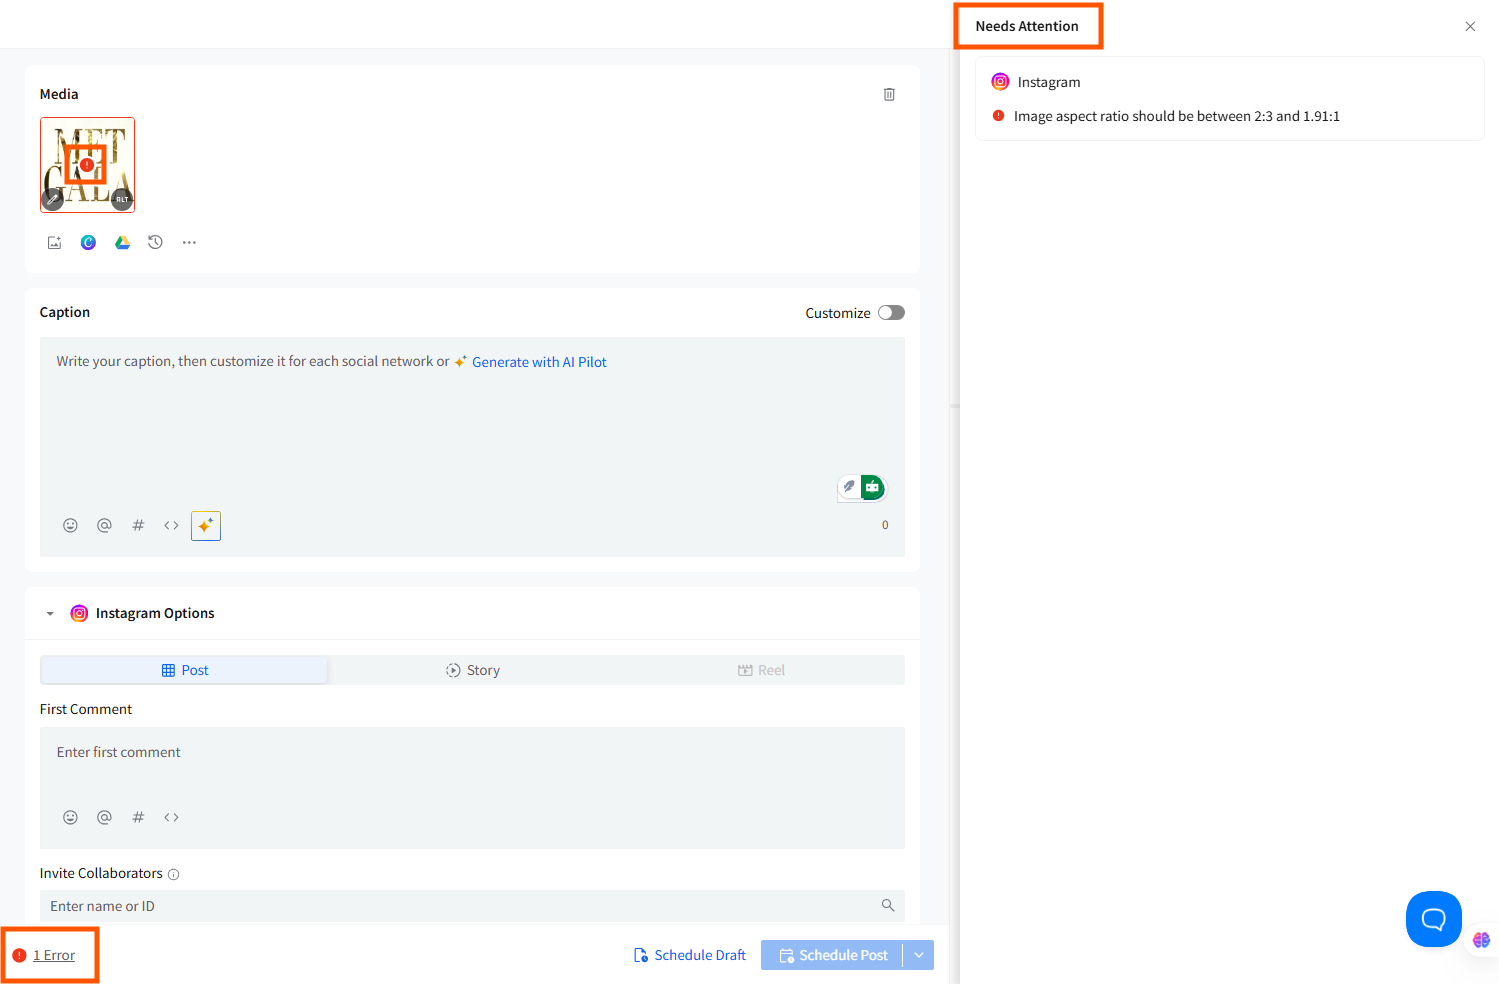
- If you add a conflicting media type, the right-side error panel highlights the issue and disables the scheduling button until it is fixed.
- Media previews update in real time in the right panel based on the selected platform and selected media (image, carousel, video, Reel, etc.).
- Upload limits and platform-specific checks (size, duration, aspect ratio, and formats) are shown as explicit errors in the right panel if requirements are not met.
- Any media option (alt text, tag people, subtitles, change thumbnail) shows only when the user has at least one connected account that supports that option (accounts may be paused or require reconnection; they still trigger option visibility).
Canva Integration
Canva now works exactly like any other media input inside the new Media section.
Accessing and Designing in Canva
- Inside Create Post, open the Media panel and click the Canva button to create an image or video. Pick the size of the design to get started.
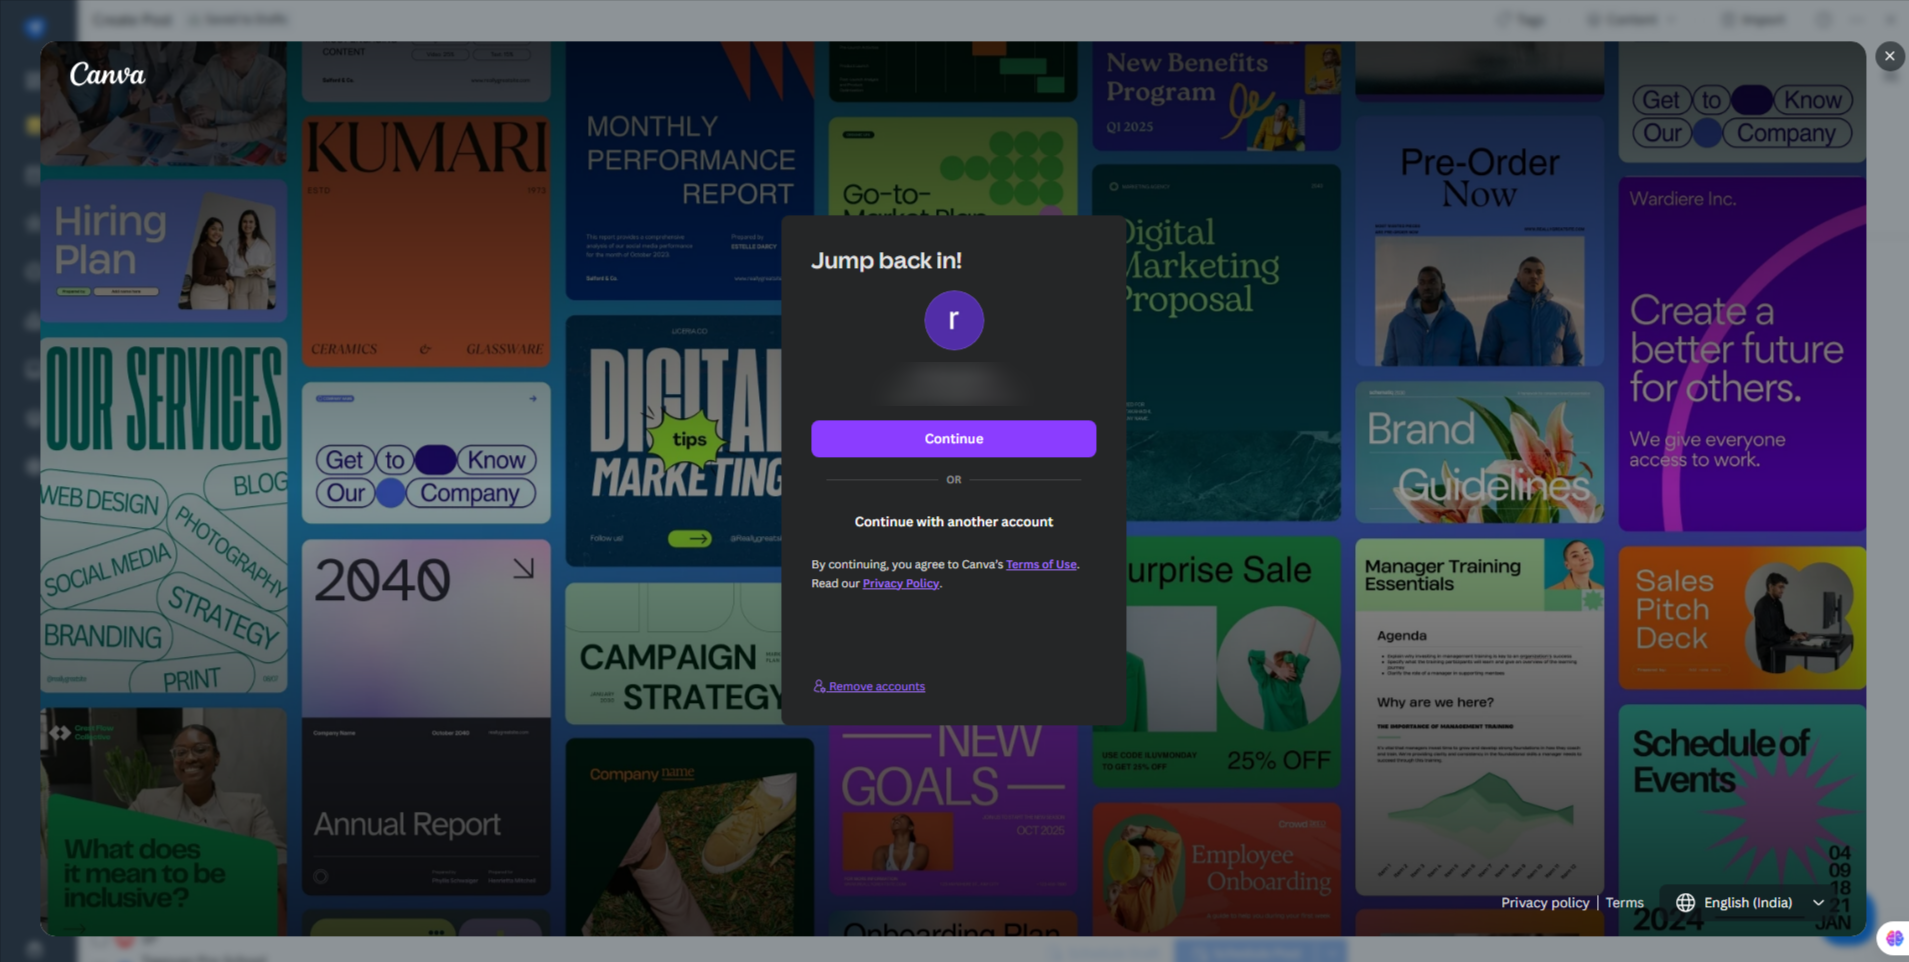
- A pop-up appears asking you to log in/sign up to Canva.
- Create your image or bring your designs from All Your Design Folders and click on the Publish button to add the creative to your post.
How Canva Imports Work in the New Create Post
Canva imports now follow all updated media rules:
- Canva works like any other media source (local device, cloud, Unsplash).
- You can bring up to 4 images or 1 video from Canva into a post.
- Canva designs appear inside the Media section immediately after publishing.
- Every Canva design you add also appears in Recently Uploaded (last 7 days), so you can reuse it quickly.
- Media-type rules apply: you cannot mix images and videos.
Once the Canva design is attached, add your caption, first comment, mentions, hashtags, etc. Select accounts and schedule normally.
Mentions and Mention Groups
The new Create Post includes a unified and more intuitive mentions experience.
Adding Mentions:
- Typing @ in the caption (or clicking an existing @ or the Mention icon) opens the Mention Dialogue Box.
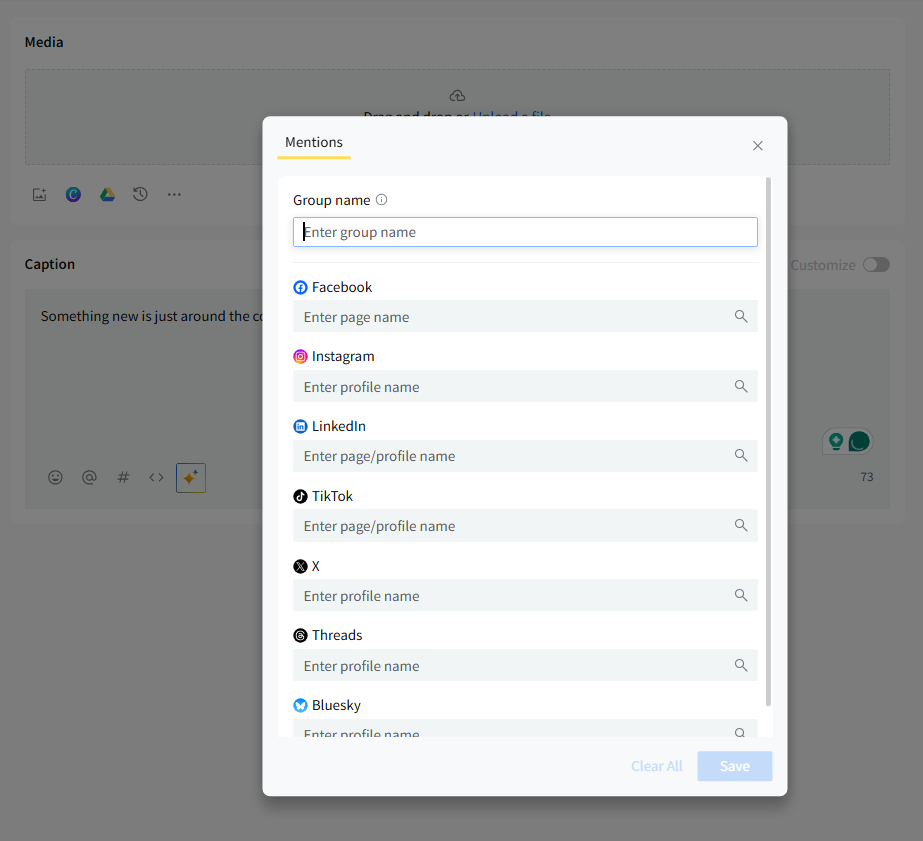
- When Customization is ON, mentions are edited per platform inside each tab and do not automatically carry to other tabs.
Mention Groups
When customization is OFF, you can save sets of mentions as Mention Groups. Mention Groups make it easy to reuse and update sets of mentions.
You can add and save Mention Groups and use them whenever you create a new post.

Platform-Specific Options
Every platform gets its own dedicated section inside Platform Options, visible only when at least one account for that platform is selected.
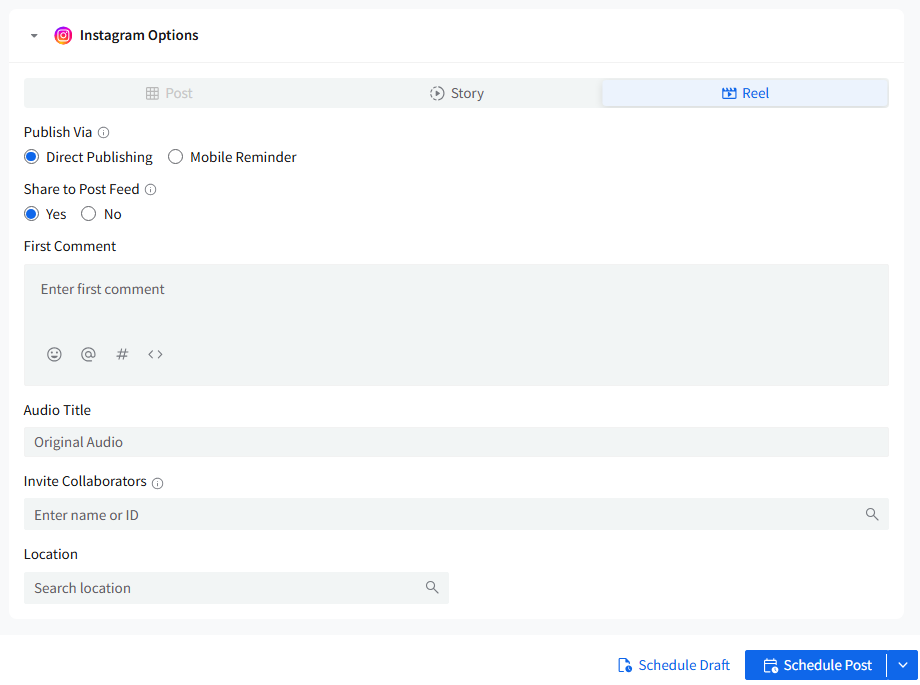
- Instagram – Post, Story, and Reel, Publish via Share to Post Feed, First Comment, Audio Title, Invite Collaborators, and Location.
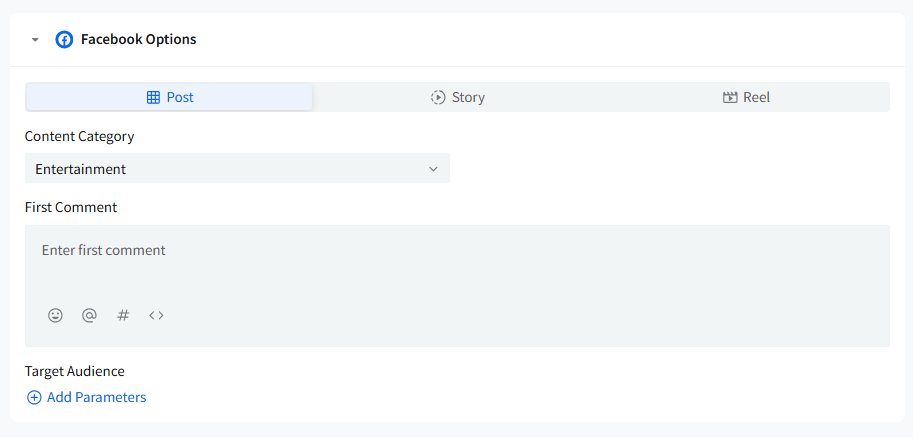
- Facebook – Post, Story, and Reel, Content Category, First Comment, Target Audience.
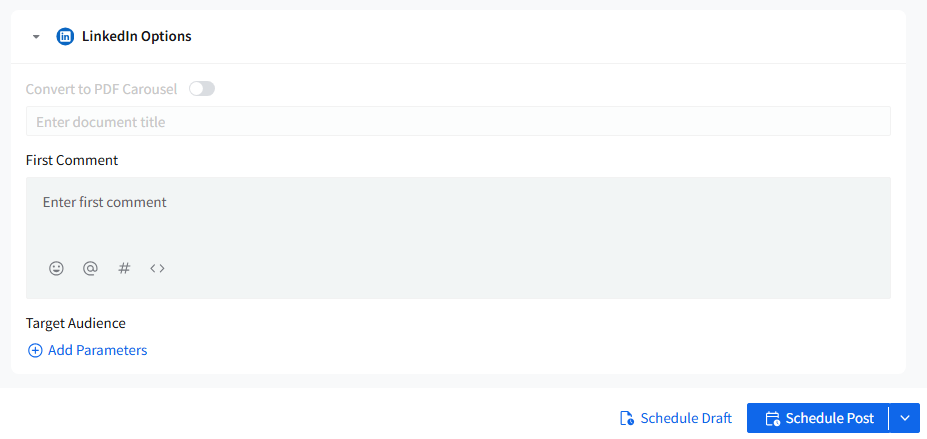
- LinkedIn – Audience targeting, First Comment, Convert to Carousel Toggle.
- X (Twitter) – Single Media requirement, Mentions, Custom Fields, Hashtags, Emojis
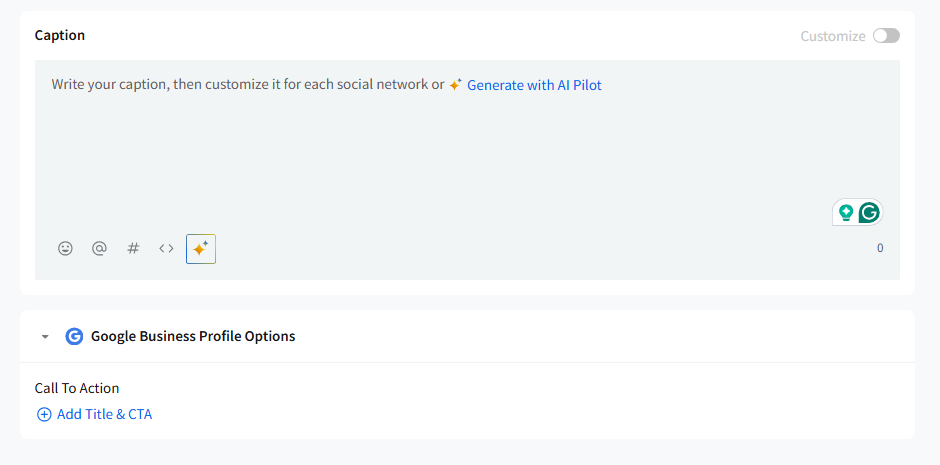
- Google Business Profile – CTA
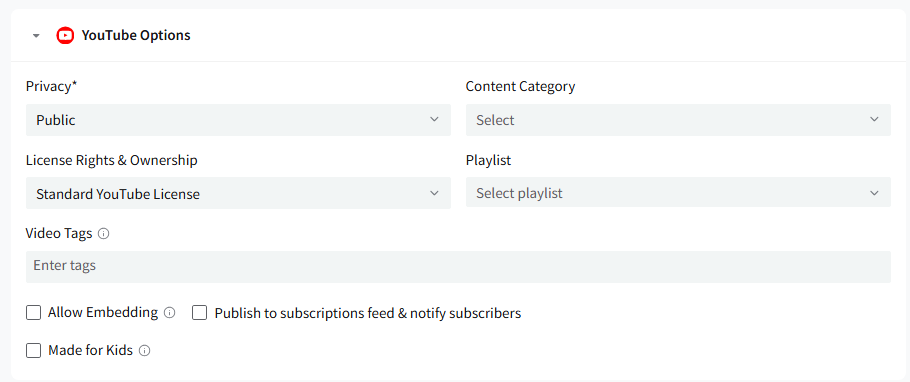
- YouTube - Privacy, Content Category, License Rights and Ownership, Playlist, Video Tags
- TikTok - Title, Publish Via, Auto Add Music, Privacy, Disclose Content, Allow Users to

- Pinterest - Title, Destination URL, ALT Text for Pin

- Bluesky - Single Media requirement, Mentions, Custom Fields, Hashtags, Emojis
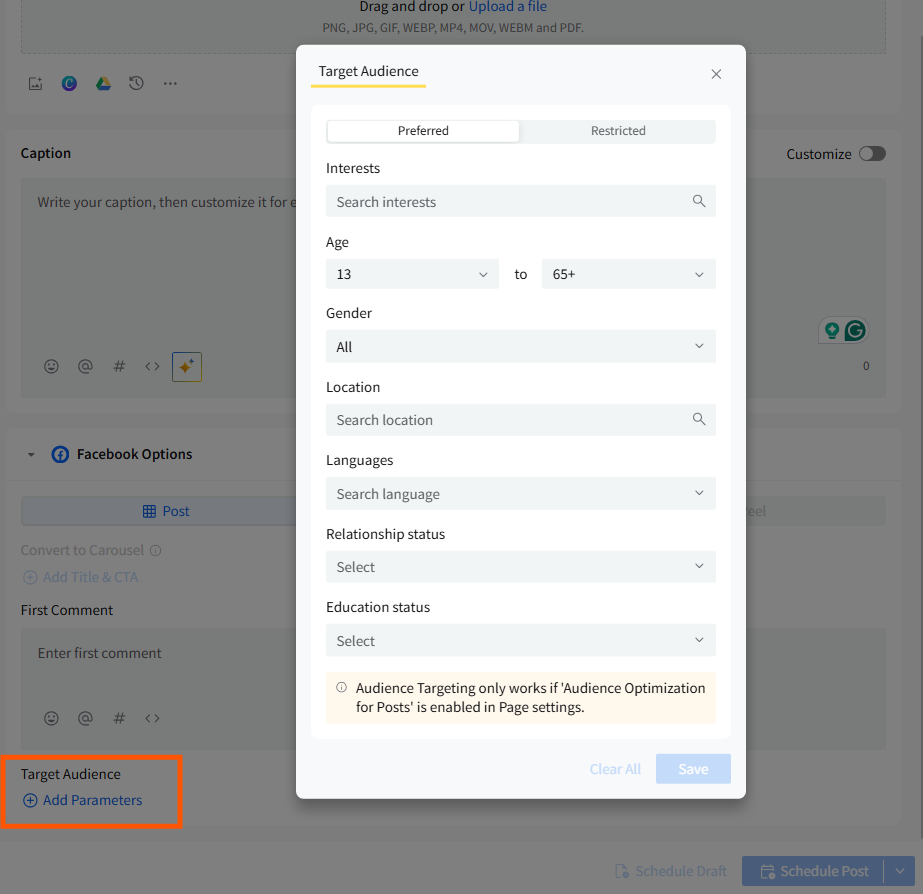
Audience Targeting
Audience Targeting helps you reach more relevant users on Facebook Pages and LinkedIn Company Pages.
To apply targeting:
- Switch to the Facebook or LinkedIn tab.
- Click Audience Targeting.
- Select Preferred or Restricted Audience for Facebook.
- Select demographics such as industry, seniority, or company size for LinkedIn.
If targeting is unavailable due to platform restrictions, the error panel will notify you.
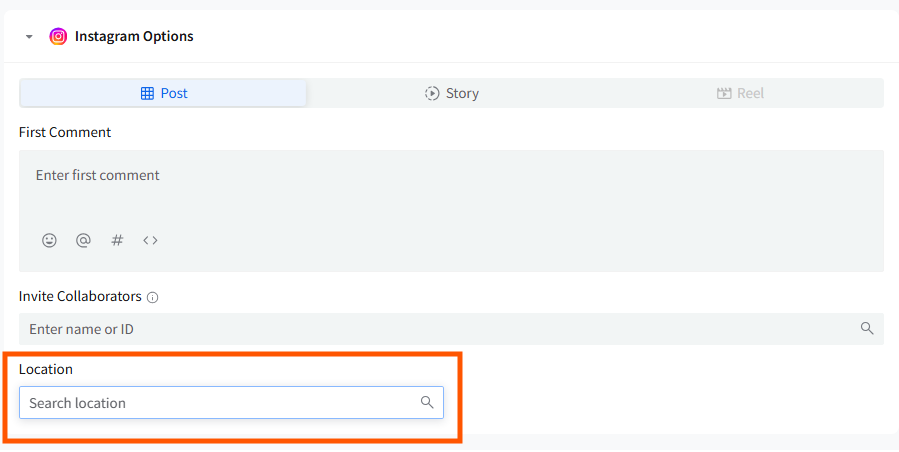
Location Tags
Location tags help improve the visibility of your posts among local audiences. For platforms that support location tagging, such as Instagram, you can add a location by opening the Platform Options section that appears below the caption box once the account is selected and clicking on Location to choose the appropriate location.
Custom Fields
Custom Fields help you store commonly used text snippets like contact information, URLs, disclaimers, and promotional lines. Custom Fields are now accessible in the caption editor and apply at the post level.

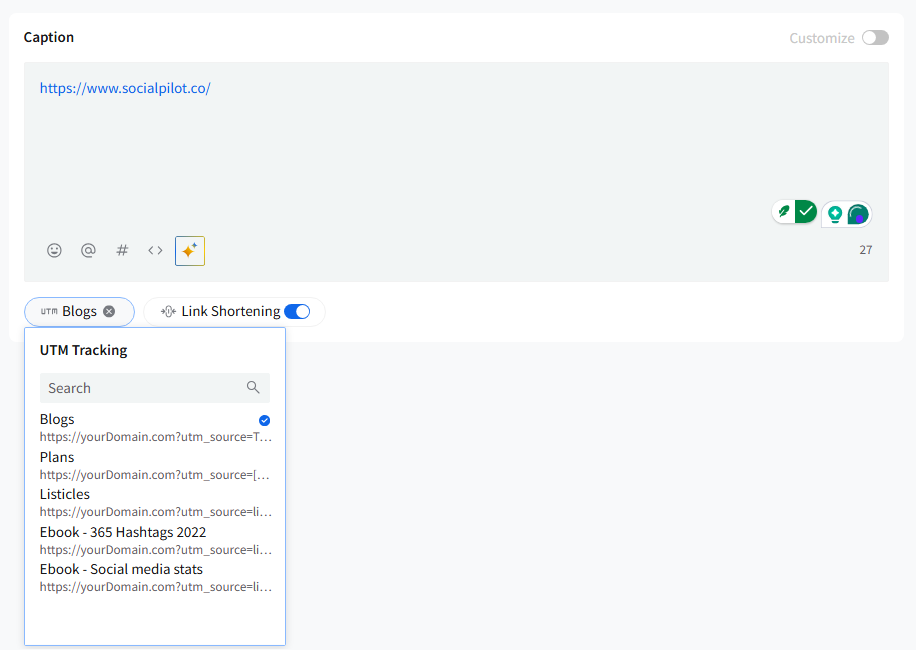
UTM Parameters
Tracking the performance of your campaigns is crucial. UTM parameters allow you to monitor how well your posts are driving traffic and engagement. You can add these tracking codes to your links to measure the effectiveness of your campaigns.
To add UTM tracking:
- Add a URL in the caption.
- Click the UTM icon.
- Choose a UTM set or remove tracking if needed.
If a default UTM set is active, it will be applied automatically.
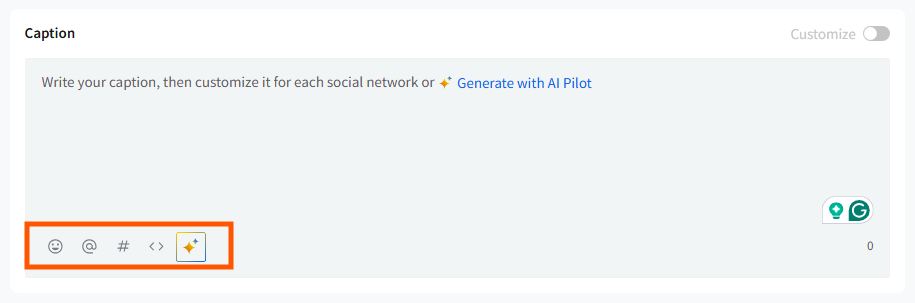
Hashtags
Hashtags can be added directly in the caption editor. You can type them in manually, one by one, or click the Hashtags option to choose a saved hashtag set from your Content Library and insert it into your caption with a single click.

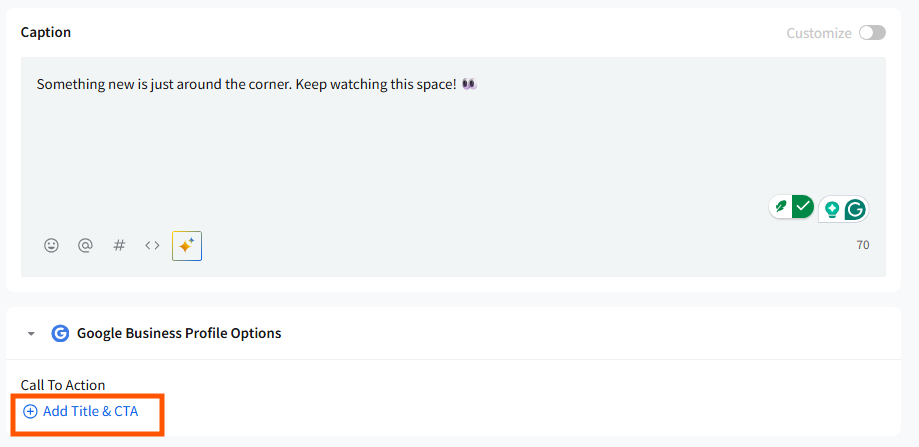
CTA Buttons
Call-to-action buttons make your posts more interactive and help drive specific actions, such as visiting a website or making a purchase. You can add call-to-action buttons to your posts for Facebook pages and Google Business Profiles from the respective platform tabs.
First Comment
Keeping your captions clutter-free can improve the readability of your posts. SocialPilot allows you to schedule the first comment along with your posts. For Facebook, Instagram, and LinkedIn posts, you can schedule the first comments along with the actual posts to keep the captions clutter-free.
The First Comment field appears inside the platform tab when the supported platform is selected.
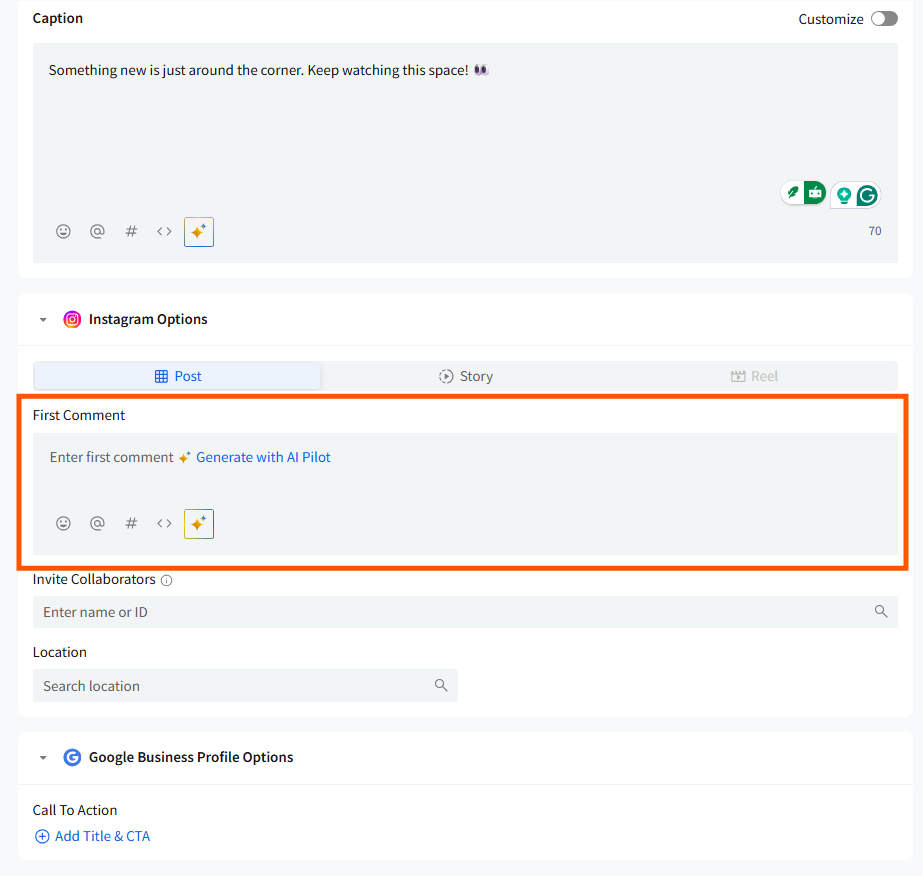
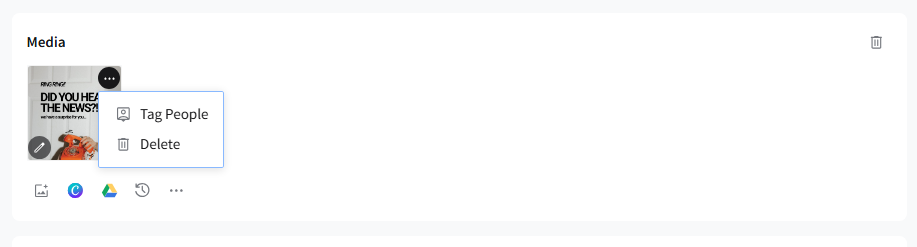
Image Tagging
Image tagging helps increase your post’s visibility by tagging relevant accounts on your image. Supported platforms include Instagram Business/Creator accounts (up to 9 tags per image) and Facebook Pages.
After uploading an image, choose the Tag People option on it and select the profiles to tag.
Content From Library
SocialPilot provides users with a built-in Content Library to create and store digital assets in account-wise folders that they need to add to their social media posts regularly. These assets include complete posts, texts, links, images, hashtags, etc.
Preview & Error Panel
The right side of Create Post shows platform-specific previews for all selected accounts.
Live Preview
Shows how your post will appear on each platform:
- Caption
- Media
- First comment
- Link preview
- Reels/Shorts layout (if applicable)

Error & Requirement Panel
Shows:
- Unsupported media formats
- Missing fields
- Character limit errors
- Platform restrictions (e.g., X allows one media type)
- Reels or video requirement mismatches
You must resolve these errors before scheduling.

Related Articles:
-
How to Customize Posts for Google Business Profile in the New Create Post?
-
How to Customize Posts for Instagram in the New Create Post?
-
How to Customize Posts for Pinterest in the New Create Post?
-
How to Create a TikTok Carousel on SocialPilot in the New Create Post Experience?
- Using the Accounts, Groups & Clients Panel in the New Create Post
- How to Use Platform Options in the New Create Post Experience?
- Create Post Errors in SocialPilot and How to Fix Them