Getting Started With SocialPilot
Introduction
Social media management can be overwhelming with so many platforms to manage. SocialPilot makes it easy by allowing you to automate posts across multiple platforms, saving you time and helping you build your brand more efficiently. This guide will walk you through the steps to get started with SocialPilot, allowing you to take control of your social media efforts in just a few simple steps.
You are just 9 easy steps away from a better way to manage your social media. Open your SocialPilot account in another tab and follow along.
In This Article
- Connect Social Accounts
- Set Up Posting Schedules
- Create Your First Post
- Visualize the Posting Queue With Calendar
- See What Works With Analytics
- Invite Team Members
- Go Mobile With Apps and Extensions
- Other Great Features
Connect Social Accounts
The first step to using SocialPilot is to connect your social media profiles to SocialPilot.
- Click Accounts -> Connect Account to connect one of the profiles listed below.
- Facebook: Page, Group
- Twitter: Profile
- LinkedIn: Profile, Page
- Pinterest: Board
- Instagram: Profile, Business (Professional)
- YouTube: Channel
- Tumblr: Blog
- Threads: Profile
- Google Business Profile: Chain Locations
- TikTok: Profile
- Bluesky: Profile

- Once you click on the Connect button, you will be redirected to the social media platform and be asked for authorization.
- Accept all permissions to continue.
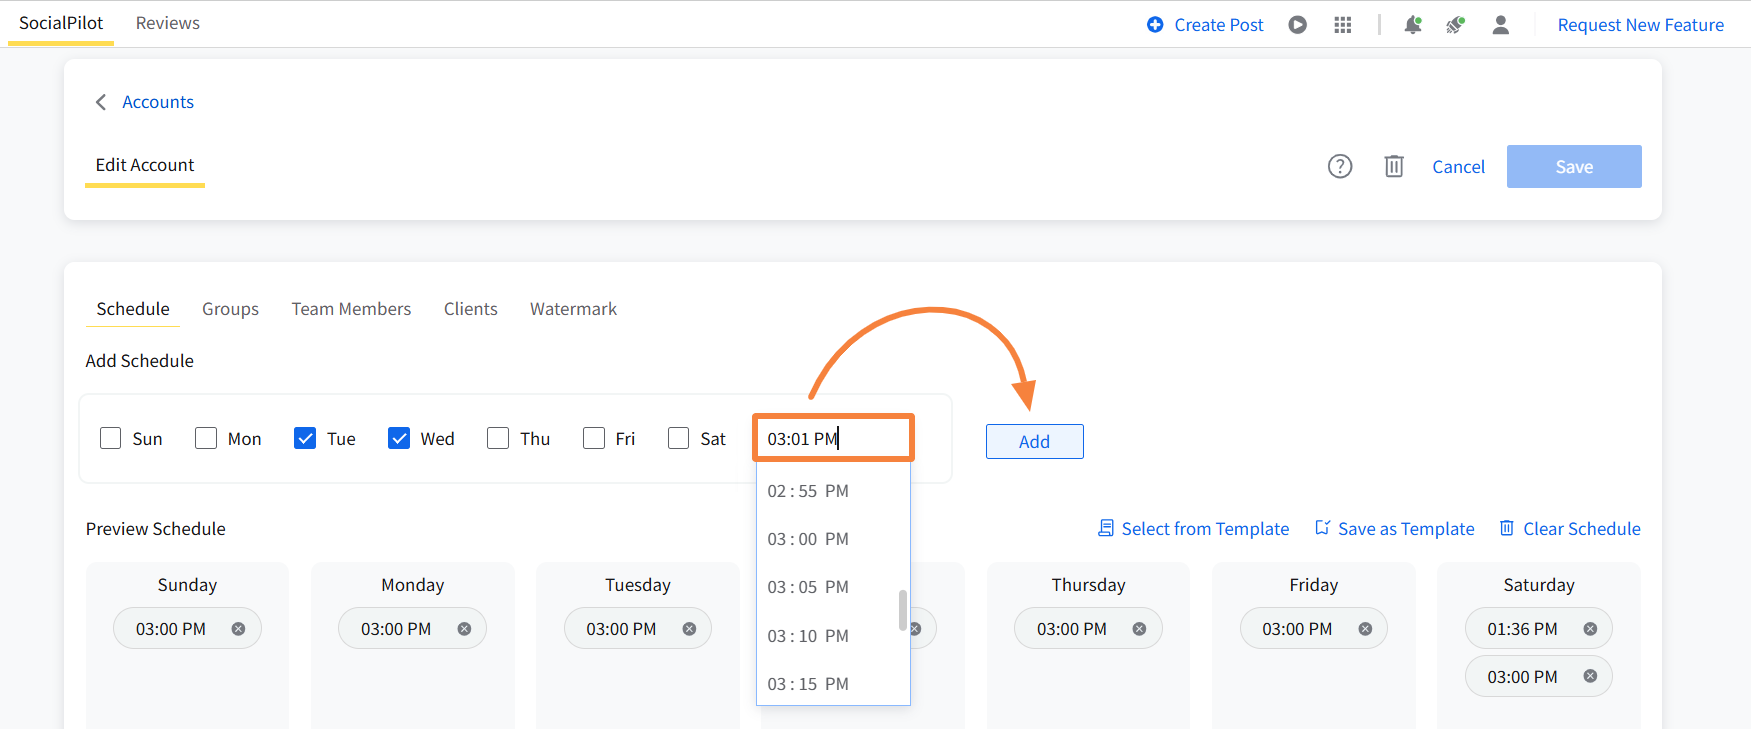
Set Up Publishing Schedules
Once your accounts have been connected to SocialPilot, you can manage your scheduled publishing by creating posting schedules. Posts added to your queue will be automatically scheduled during the next available time slot according to the posting schedule you have set up. Follow these steps to establish your posting schedule:
-
Go to Accounts -> Manage Accounts.

-
Select the social account for which you want to define a posting schedule.

-
Set time slots for posting by adding a time in the given field, selecting the days that you want to assign it to, and clicking on Add.
-
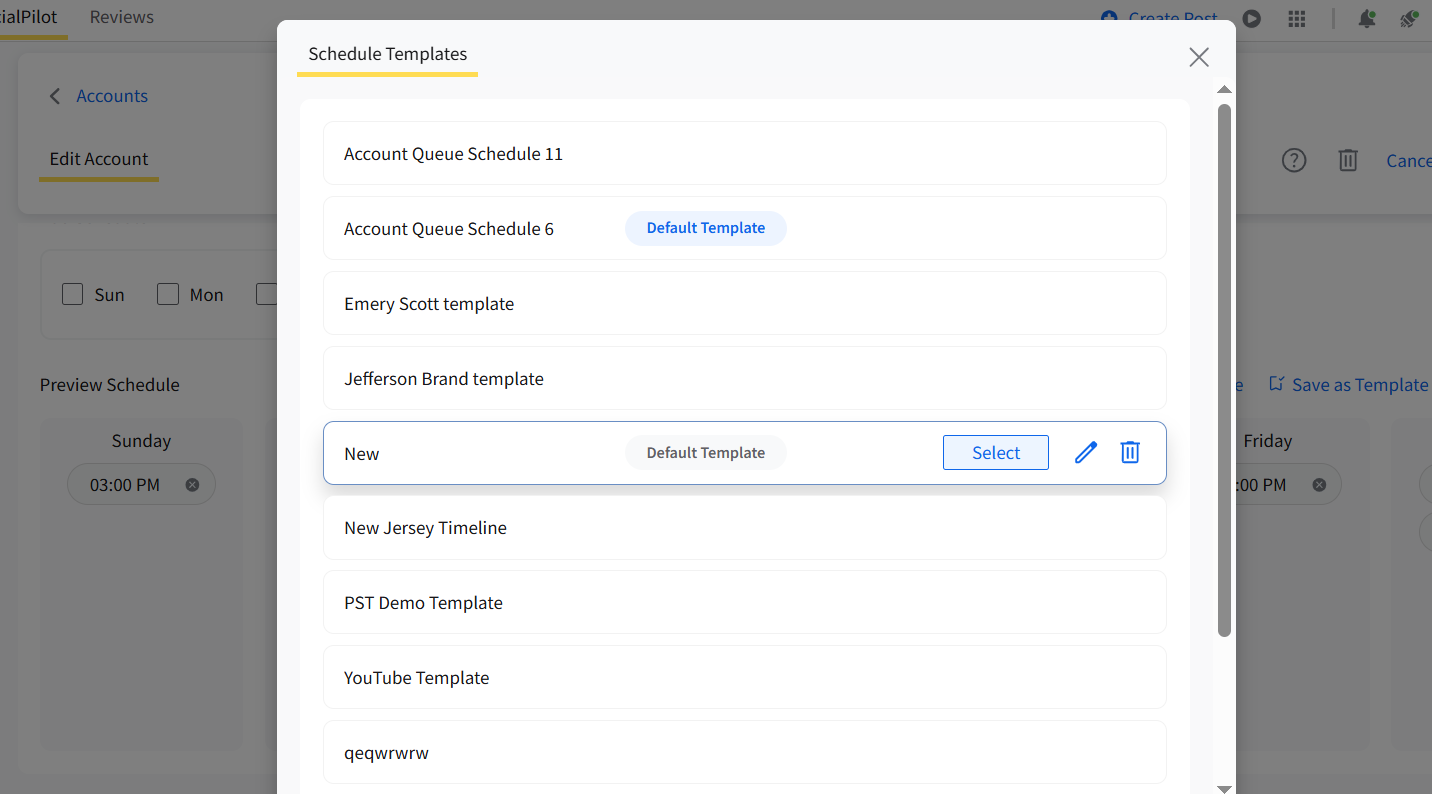
You can also click on Select from Templates to customize your scheduling timeslots with a simple click.
- Once you have added all the timings you want for each day, click the blue Save button.


Your posts are now scheduled and will be automatically published at the designated times.
Create Your First Post
SocialPilot seamlessly schedules and publishes to your connected social media profiles. Posts can be made to individual social media accounts or to multiple accounts all at once.
The new Create Post screen is divided into three areas—accounts on the left, composer in the center, and previews on the right—to make the workflow smoother and more intuitive.
Follow these steps to create a post:
Now, here's the step-by-step description of creating a post with SocialPilot:
-
To create a new post, click Posts -> Create Post.
Select the accounts you want to publish to.
Use the left Accounts, Groups & Clients panel to pick accounts or groups.
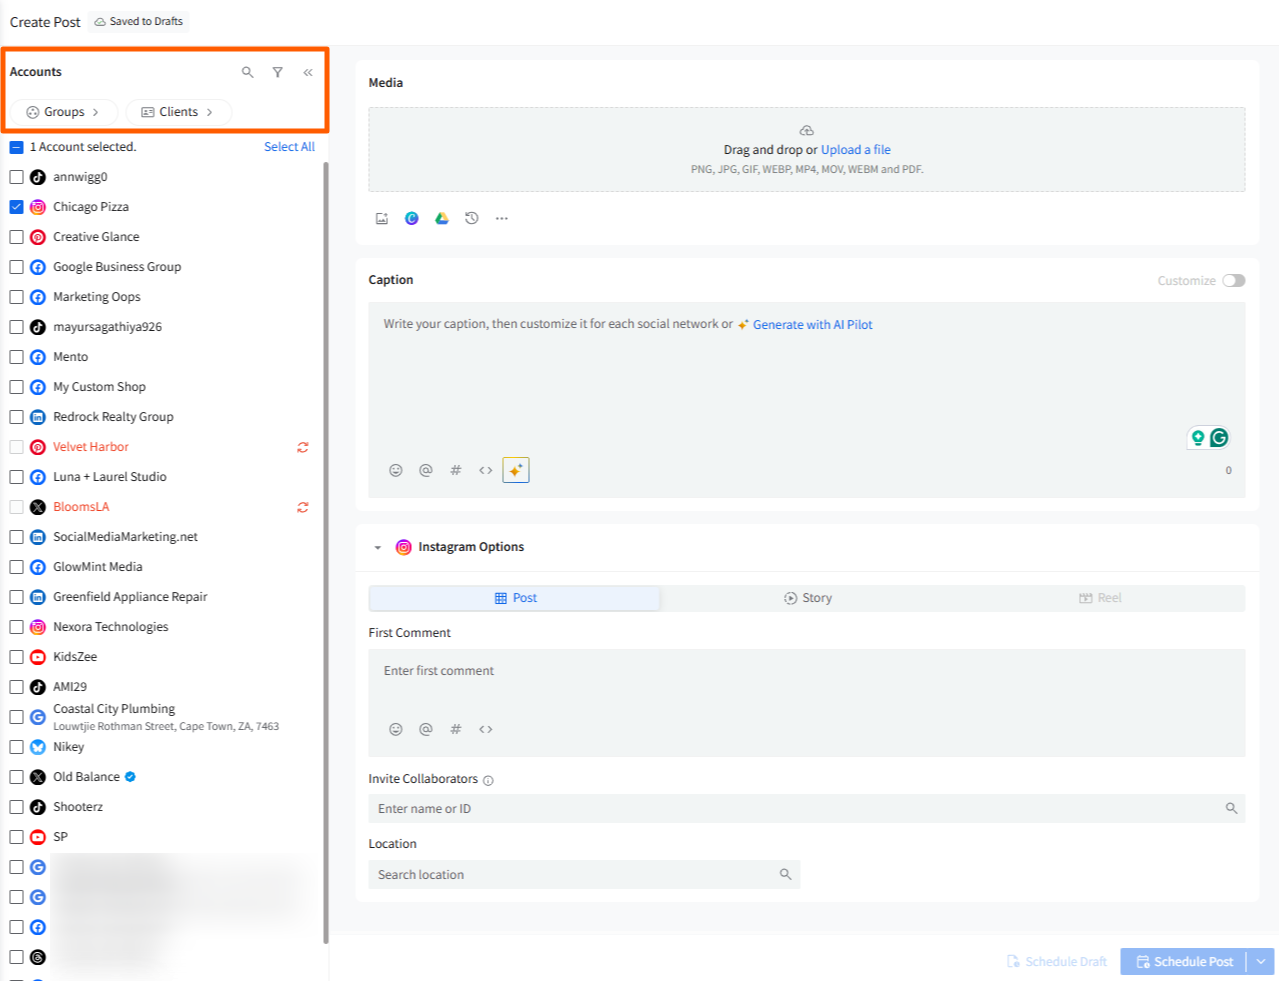
- You can filter accounts by platform from the top of the panel.
- Accounts now appear alphabetically, with connection status clearly marked.
- The panel can be collapsed to give you more writing space while keeping selected accounts visible.
-

- You can filter accounts by platform from the top of the panel.
- Accounts now appear alphabetically, with connection status clearly marked.
- The panel can be collapsed to give you more writing space while keeping selected accounts visible.


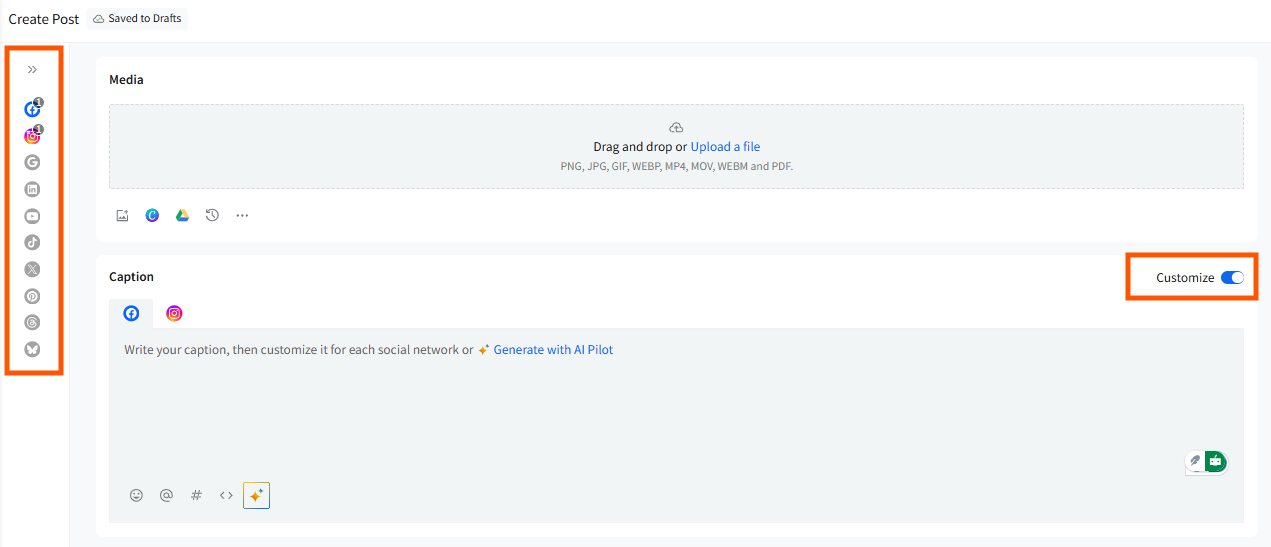
- Write your caption in the center composer. If you want to customize the caption platform-wise, simply turn on the customization toggle.
- The caption box includes emojis, hashtag sets from your Library, and Custom Fields.
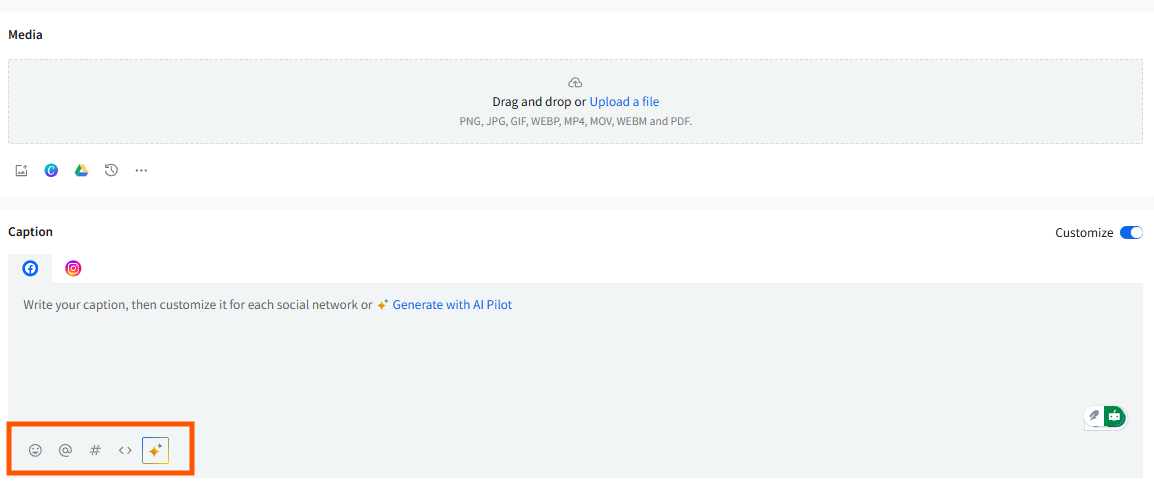
- AI Pilot (marked by the star icon) helps you generate, rewrite, or enhance content.
- If the caption area is empty, AI Pilot opens with prompt ideas.
- If text is present, AI Pilot shows smaller rewrite/expand/shorten/tone options for quick edits.
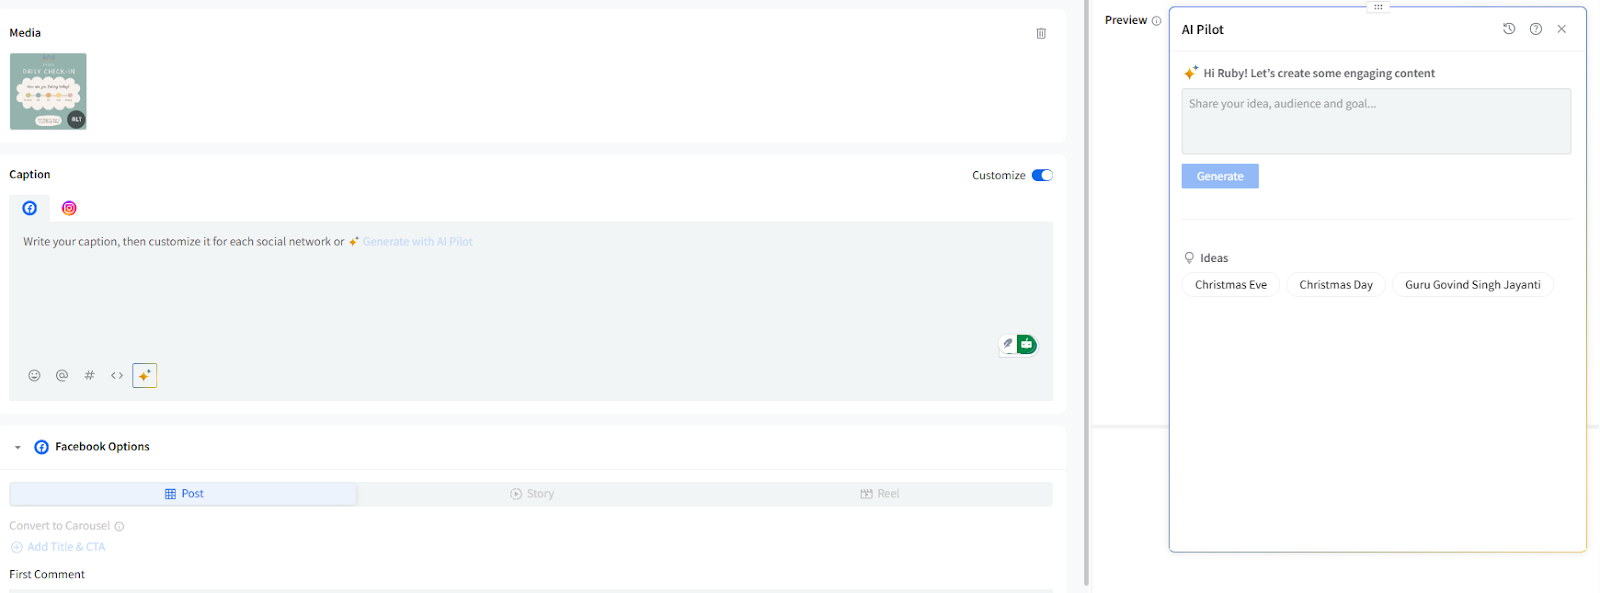
- Autosave ensures your work is saved automatically as you type.
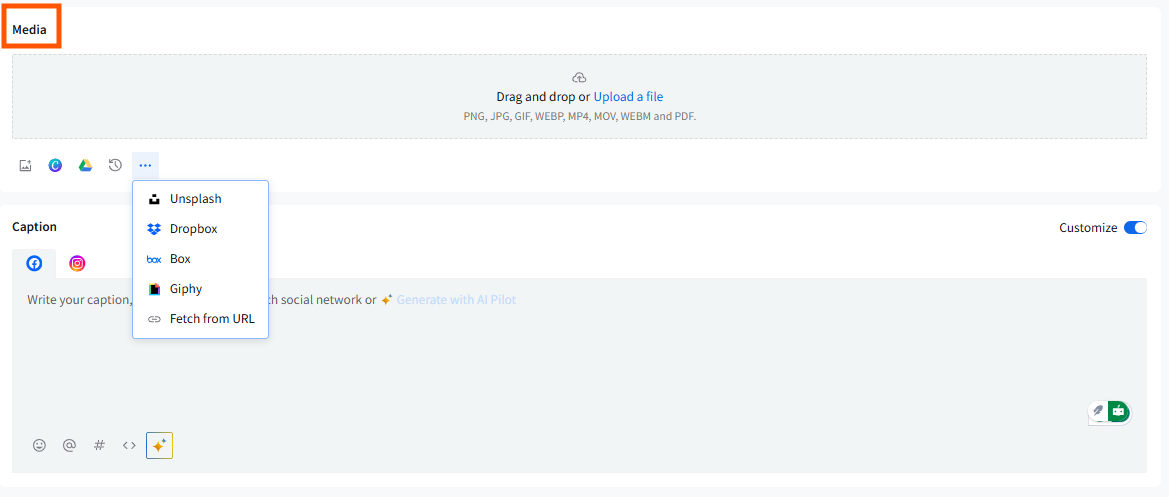
- Add media to your post.
- You can add up to four images OR one video/GIF/document per post.
- Upload from your device, Google Drive, Dropbox, or Box, or use Unsplash or Canva.
- Recently added media appear in the Recently Uploaded section for 7 days.
- Media-specific actions (Alt Text, Tag People, Edit Image, Replace, Change Thumbnail) appear directly on the media card.
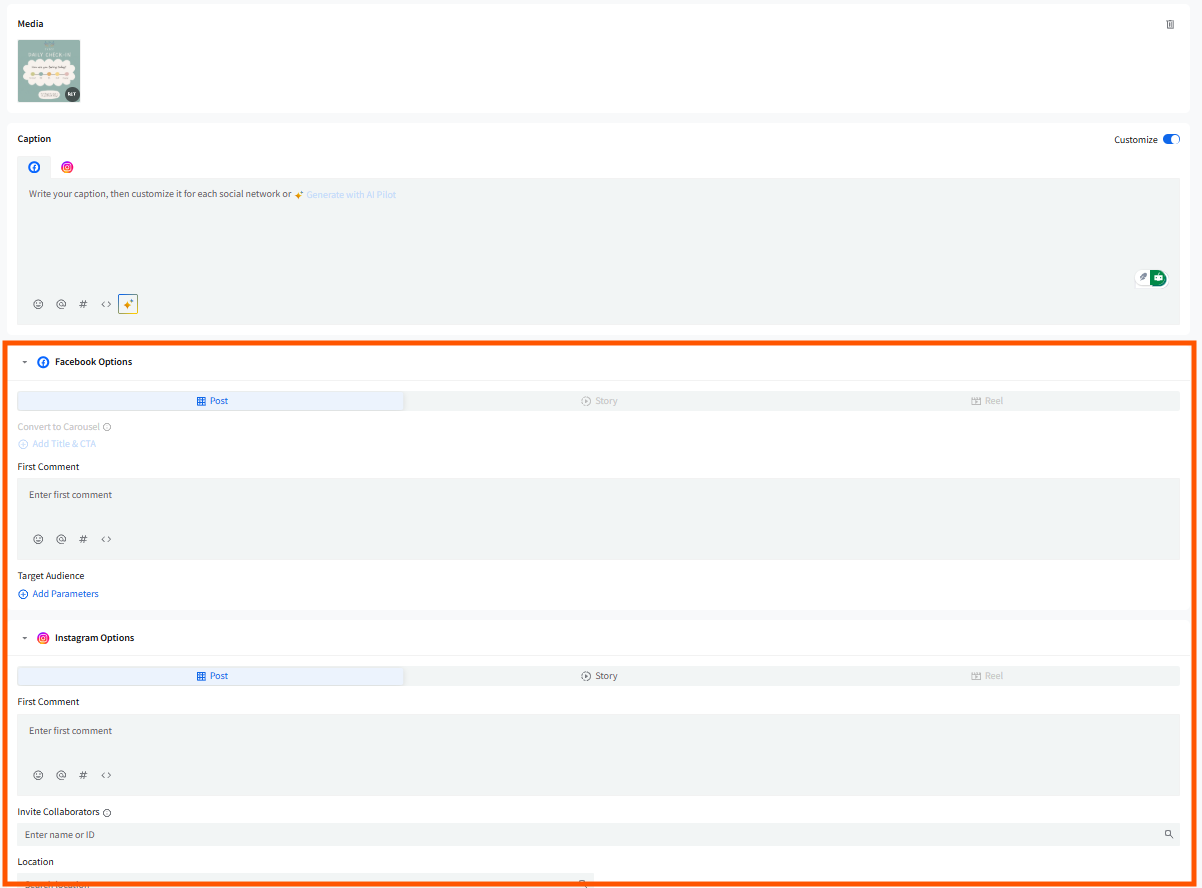
- Use Platform Options if you want to customize platform-specific elements.
Platform Options appear below the caption box when the selected accounts support them.
Examples include:
- Post / Story / Reel selection
- First Comment (Facebook, Instagram, LinkedIn)
- Alt Text
- Carousel options
- Audio title & custom Reel covers
- Video title, subtitles, destination URL
-
Target Audience
These options expand/collapse to keep your workspace clean.
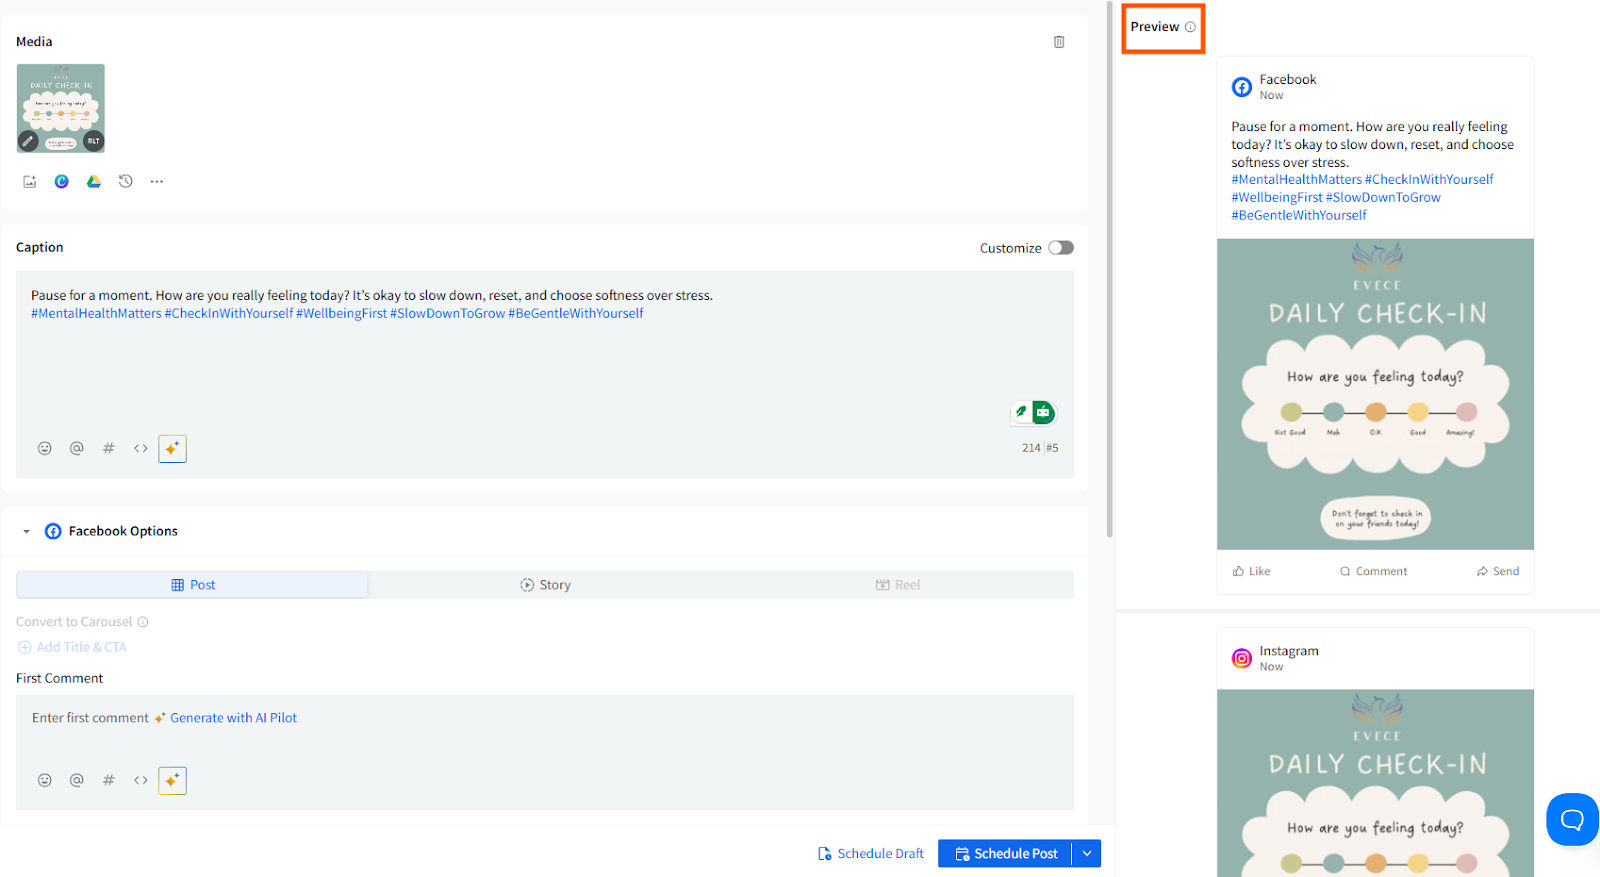
- Preview your post on the right.
- All selected account previews appear one after another in the Preview panel.
- Multi-image posts for Instagram and Pinterest display a slide viewer so you can scroll through images.
- If you customize captions per platform, each preview reflects the correct version.
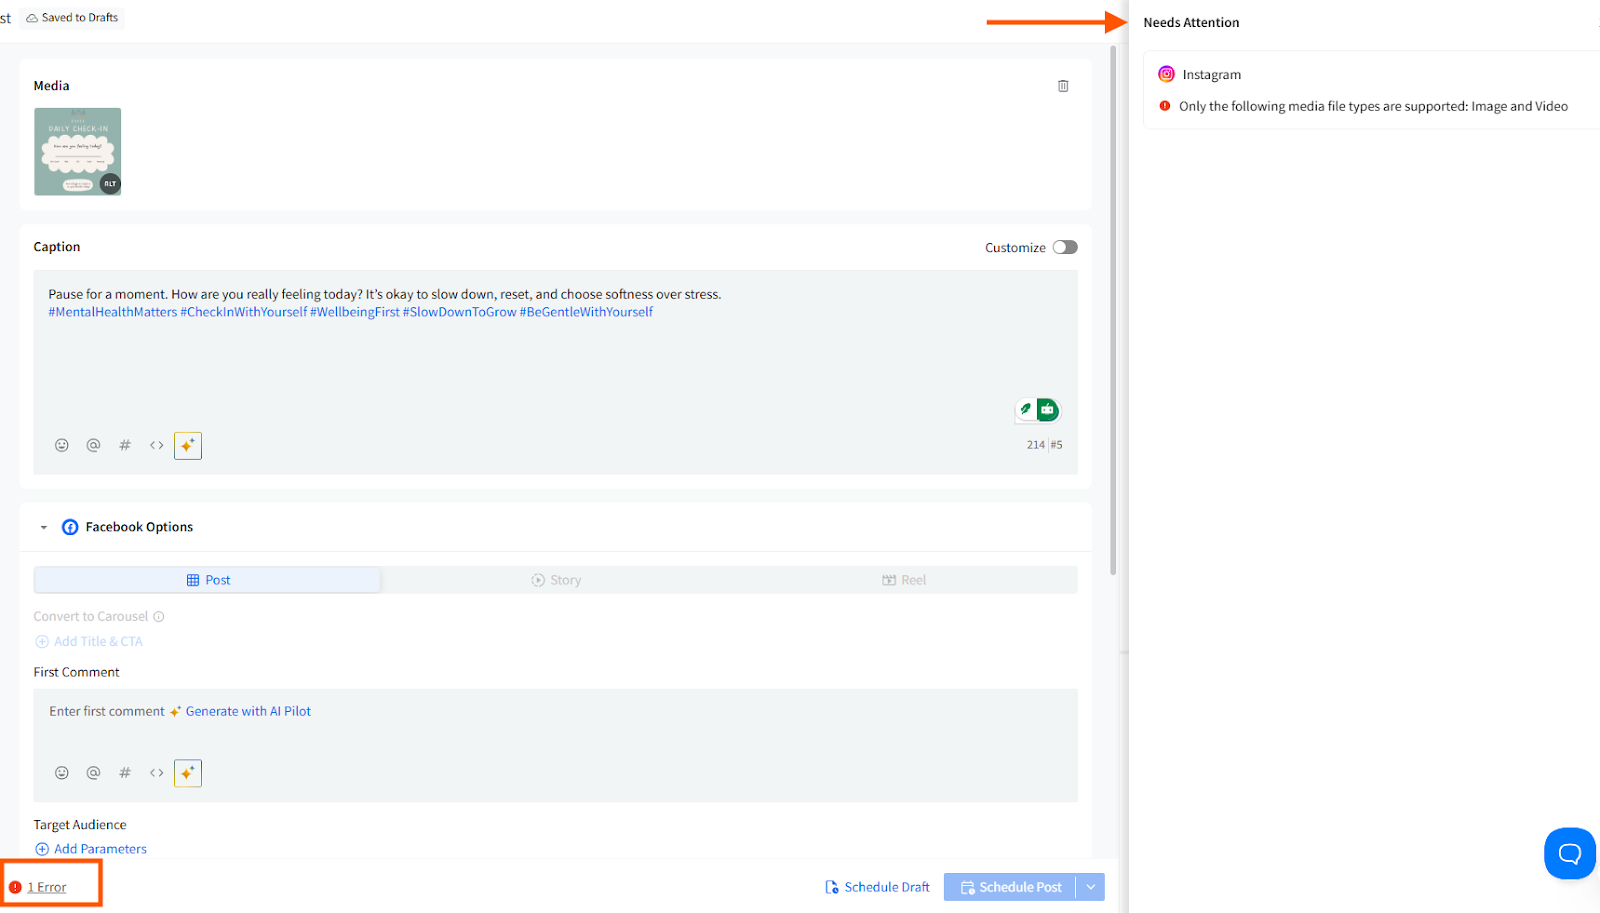
- Check for errors or warnings.
- Any issues appear as an Error/Warning label near the Schedule button.
- Clicking it opens the error panel on the right, showing what needs attention before scheduling.
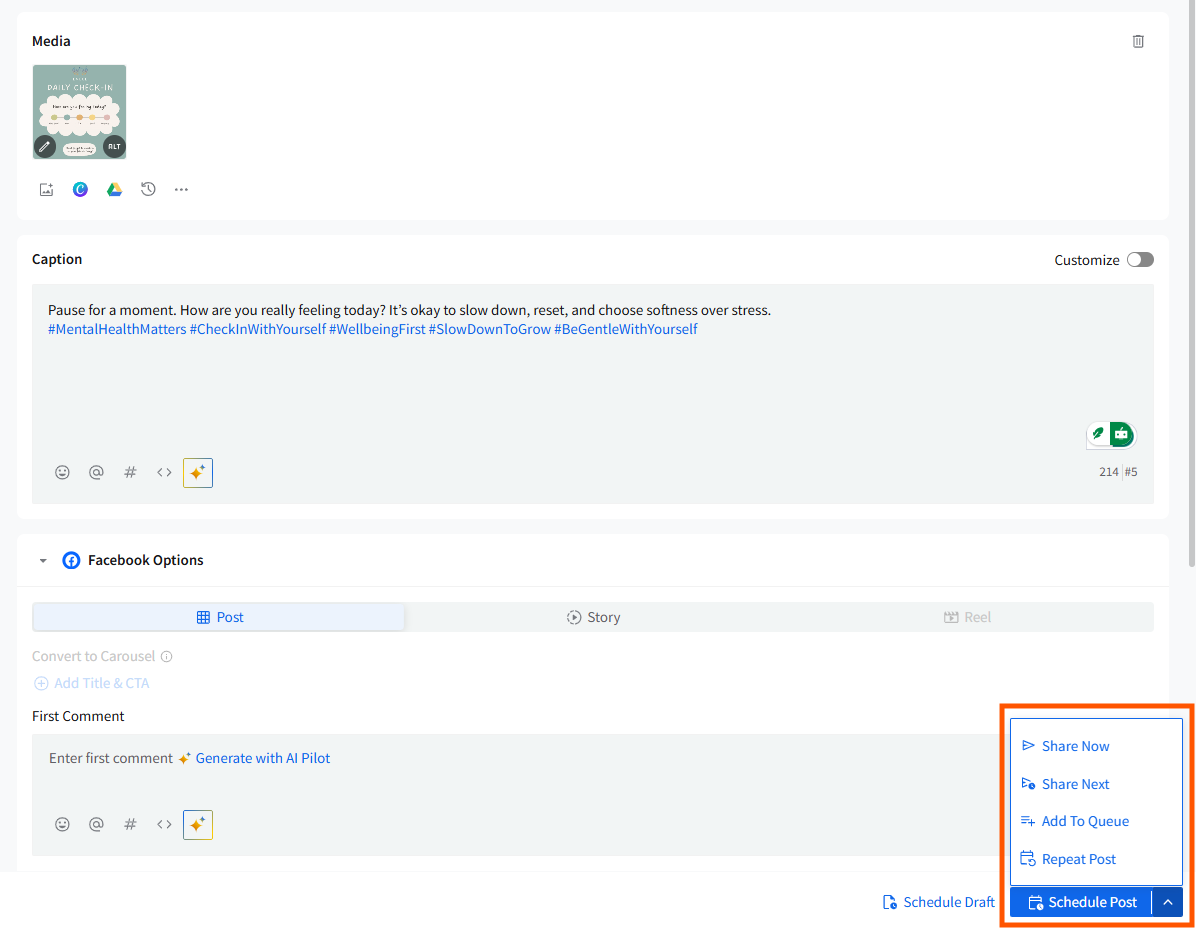
- Choose how you want to publish.
When your post is ready, choose one of the posting options:
- Add to Queue
- Share Now
- Share Next
- Schedule Post
- Repeat Post
Visualize the Posting Queue With Calendar
The Content Calendar is a dynamic dashboard that helps you track your scheduled content and reschedule posts easily. You can filter the view of the calendar, create posts, and more.
- Click Posts -> Calendar to view your scheduled posts.
-
Drag-and-drop scheduled posts to reschedule them without manually changing the time and date fields.


See What Works With Analytics
Analytics helps you take a deep dive into your social media data. You can not only analyze the posts you make from SocialPilot, but you can also analyze other posts made on your connected social media accounts. With one click, you have your easy-to-understand analytics report at your fingertips. Track your social media performance with SocialPilot analytics. Here is how you can access analytics:
-
Go to Analytics and select which social platform you want to view analytics for.

- View engagement metrics and generate reports for further analysis.

To get a better understanding of social analytics and reports, click here.
Invite Team Members
Never miss a deadline again by collaborating with your team using SocialPilot. Let them create content for your selected social media accounts while you retain full control of post approvals. Here is how you can invite team members
-
Go to the Profile Icon on the top right of the screen and go to Users.

-
Click on Invite User and enter the email addresses of your team members or clients.


- Assign roles - Admin, Manager, or Content Scheduler.
- Admin can control all members' access and activities (except your SocialPilot account's membership and billing).
- Managers can schedule, publish, and manage selected social media accounts.
-
Content Schedulers can only schedule posts for selected social media accounts. The posts will be added to the queue only when a Manager or the Admin approves.


-
Select the social accounts for each member to manage.
You can change the role of a team member at any time by going to 'Users' and then selecting the edit icon beside the team member’s name.


Go Mobile With Apps and Extensions
Tackle your social media on the go with the intuitive SocialPilot mobile app so you can make every minute count with your audience. From connecting your social media accounts to scheduling new content, SocialPilot mobile app allows you to access almost all of SocialPilot features while on the go.
- Get the iOS or Android mobile app and start using SocialPilot app.
-
You can make your posting easier with the SocialPilot Browser Extension. Install the SocialPilot Browser Extension (available for Chrome and Firefox) to quickly queue posts while browsing. Once the extension is downloaded, just click on the SocialPilot extension when you find the content you want to post while you’re surfing. A Create Post popup will appear right on your current window. Once your post is created and queued, you can continue surfing, all without leaving your current web page.


Other Great Features
In addition to the features covered above, SocialPilot offers these additional features:
- Invite Clients: You can manage your clients' social media profiles hassle-free without the need for their credentials.
- Add RSS Feeds: Share your blog posts automatically or manually to your connected social profiles by adding your blog’s RSS Feed to your SocialPilot account.
- Shorten URLs: Get rid of the long, ugly-looking URLs by shortening them using Bitly, Rebrandly, and Sniply
- Create Groups: If you want to create and share content over the same set of social media accounts regularly, and you don’t want to select the accounts individually each time, you can create groups of accounts to easily queue posts with a single click.
- Social Inbox: Manually reply to or set up automated replies for all messages, posts, and comments on your Facebook, LinkedIn Pages, and Instagram accounts, in one place
Awesome, you are all set now! Welcome to SocialPilot, the future of social media management!